This is the multi-page printable view of this section. Click here to print.
MySensor Components
- 1: Garage Door
- 2: Minecraft Lights
- 3: MQTT Gateway
- 4: Passive Infrared (PIR) Sensor
- 5: Power Usage Sensor
- 6: Rinnai Gas Heater (FTR557)
- 7: Tropical Aquarium
- 8: TV Backlight
- 9: Daikin Heatpumps
1 - Garage Door

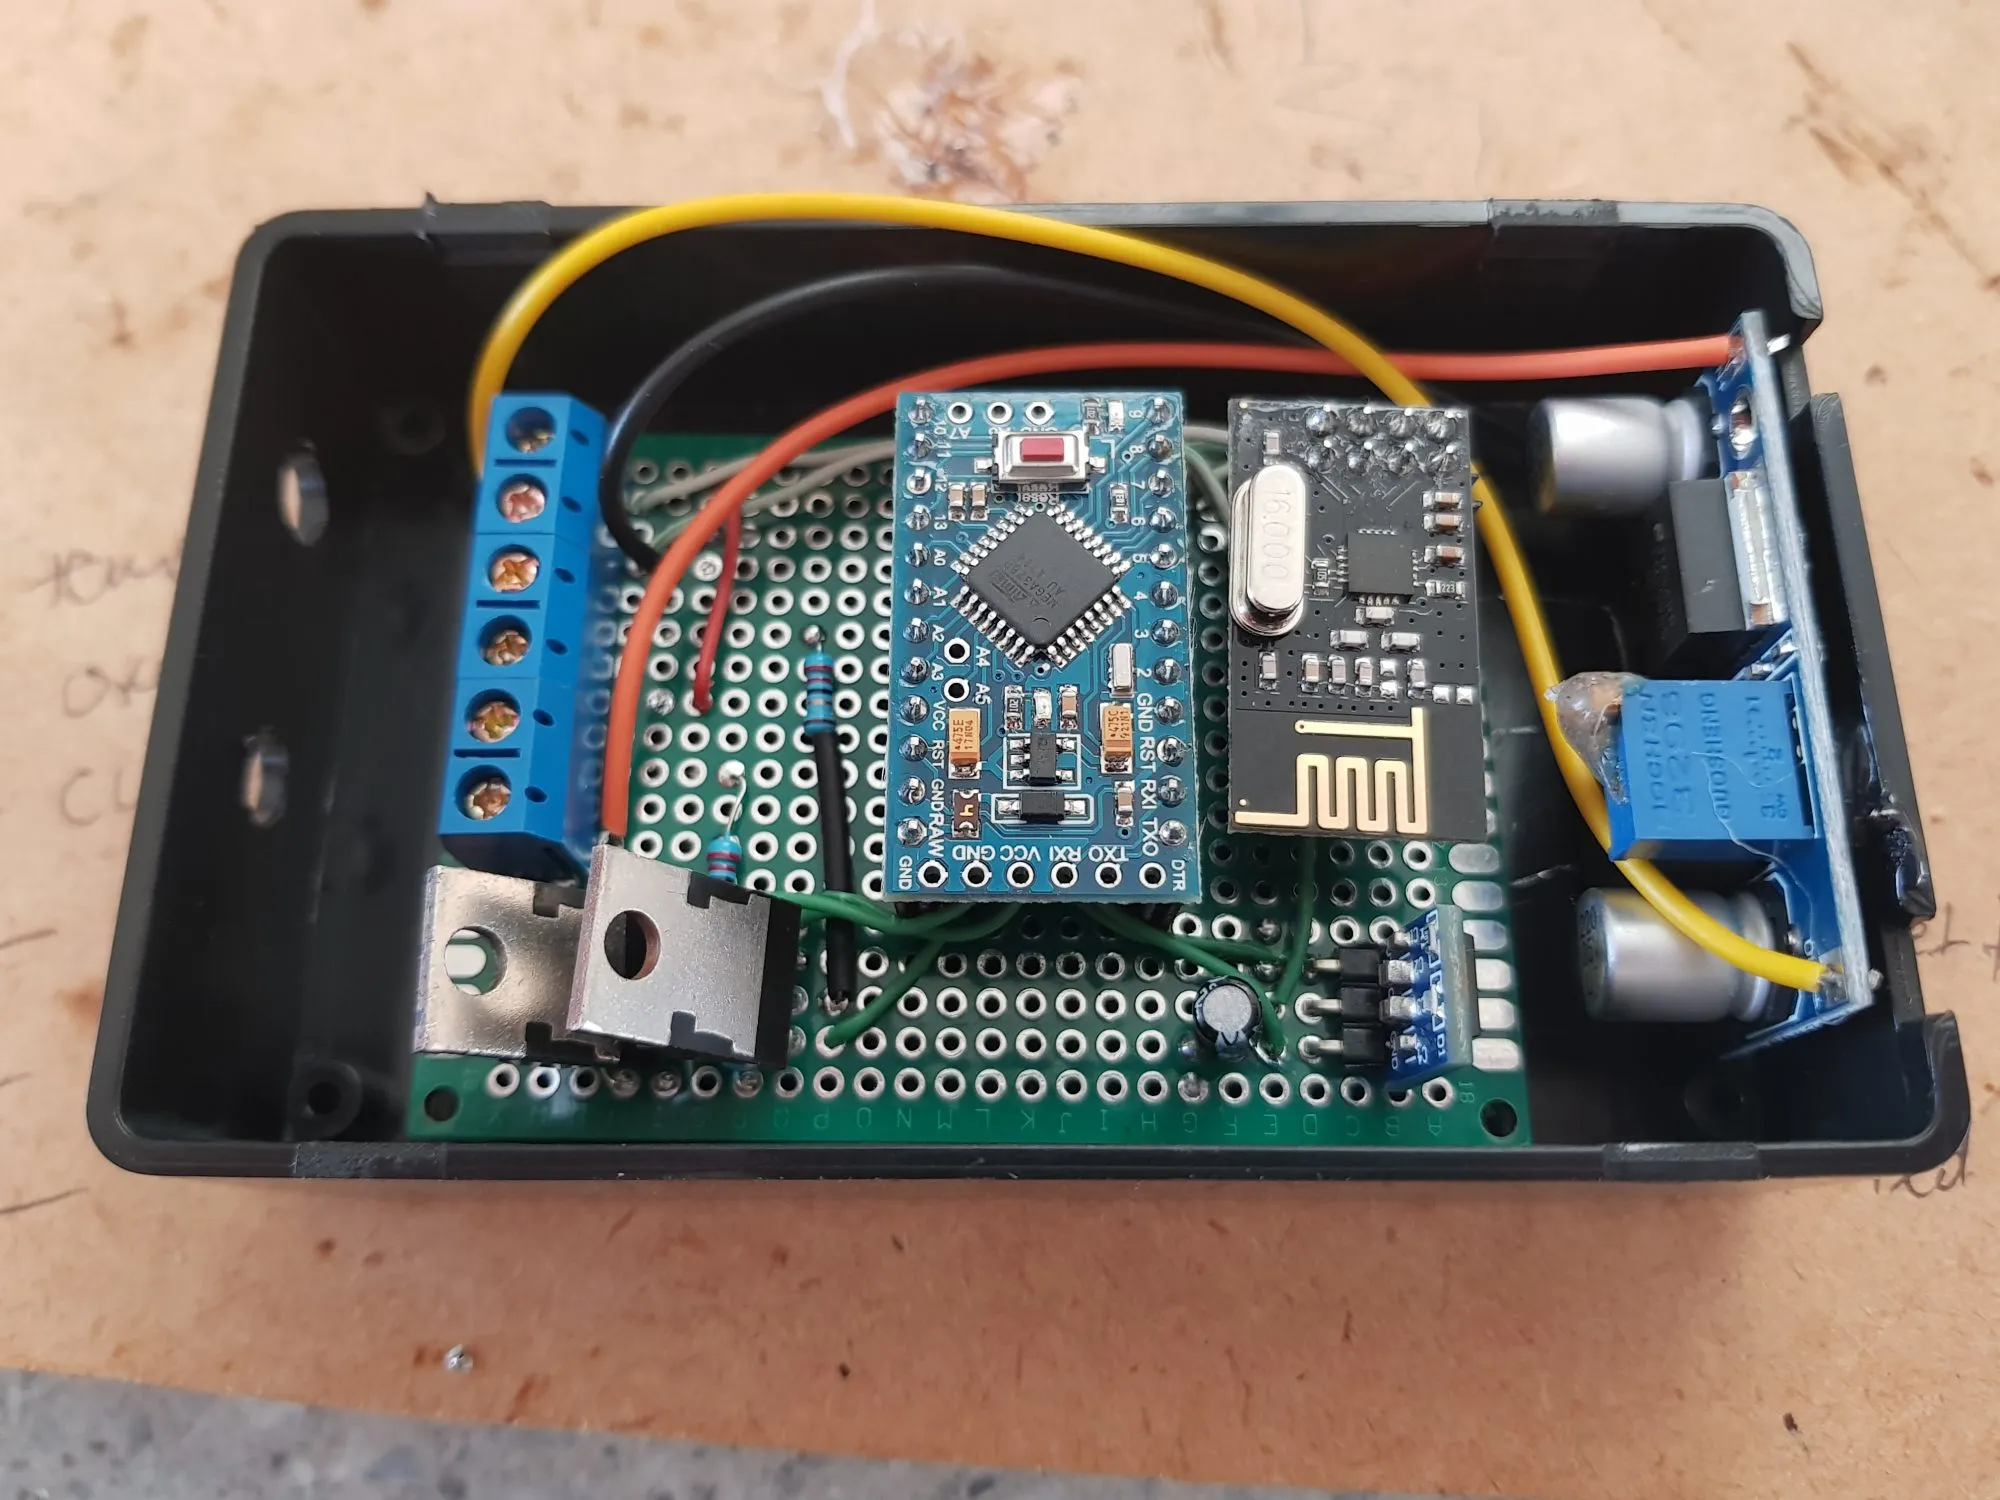
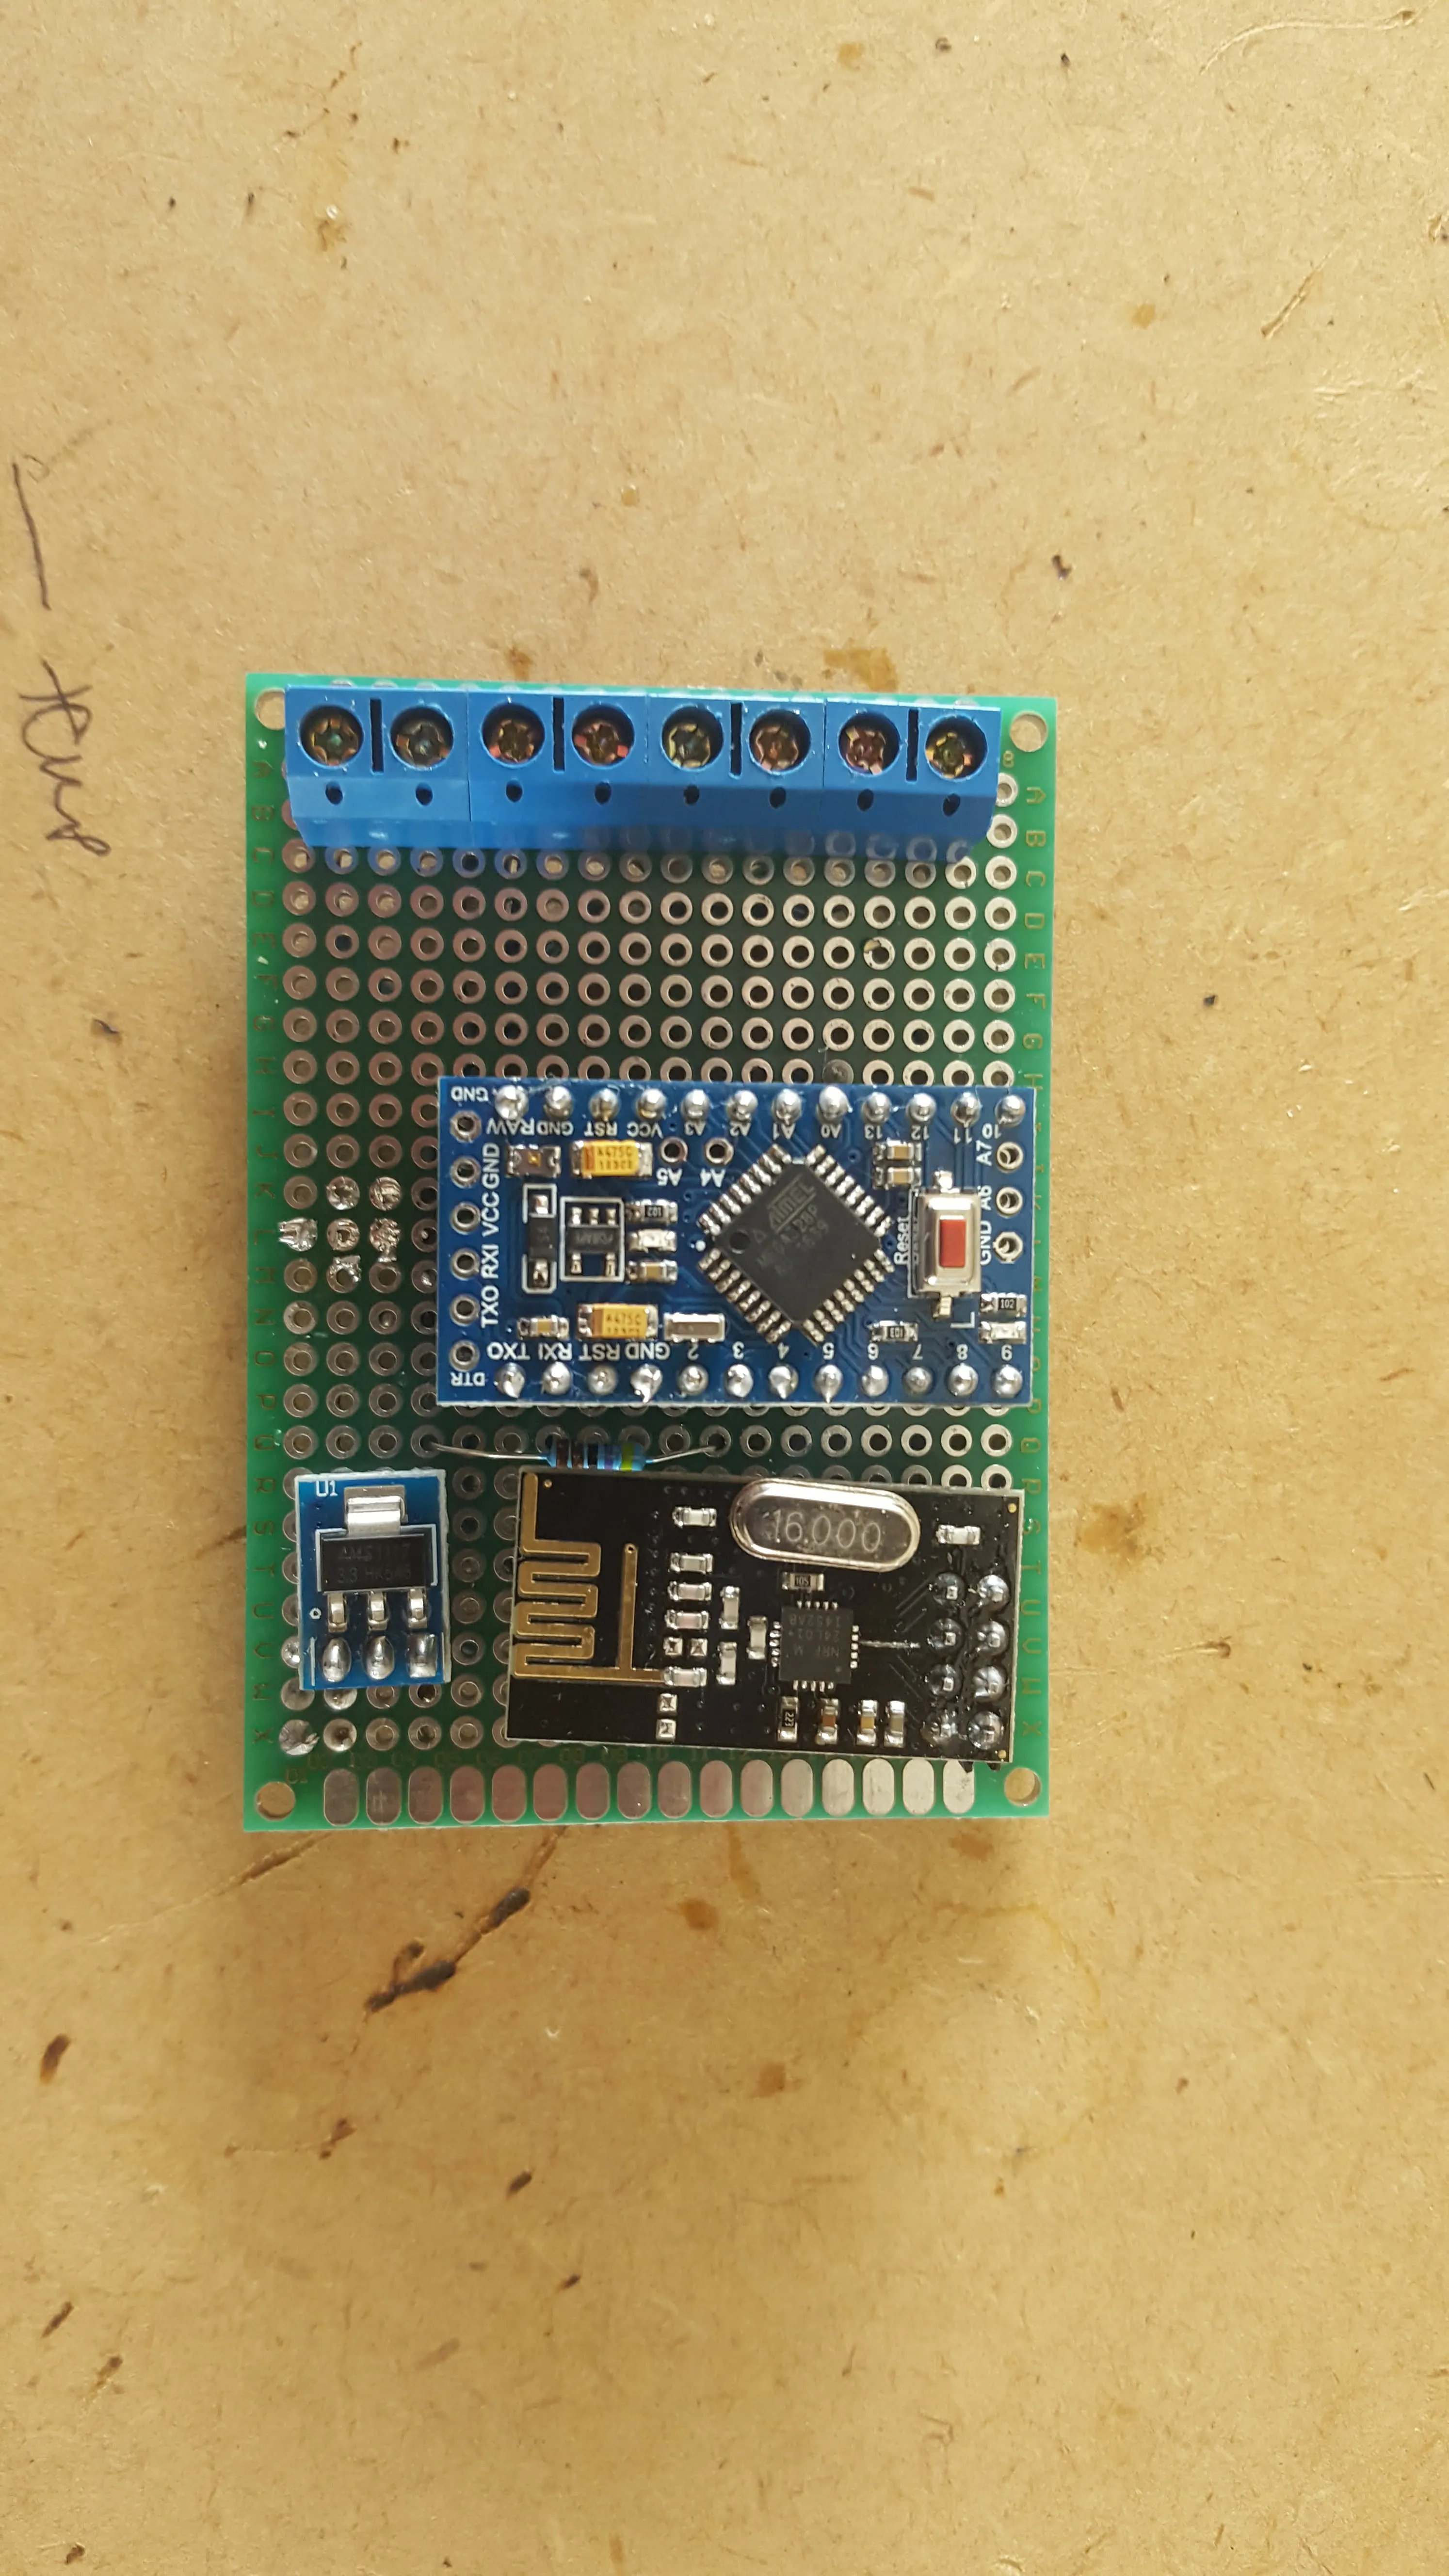
Hacked Merlin garage door opener. Consisting of
- MySensors Actuator circuit for controlling open/close and light
- 2 x Binary Sensor (for Open and Closed status)
- Powered by the Merlin door opener with LM2596 buck to drop 16v down to 5v
- Includes home temperature backbone for sensors in the garage, attic, outdoor and in the gas heater cavity (more for single sensor convenience and power source reuse than anything else)
- Automatically opens the garage when I return home on my scooter via OwnTracks, and notifying OpenHAB via MQTT when I travel through certain GPS located regions.
- OwnTracks connects to my private MQTT broker by port forwarding through my router & publishes the way point triggers.
- These publications are received by OpenHAB with the mqttitude binding and ‘latch’ switches – see OpenHAB Items below.
- Se-cured/Signed communication with the Gateway, so no one else can send a MySensors signal to control it


The RFP30N06LE Mosfets you can see there are complete overkill for the switching circuits. I could have used relays, but was conscious of the limited power supply I was tapping into. I should have used a basic transistor, or even better, an optocoupler, but that’s all I had at the time.
It’s possibly due to this lack of isolation that the light flashes on the opener unit after moving, when controller via this circuit. I’ll possibly revisit this in the future.
The resistors there are the same as on the wired opener. One for the motor, one for the light. The original idea was to flash the light as a pre-warning when controlling the opener remotely.
OpenHab Items
Switch PresenceBrendan_PhoneMqttHome        "Brendan at Home"           (gPresence)       {mqttitude="mosquitto:owntracks/brendan/0/event:Home"}
Switch PresenceBrendan_PhoneMqttWgtn       	"Brendan at Wellington"   	(gPresence)      	{mqttitude="mosquitto:owntracks/brendan/0/event:Wellington"}


String Garage_Door_Closed       "Garage Door Fully Down[%s]"    <door>          (All, gGarage)          {mqtt="<[mosquitto:mygateway1-out/46/2/1/0/16:state:MAP(garage_door_en.map)]"}
String Garage_Door_Opened       "Garage Door Fully Up[%s]"      <door>          (gGarage)               {mqtt="<[mosquitto:mygateway1-out/46/4/1/0/16:state:MAP(garage_door_en.map)]"}
Switch Garage_Door_Switch       "Garage Door Switch"            <garage>        (gGarage)               {mqtt=">[mosquitto:mygateway1-in/46/1/0/0/2:command:on:1]", autoupdate="false"}
String Garage_Door_Switch_Push                                                                          {mqtt=">[mosquitto:mygateway1-in/46/1/0/0/2:command:on:1]"}<br>
Switch Garage_Light_Switch      "Garage Light Switch"           <light>         (gGarage)               {mqtt=">[mosquitto:mygateway1-in/46/2/0/0/2:command:on:1]", autoupdate="false"}
Switch Garage_Door_Timer                                                                                {expire="30m,command=OFF"}
OpenHAB Sitemap
Frame label="Garage" {
        Text item=Garage_Door_Closed
        Group item=gGarage
        Text item=Garage_Temperature
}

Frame label="Presence"{
        Group item=gPresence
}
OpenHAB Rules
var DateTime brendanAtWgtn

rule "Brendan at Wgtn "
when
//Doesn't matter whether I'm entering or existing Wgtn, point is, I was there
        Item PresenceBrendan_PhoneMqttWgtn received update
then
        brendanAtWgtn = now
        logWarn("BrendanAtWgtn", "Setting to now")
end

rule "Brendan at Home"
when
//This time though, only trigger as I enter home region
        Item PresenceBrendan_PhoneMqttHome changed to ON
then
        logWarn("BrendanAtHome", "PhoneMqttHome changed to ON")
//and if I was recently in Wgtn, then open the door if it's not already.
        if((brendanAtWgtnn != null && brendanAtWgtn.plusMinutes(90).isAfter(now))){

                if(Garage_Door_Closed.state == "Yes"){
                        logWarn("BrendanAtHome", "Do Open Garage")
                        sendCommand(Garage_Door_Switch, ON)
                }else{
                        logWarn("BrendanAtHome", "Brendan home, but garage is already open")
                }
//Clear the Wgtn state so we don't cause false openings while we come and go around home
                brendanAtWgtn = null
        }
end


var Timer garageDoorTimer = null
var Boolean garageDoorStillOpen = false


rule "Garage Door Opening"
when
        Item Garage_Door_Closed received update
then
        if(Garage_Door_Closed.state == "No"){
                Notify_Info.postUpdate("Garage door is opening")
                Garage_Door_Timer.sendCommand(ON)
        }else{
                Notify_Info.postUpdate("Garage door has closed")
                Garage_Door_Timer.postUpdate(OFF)
        }

end

rule "Garage Door Closing"
when
        Item Garage_Door_Opened received update
then
        if(Garage_Door_Opened.state == "No"{
                Notify_Info.postUpdate("Garage door is closing")
        }else
                Notify_Info.postUpdate("Garage door has opened")
        }
end


rule "Garage Door Timer"
when
        Item Garage_Door_Timer received command OFF
then
        Notify_Info.postUpdate("The garage door is still open")
        Garage_Door_Timer.sendCommend(ON)
end
Arduino code
// Enable debug prints to serial monitor
//#define MY_DEBUG

// Enable and select radio type attached
#define MY_RADIO_NRF24
//#define MY_RADIO_RFM69


#define MY_NODE_ID 46

//#define MY_DEBUG_VERBOSE_SIGNING
//#define MY_REPEATER_FEATURE

#define MY_SIGNING_SOFT //!< Software signing
#define MY_SIGNING_SOFT_RANDOMSEED_PIN 15
#define MY_SIGNING_REQUEST_SIGNATURES


//#define   MY_DEBUG_VERBOSE_SIGNING


#include <SPI.h>
#include <MySensors.h>

#include <DallasTemperature.h>
#include <OneWire.h>

#define COMPARE_TEMP 1 // Send temperature only if changed? 1 = Yes 0 = No

#define ONE_WIRE_BUS 3 // Pin where dallase sensor is connected
#define MAX_ATTACHED_DS18B20 16
OneWire oneWire(ONE_WIRE_BUS); // Setup a oneWire instance to communicate with any OneWire devices (not just Maxim/Dallas temperature ICs)
DallasTemperature sensors(&oneWire); // Pass the oneWire reference to Dallas Temperature.
float lastTemperature[MAX_ATTACHED_DS18B20];
int numSensors=0;
boolean receivedConfig = false;
boolean metric = true;
// Initialize temperature message
MyMessage msg(0,V_TEMP);


// From Binary switch
#include <Bounce2.h>
#define DOOR_FULLY_CLOSED_CHILD_ID 2
#define DOOR_FULLY_OPEN_CHILD_ID 4
#define DOOR_FULLY_CLOSED_PIN  2  // Arduino Digital I/O pin for button/reed switch
#define DOOR_FULLY_OPEN_PIN  4  // Arduino Digital I/O pin for button/reed switch
int oldFullyClosedValue=-1;
int oldFullyOpenValue=-1;
// Change to V_LIGHT if you use S_LIGHT in presentation below
MyMessage binfullyclosedmsg(DOOR_FULLY_CLOSED_CHILD_ID,V_TRIPPED);
MyMessage binfullyopenmsg(DOOR_FULLY_OPEN_CHILD_ID,V_TRIPPED);

Bounce debouncerClosed = Bounce();
Bounce debouncerOpened = Bounce();


//from RelayActuator
#define RELAY_1  5  // Arduino Digital I/O pin number for first relay (second on pin+1 etc)
#define NUMBER_OF_RELAYS 2 // Total number of attached relays
#define RELAY_ON 1  // GPIO value to write to turn on attached relay
#define RELAY_OFF 0 // GPIO value to write to turn off attached relay
#define CONTROL_DOOR_PIN 7


//From Pressure
#include <Adafruit_BMP085.h>

#define BARO_CHILD 0
#define TEMP_CHILD 1

const float ALTITUDE = 20; // <-- adapt this value to your own location's altitude.

// Sleep time between reads (in seconds). Do not change this value as the forecast algorithm needs a sample every minute.
const unsigned long SLEEP_TIME = 60000;
or


float dP_dt;
MyMessage tempMsg(TEMP_CHILD, V_TEMP);


//const unsigned long SLEEP_TIME = 60000;
unsigned long timeOfLastTempCheck = SLEEP_TIME * -1;


void before() {
 // Startup up the OneWire library
  sensors.begin();

  for (int sensor=1, pin=RELAY_1; sensor<=NUMBER_OF_RELAYS;sensor++, pin++) {
    // Then set relay pins in output mode
    pinMode(pin, OUTPUT);
    // Set relay to last known state (using eeprom storage)
    digitalWrite(pin, RELAY_OFF);
  }
}

void setup()
{

 //  requestTemperatures() will not block current thread
  sensors.setWaitForConversion(false);


// From Binary switch
 // Setup the buttons
  pinMode(DOOR_FULLY_CLOSED_PIN,INPUT);
  pinMode(DOOR_FULLY_OPEN_PIN,INPUT);
  // Activate internal pull-up
  digitalWrite(DOOR_FULLY_CLOSED_PIN,HIGH);
  digitalWrite(DOOR_FULLY_OPEN_PIN,HIGH);


  debouncerClosed.attach(DOOR_FULLY_CLOSED_PIN);
  debouncerClosed.interval(200);
  debouncerOpened.attach(DOOR_FULLY_OPEN_PIN);
  debouncerOpened.interval(200);


  metric = getControllerConfig().isMetric;
}

char* string2char(String command){
    if(command.length()!=0){
        char *p = const_cast<char*>(command.c_str());
        return p;
    }
}

void presentation() {
  // Send the sketch version information to the gateway and Controller
  sendSketchInfo("Garage Door and Sensors", "1.1");

  // Fetch the number of attached temperature sensors
  numSensors = sensors.getDeviceCount();

  // Present all sensors to controller
  for (int i=0; i<numSensors && i<MAX_ATTACHED_DS18B20; i++) {
     present(i, S_TEMP, string2char(String("Temperature: " + String(i))));
  }


// From Binary switch
  // Register binary input sensor to gw (they will be created as child devices)
  // You can use S_DOOR, S_MOTION or S_LIGHT here depending on your usage.
  // If S_LIGHT is used, remember to update variable type you send in. See "msg" above.
  present(DOOR_FULLY_CLOSED_CHILD_ID, S_DOOR, "Door location 1");
  present(DOOR_FULLY_OPEN_CHILD_ID, S_DOOR, "Door location 2");


   for (int sensor=1, pin=RELAY_1; sensor<=NUMBER_OF_RELAYS;sensor++, pin++) {
    // Register all sensors to gw (they will be created as child devices)
    present(sensor, S_LIGHT, string2char(String("Relay: " + String(sensor))));
  }


}

void loop() {

  if(millis() - timeOfLastTempCheck > SLEEP_TIME){
    timeOfLastTempCheck = millis();
    checkTemperature();
 //   checkpressure();
  }

  checkSwitchs();
}


void receive(const MyMessage &message) {

  // We only expect one type of message from controller. But we better check anyway.
  if (message.type==V_LIGHT) {


       digitalWrite(message.sensor-1+RELAY_1, RELAY_ON);
       wait(200);
       digitalWrite(message.sensor-1+RELAY_1, RELAY_OFF);


   }
}

void checkTemperature(){


  // Fetch temperatures from Dallas sensors
  sensors.requestTemperatures();

//Serial.println("checkTemperature()");
  // query conversion time and sleep until conversion completed
  int16_t conversionTime = sensors.millisToWaitForConversion(sensors.getResolution());
  // sleep() call can be replaced by wait() call if node need to process incoming messages (or if node is repeater)
  wait(conversionTime);

  // Read temperatures and send them to controller
  for (int i=0; i<numSensors && i<MAX_ATTACHED_DS18B20; i++) {

    // Fetch and round temperature to one decimal
    float temperature = static_cast<float>(static_cast<int>((getControllerConfig().isMetric?sensors.getTempCByIndex(i):sensors.getTempFByIndex(i)) * 10.)) / 10.;

    // Only send data if temperature has changed and no error
    #if COMPARE_TEMP == 1
    if (lastTemperature[i] != temperature && temperature != -127.00 && temperature != 85.00) {
    #else
    if (temperature != -127.00 && temperature != 85.00) {
    #endif

      // Send in the new temperature
      send(msg.setSensor(i).set(temperature,1));
      // Save new temperatures for next compare
      lastTemperature[i]=temperature;
    }

  }

}


void checkSwitchs(){

  debouncerClosed.update();
  debouncerOpened.update();

 int value = debouncerClosed.read();
 if (value != oldFullyClosedValue) {
     // Send in the new value
     send(binfullyclosedmsg.set(value==HIGH ? 1 : 0));
     oldFullyClosedValue = value;
  }


 value = debouncerOpened.read();
 if (value != oldFullyOpenValue) {
     // Send in the new value
     send(binfullyopenmsg.set(value==HIGH ? 1 : 0));
     oldFullyOpenValue = value;
  }

}
2 - Minecraft Lights
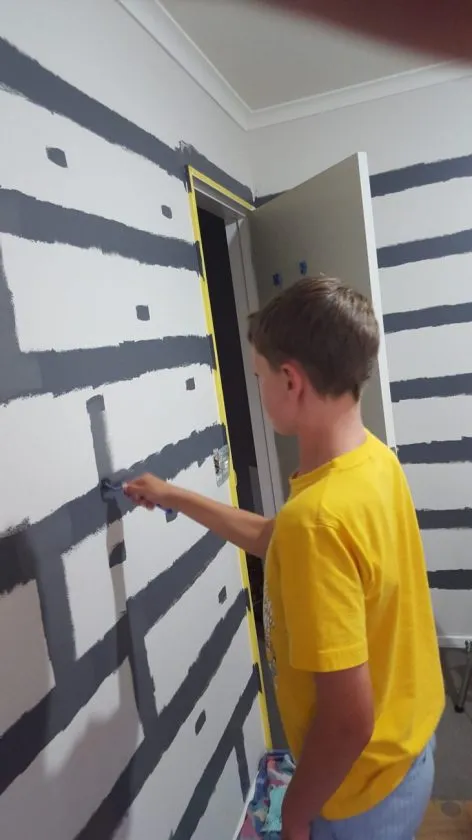
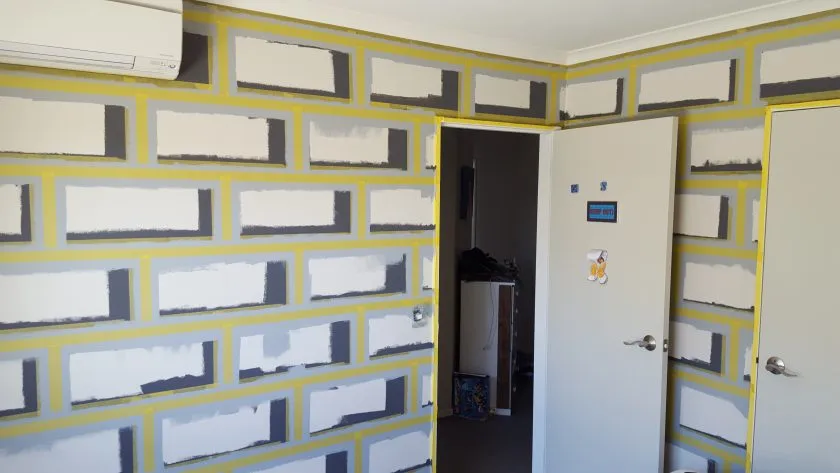
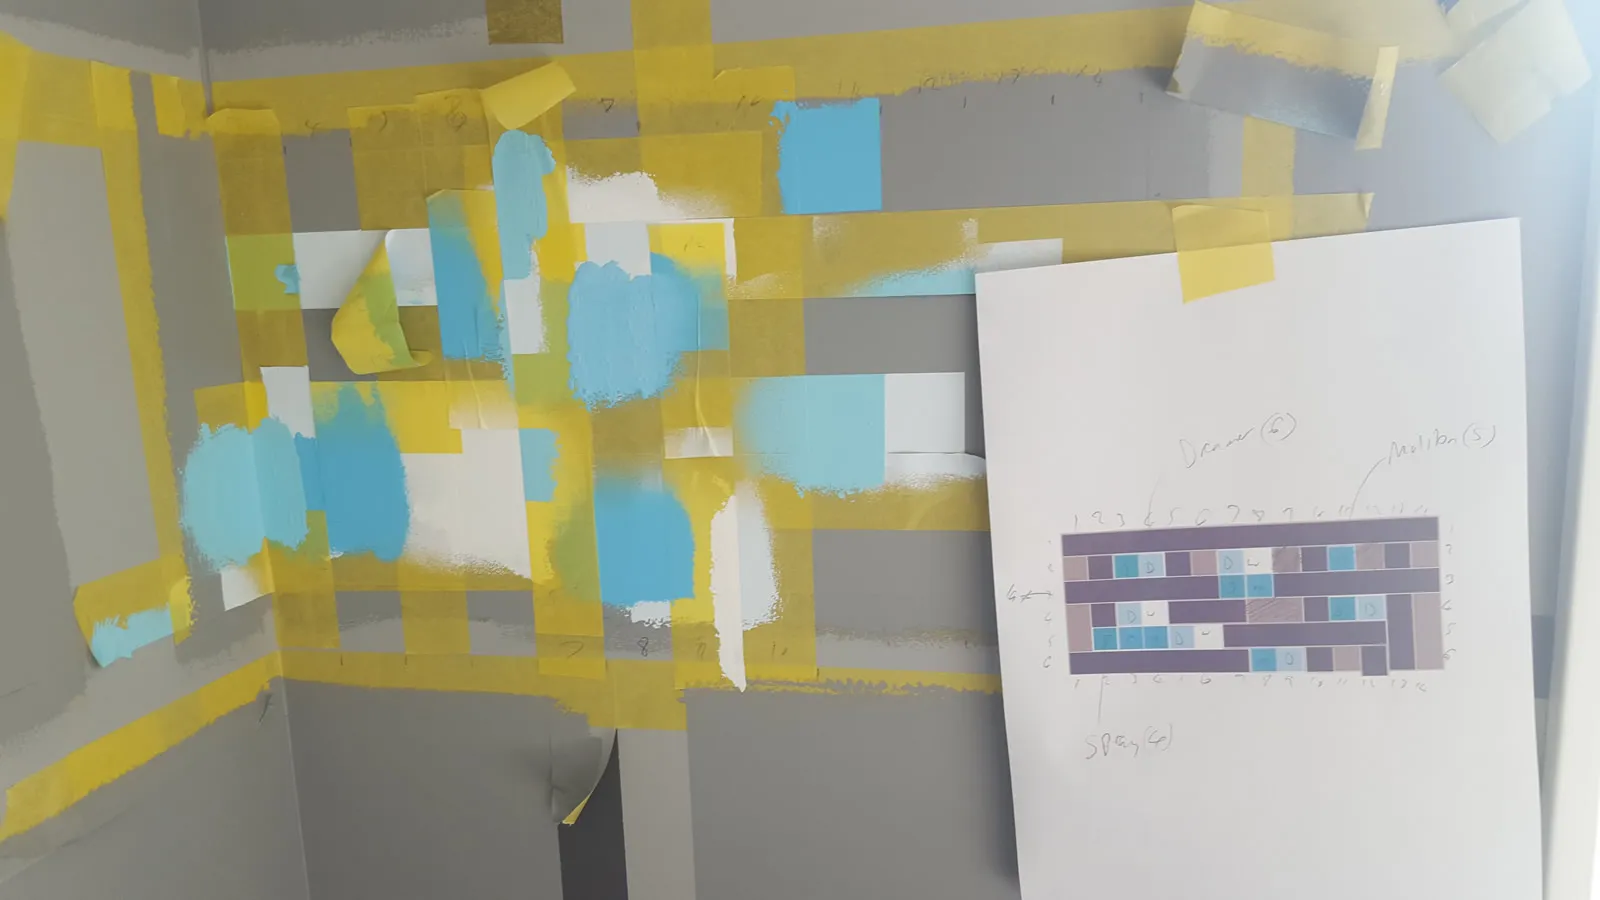
- OTT kids room.
- Replace batteries in Minecraft lights with power from MySensors node (original reason for this mod, so we don’t have to keep replacing/charging)
- Control off/on, brightness and random flicker effect
- Establish the start of a 12v power distribution point in the attic for additional nodes in the future.
- Drop from 12v to 5v/3.3v in the actual node.
- This way there’s no potential for voltage drop over distance to affect nodes.


Code
/**
* The MySensors Arduino library handles the wireless radio link and protocol
* between your home built sensors/actuators and HA controller of choice.
* The sensors forms a self healing radio network with optional repeaters. Each
* repeater and gateway builds a routing tables in EEPROM which keeps track of the
* network topology allowing messages to be routed to nodes.
*
* Created by Henrik Ekblad <henrik.ekblad@mysensors.org>
* Copyright (C) 2013-2015 Sensnology AB
* Full contributor list: https://github.com/mysensors/Arduino/graphs/contributors
*
* Documentation: http://www.mysensors.org
* Support Forum: http://forum.mysensors.org
*
* This program is free software; you can redistribute it and/or
* modify it under the terms of the GNU General Public License
* version 2 as published by the Free Software Foundation.
*/
// Enable debug prints to serial monitor
#define MY_DEBUG
#define MY_NODE_ID 59
// Enable and select radio type attached
#define MY_RADIO_NRF24
//#define MY_RADIO_RFM69
#include <MySensors.h>
#define SN "Minecraft Torches"
#define SV "1.1"
#define FADE_DELAY 10 // Delay in ms for each percentage fade up/down (10ms = 1s full-range dim)
int16_t currentLevels[6];
MyMessage light3Msg(3, V_DIMMER);
MyMessage light5Msg(5, V_DIMMER);
MyMessage rgbFlickerState(0, V_LIGHT);
// Arduino pin attached to MOSFET Gate pin
#define LIGHT_PIN_3 3
#define LIGHT_PIN_5 5
int isFlicker;
void setup()
{
// Pull the gateway's current dim level - restore light level upon sendor node power-up
request( 0, V_DIMMER );
//fadeAllToLevel(0);
}
void presentation()
{
// Register the LED Dimmable Light with the gateway
present(LIGHT_PIN_3, S_DIMMER, "Light on Pin 3", false);
present(LIGHT_PIN_5, S_DIMMER, "Light on Pin 5", false);
present(0, S_DIMMER, "All Lights", false);
present(0, S_LIGHT, "Flicker all", false);
sendSketchInfo(SN, SV);
}
void loop()
{
// Run RGB Flicker if is set
if (isFlicker==1)
{
flicker();
}
}
void receive(const MyMessage &message)
{
int lightState = message.getString()[0] == '1';
if (message.type == V_LIGHT ) {
Serial.println(lightState);
// if receive RGB Flicker On commands, start the Flicker
if (message.sensor==0 && lightState==1){
Serial.println("message.sensor==0 && lightState==1");
flickerOn();
}
// if receive RGB Flicker Off commands, stop the Flicker
else if (message.sensor==0 && lightState==0){
Serial.println("message.sensor==0 && lightState==0");
flickerOff();
}
}else if(message.type == V_DIMMER){
// Retrieve the power or dim level from the incoming request message
int requestedLevel = atoi( message.data );
// Adjust incoming level if this is a V_LIGHT variable update [0 == off, 1 == on]
requestedLevel *= ( message.type == V_LIGHT ? 100 : 1 );
// Clip incoming level to valid range of 0 to 100
requestedLevel = requestedLevel > 100 ? 100 : requestedLevel;
requestedLevel = requestedLevel < 0 ? 0 : requestedLevel;
// Stop the Flicker if it's running.
// Don't call flickerOff, as this restores to the previous values first e.g. perhaps off or on. We want to go straight to the new values.
isFlicker=0;
send( rgbFlickerState.set(0), false);
Serial.print( "Changing level for light " );
Serial.print( message.sensor );
Serial.print( " to " );
Serial.print( requestedLevel );
Serial.print( ", from " );
if(message.sensor==0){
// Sensor 0 is all lights
Serial.print( " n/a" );
fadeAllToLevel(requestedLevel);
}else{
// else just an individual one
Serial.println( currentLevels[message.sensor] );
fadeToLevel(message.sensor, requestedLevel);
}
}
}
/***
* This method provides a graceful fade up/down effect
*/
void fadeToLevel( int lightPin, int toLevel )
{
int delta = ( toLevel - currentLevels[lightPin] ) < 0 ? -1 : 1;
while ( currentLevels[lightPin] != toLevel ) {
currentLevels[lightPin] += delta;
analogWrite( lightPin, (int)(currentLevels[lightPin] / 100. * 255) );
analogWrite( lightPin, (int)(currentLevels[lightPin] / 100. * 255) );
delay( FADE_DELAY );
}
if(lightPin == 3){
send(light3Msg.set(currentLevels[lightPin] > 0));
}
if(lightPin == 5){
send(light5Msg.set(currentLevels[lightPin] > 0));
}
saveState(lightPin, toLevel);
}
void fadeAllToLevel(int toLevel )
{
int delta3 = ( toLevel - currentLevels[LIGHT_PIN_3] ) < 0 ? -1 : 1;
int delta5 = ( toLevel - currentLevels[LIGHT_PIN_5] ) < 0 ? -1 : 1;
int steps = 100;
for (int x=0;x<steps;x++) {
if(currentLevels[LIGHT_PIN_3] != toLevel){
currentLevels[LIGHT_PIN_3] += delta3;
analogWrite( LIGHT_PIN_3, (int)(currentLevels[LIGHT_PIN_3] / 100. * 255) );
}
if(currentLevels[LIGHT_PIN_5] != toLevel){
currentLevels[LIGHT_PIN_5] += delta5;
analogWrite( LIGHT_PIN_5, (int)(currentLevels[LIGHT_PIN_5] / 100. * 255) );
}
delay( FADE_DELAY );
}
send(light3Msg.set(currentLevels[LIGHT_PIN_3] > 0));
send(light5Msg.set(currentLevels[LIGHT_PIN_5] > 0));
saveState(LIGHT_PIN_3, toLevel);
saveState(LIGHT_PIN_5, toLevel);
}
void flickerOn()
{
// define Flicker On
isFlicker=1;
// Write some debug info
Serial.println("Flicker on");
}
void flickerOff()
{
//turn off Flicker
isFlicker=0;
//and restore previous value to light
fadeToLevel(LIGHT_PIN_3, loadState(LIGHT_PIN_3));
fadeToLevel(LIGHT_PIN_5, loadState(LIGHT_PIN_5));
Serial.println("Flicker off");
send( rgbFlickerState.set(0), false);
}
void flicker(){
int steps = 50;
int light3toLevel = random(10, 100);
int light5toLevel = random(10, 100);
// analogWrite( LIGHT_PIN_3, (int)(light3toLevel / 100. * 255) );
// analogWrite( LIGHT_PIN_5, (int)(light5toLevel / 100. * 255) );
// delay( 100);
int delta3 = (light3toLevel - currentLevels[LIGHT_PIN_3]) < 0 ? -1 : 1;
int delta5 = (light5toLevel - currentLevels[LIGHT_PIN_5]) < 0 ? -1 : 1;
for (int x=0;x<steps;x++) {
if(currentLevels[LIGHT_PIN_3] != light3toLevel){
currentLevels[LIGHT_PIN_3] += delta3;
analogWrite( LIGHT_PIN_3, (int)(currentLevels[LIGHT_PIN_3] / 100. * 255) );
}
if(currentLevels[LIGHT_PIN_5] != light5toLevel){
currentLevels[LIGHT_PIN_5] += delta5;
analogWrite( LIGHT_PIN_5, (int)(currentLevels[LIGHT_PIN_5] / 100. * 255) );
}
delay( FADE_DELAY/2);
}
}
<span id="mce_marker" data-mce-type="bookmark" data-mce-fragment="1"></span>
Minecraft Painted Walls


3 - MQTT Gateway
I choose an MQTT gateway over an Ethernet one so it could be connected to the network anywhere in the house and not be tethered to a specific device.
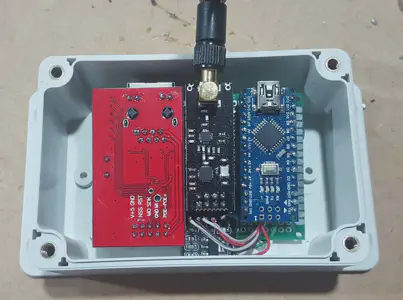
Built using instructions at MySensors. Parts include:
- Arduino Nano
- NRF24L01+PA+LNA wireless module
- W5100 LAN Ethernet Shield When I originally wanted to add MY_SIGNING_SOFT, there wasn’t enough memory available on the Nano for that and the MQTT code. Answer: trick the Nano into thinking it’s an Uno and it frees up more memory. My experiences and more information available in the MySensors forum.
The Gateway is powered by 5v into the Arduino Nano.
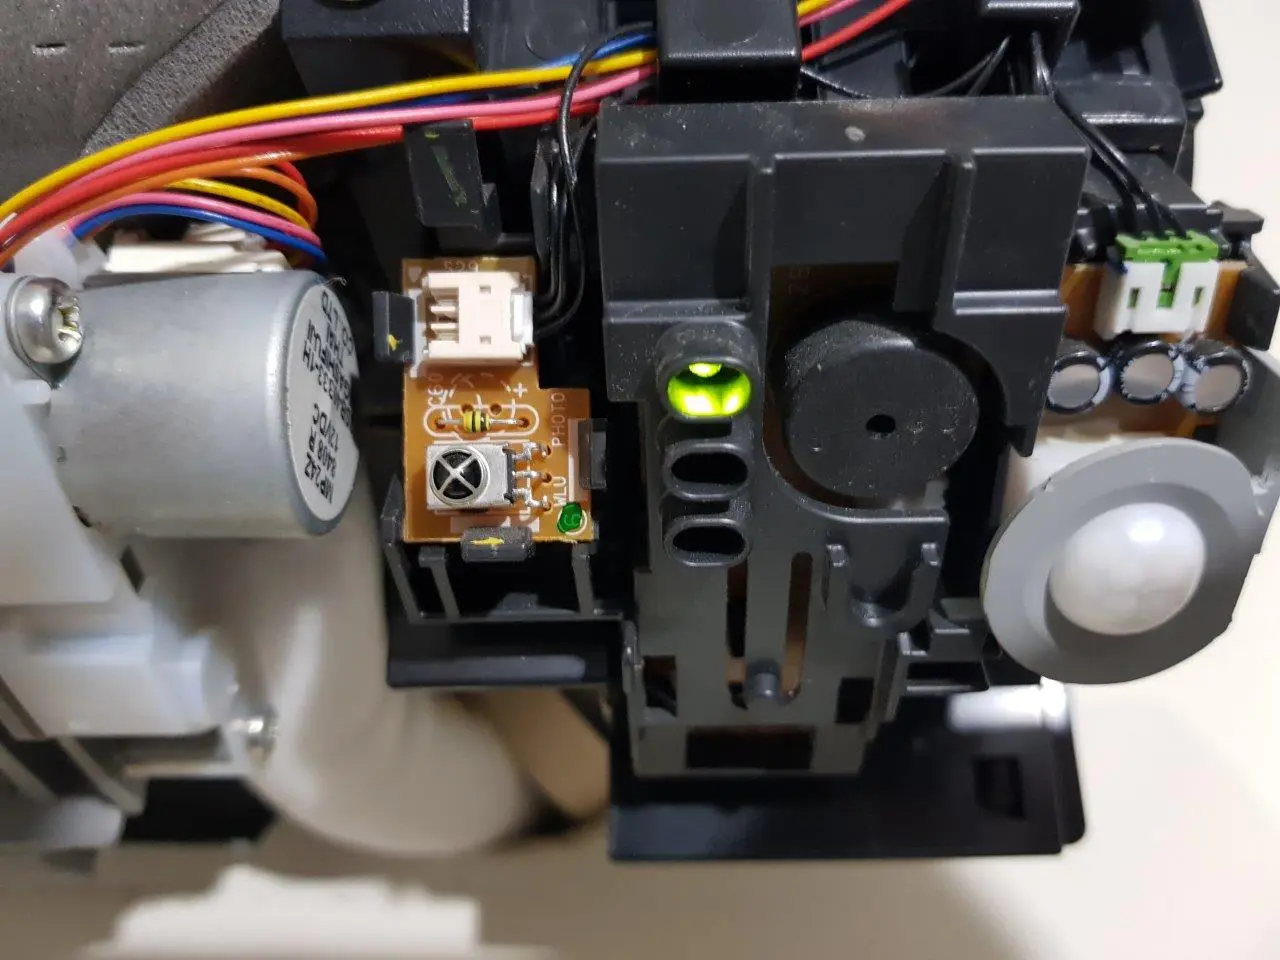
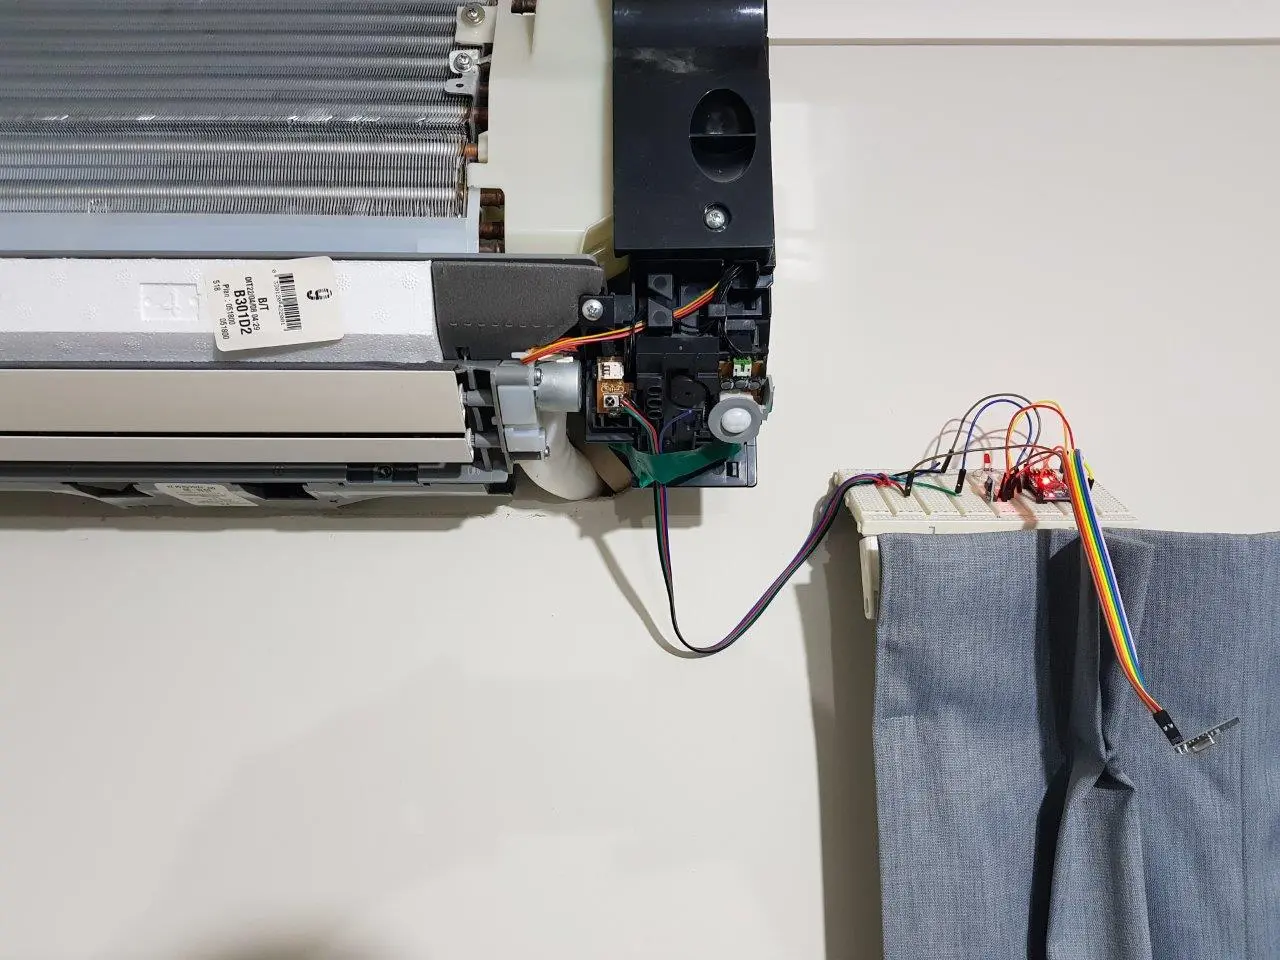
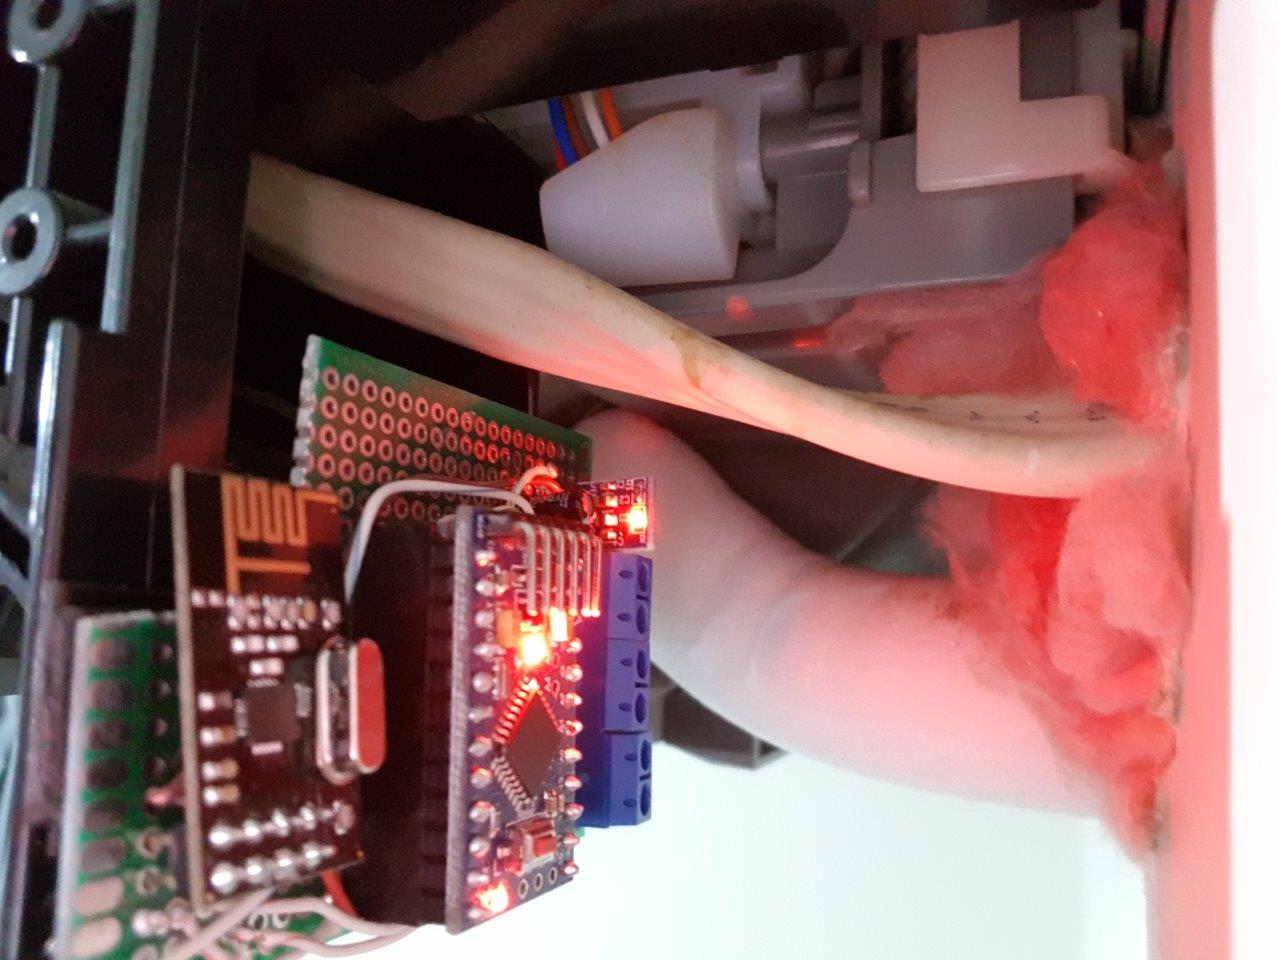
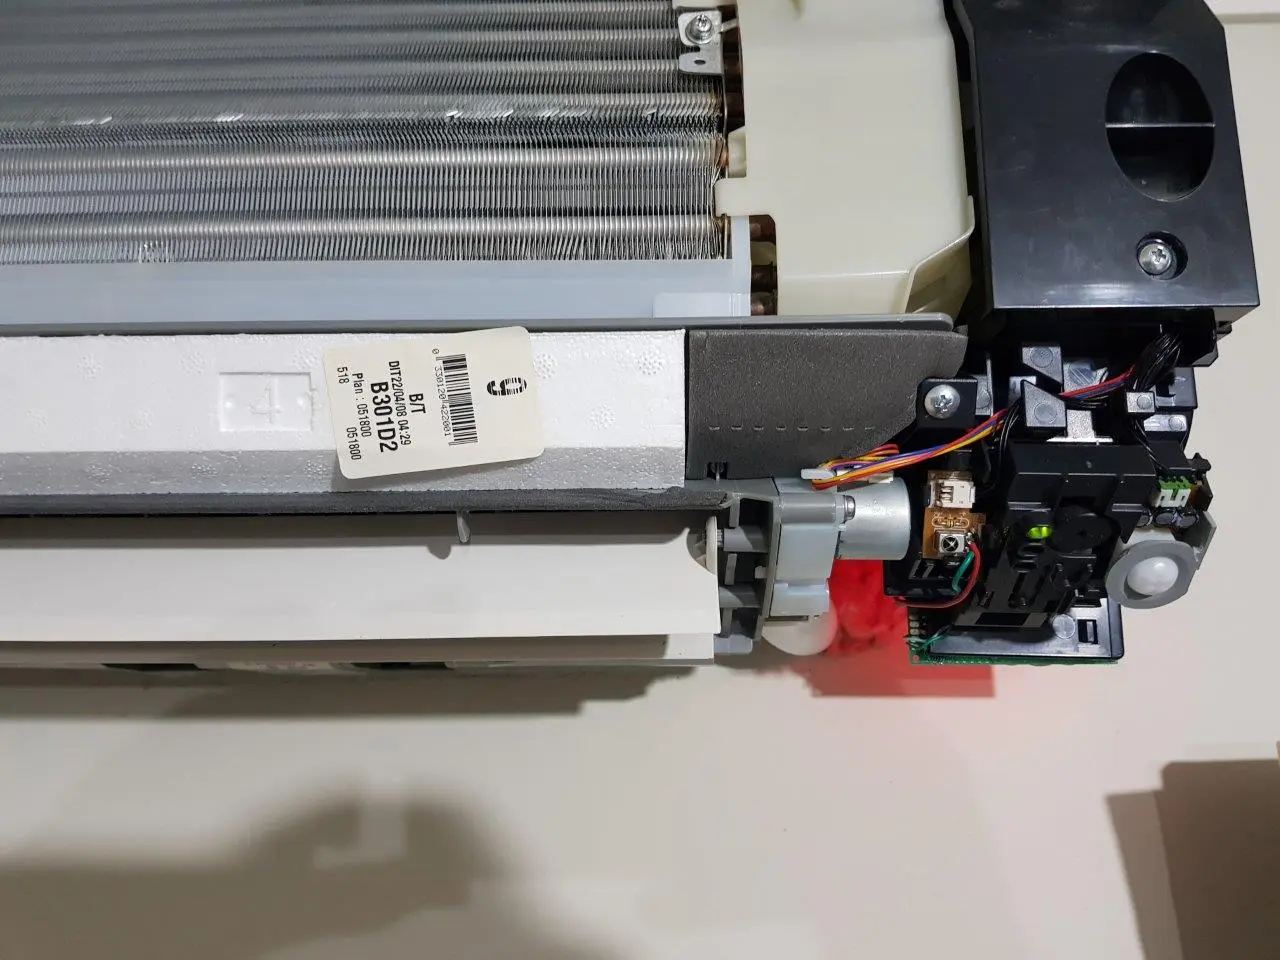
4 - Passive Infrared (PIR) Sensor
Highlights
- Powered by the alarms PIR
- No contact with the PIRs actual sense circuits, so no interruptions to the alarm functionality
- Replicates where I initially used an expensive Z-Wave Fibaro Universal Binary Sensor FGBS-001 / FGBS-321
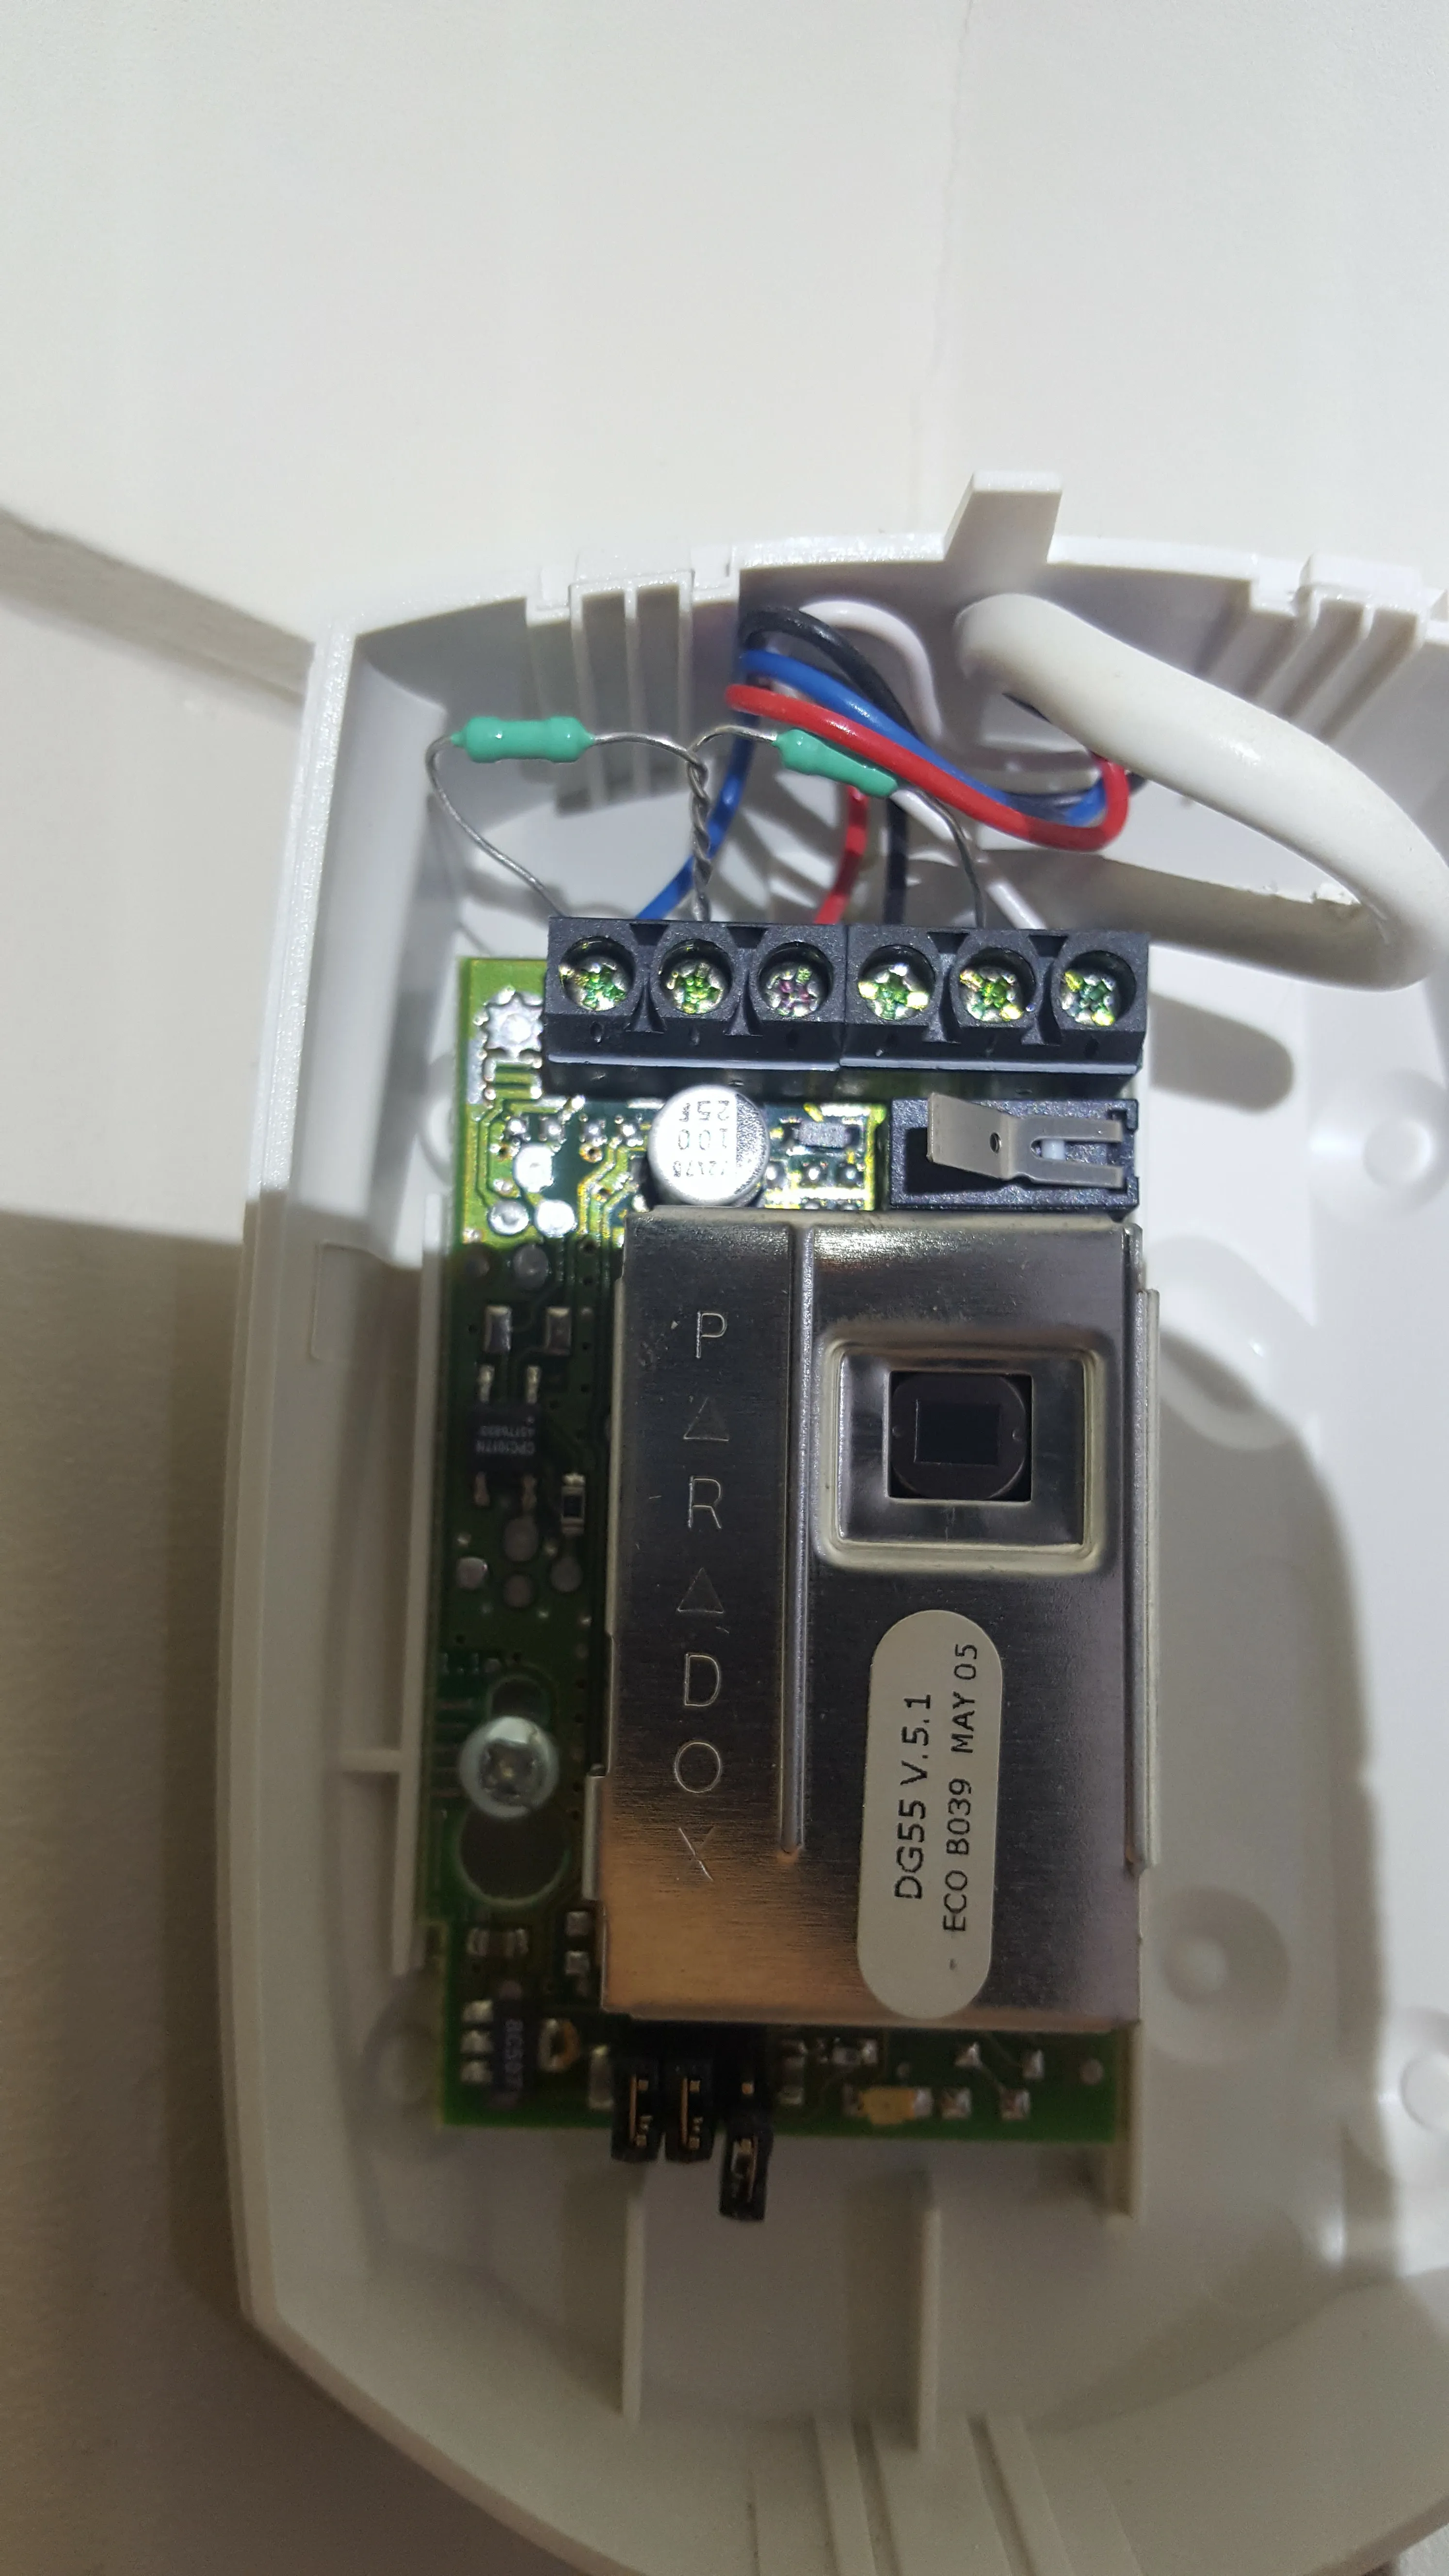
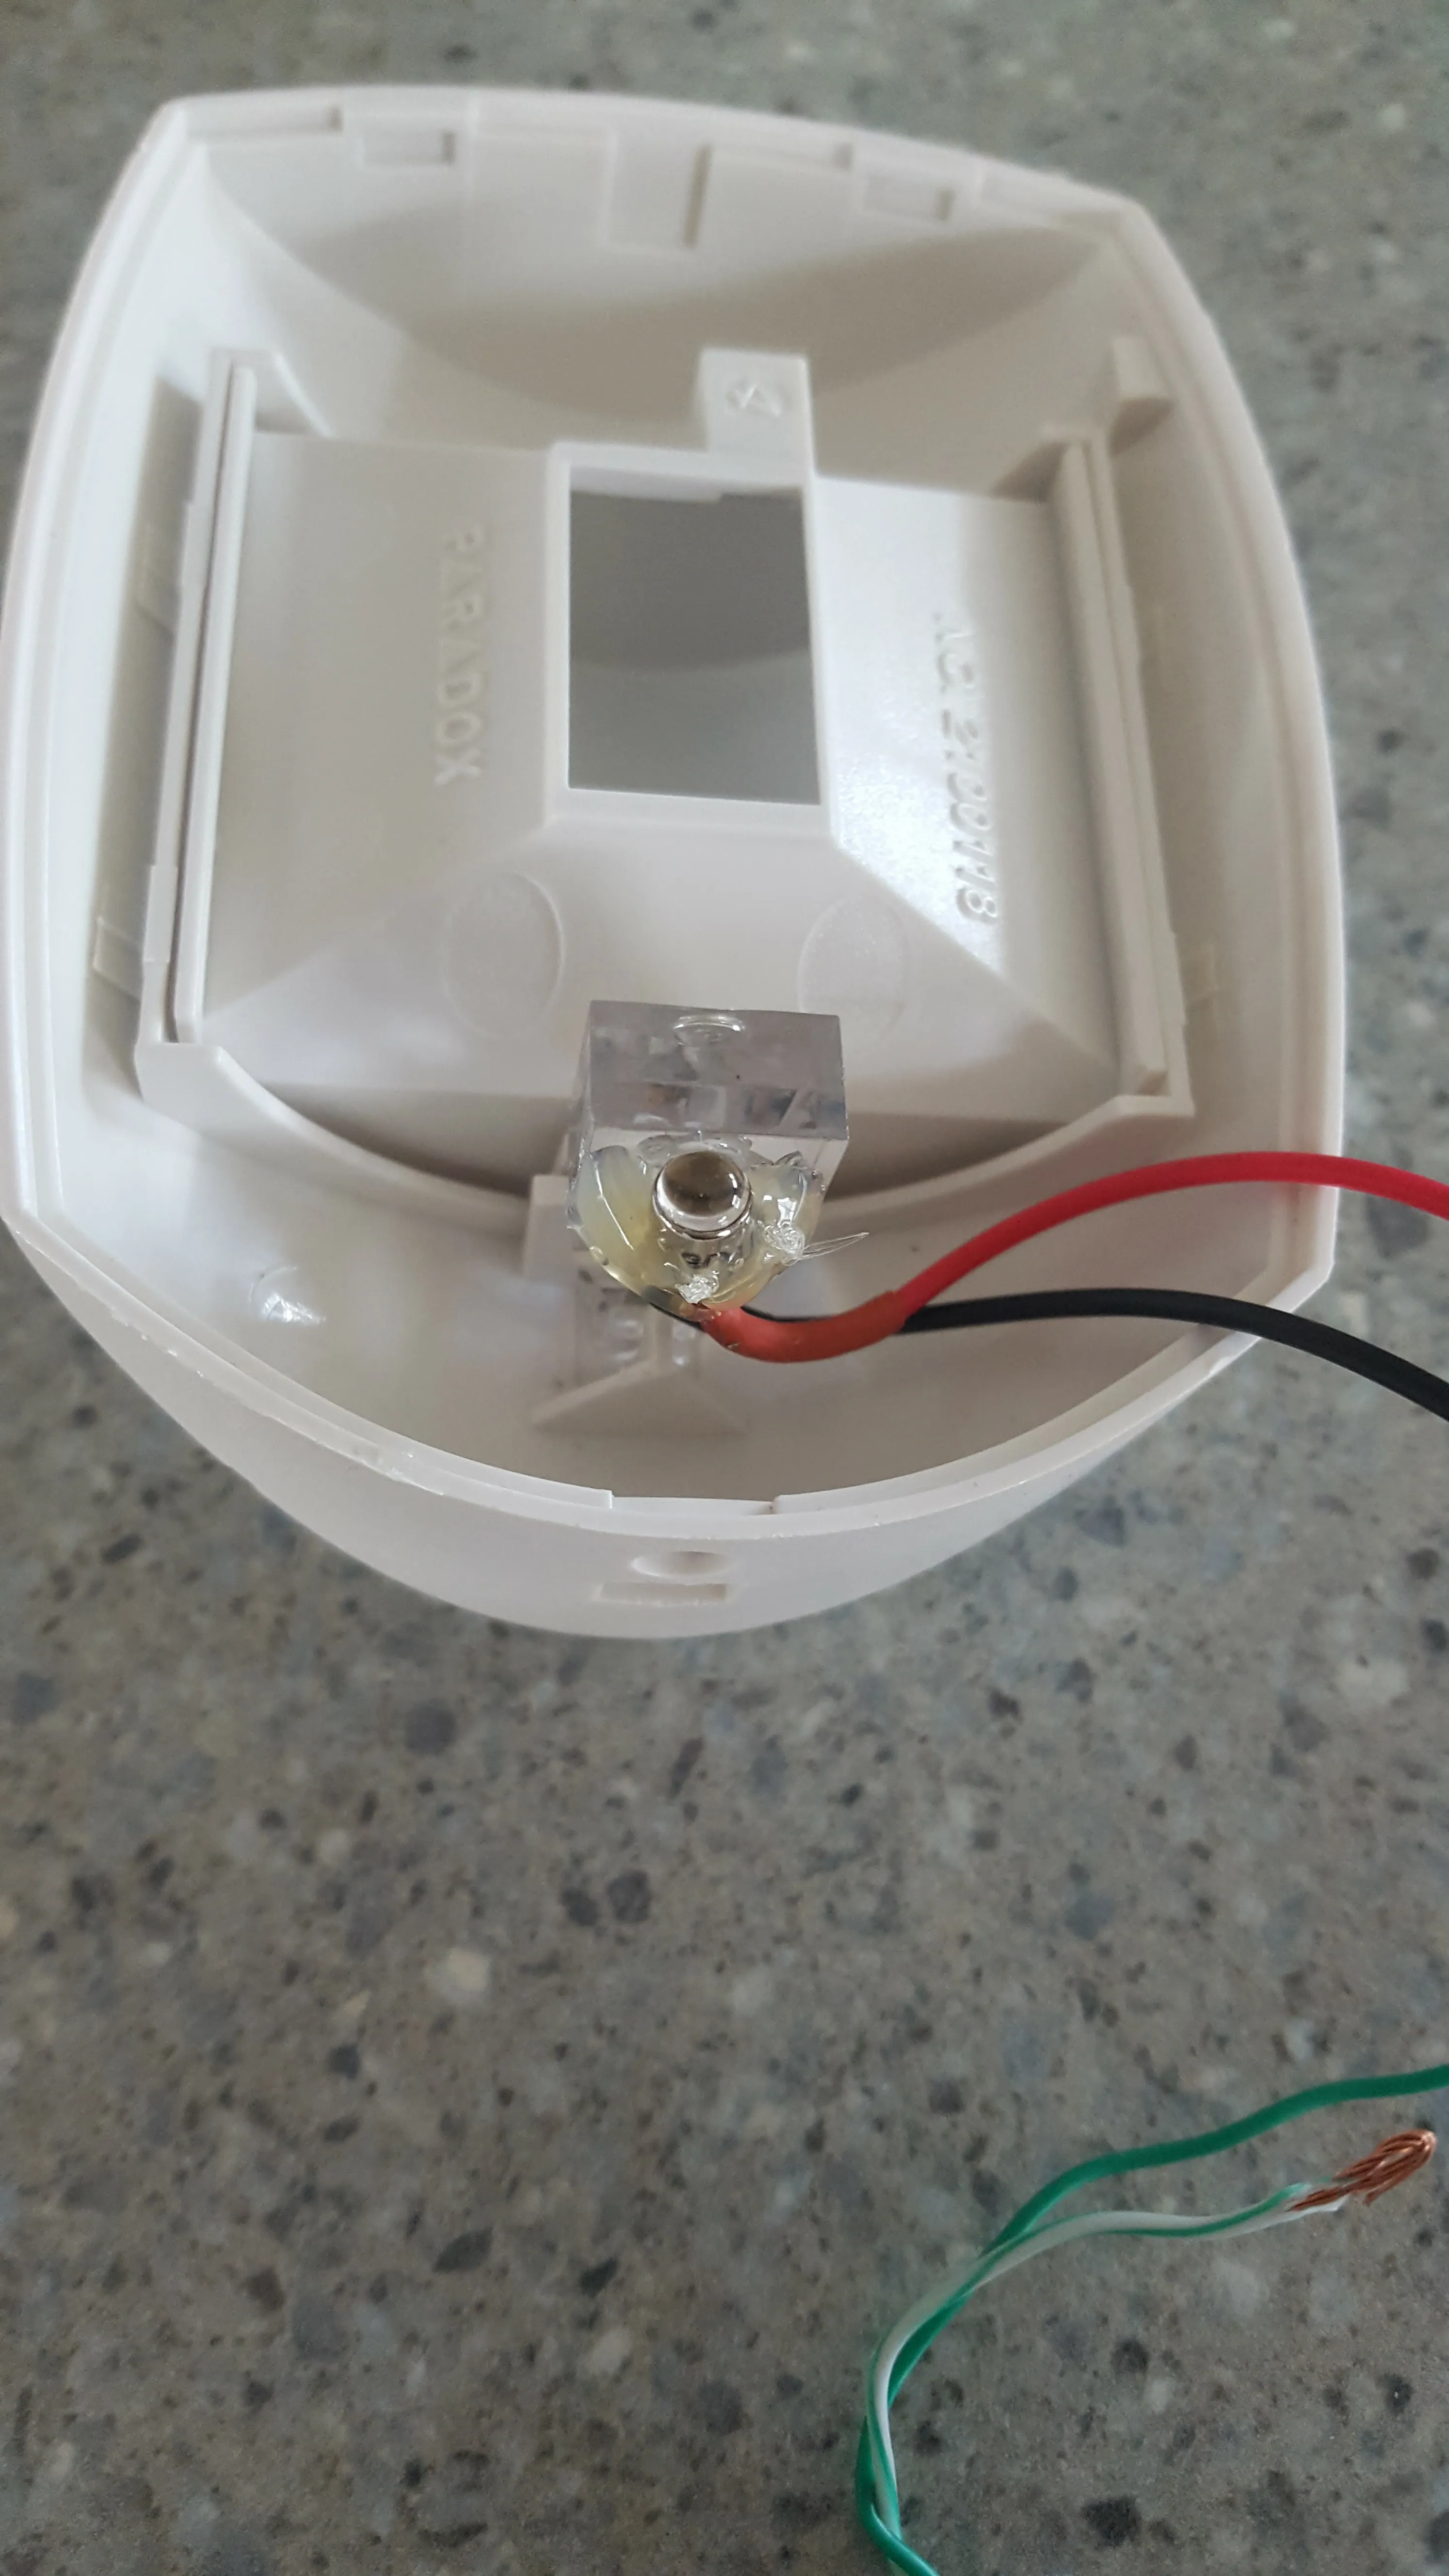

I initially set out to replace the Z-Wave unit with a similar setup. I placed an optocoupler in series with the trip circuit and calculated the various resistances etc to replace one of the standard End Of Line / Tamper resistors. This worked, but I always felt a little funny about modifying a core security feature of the house.
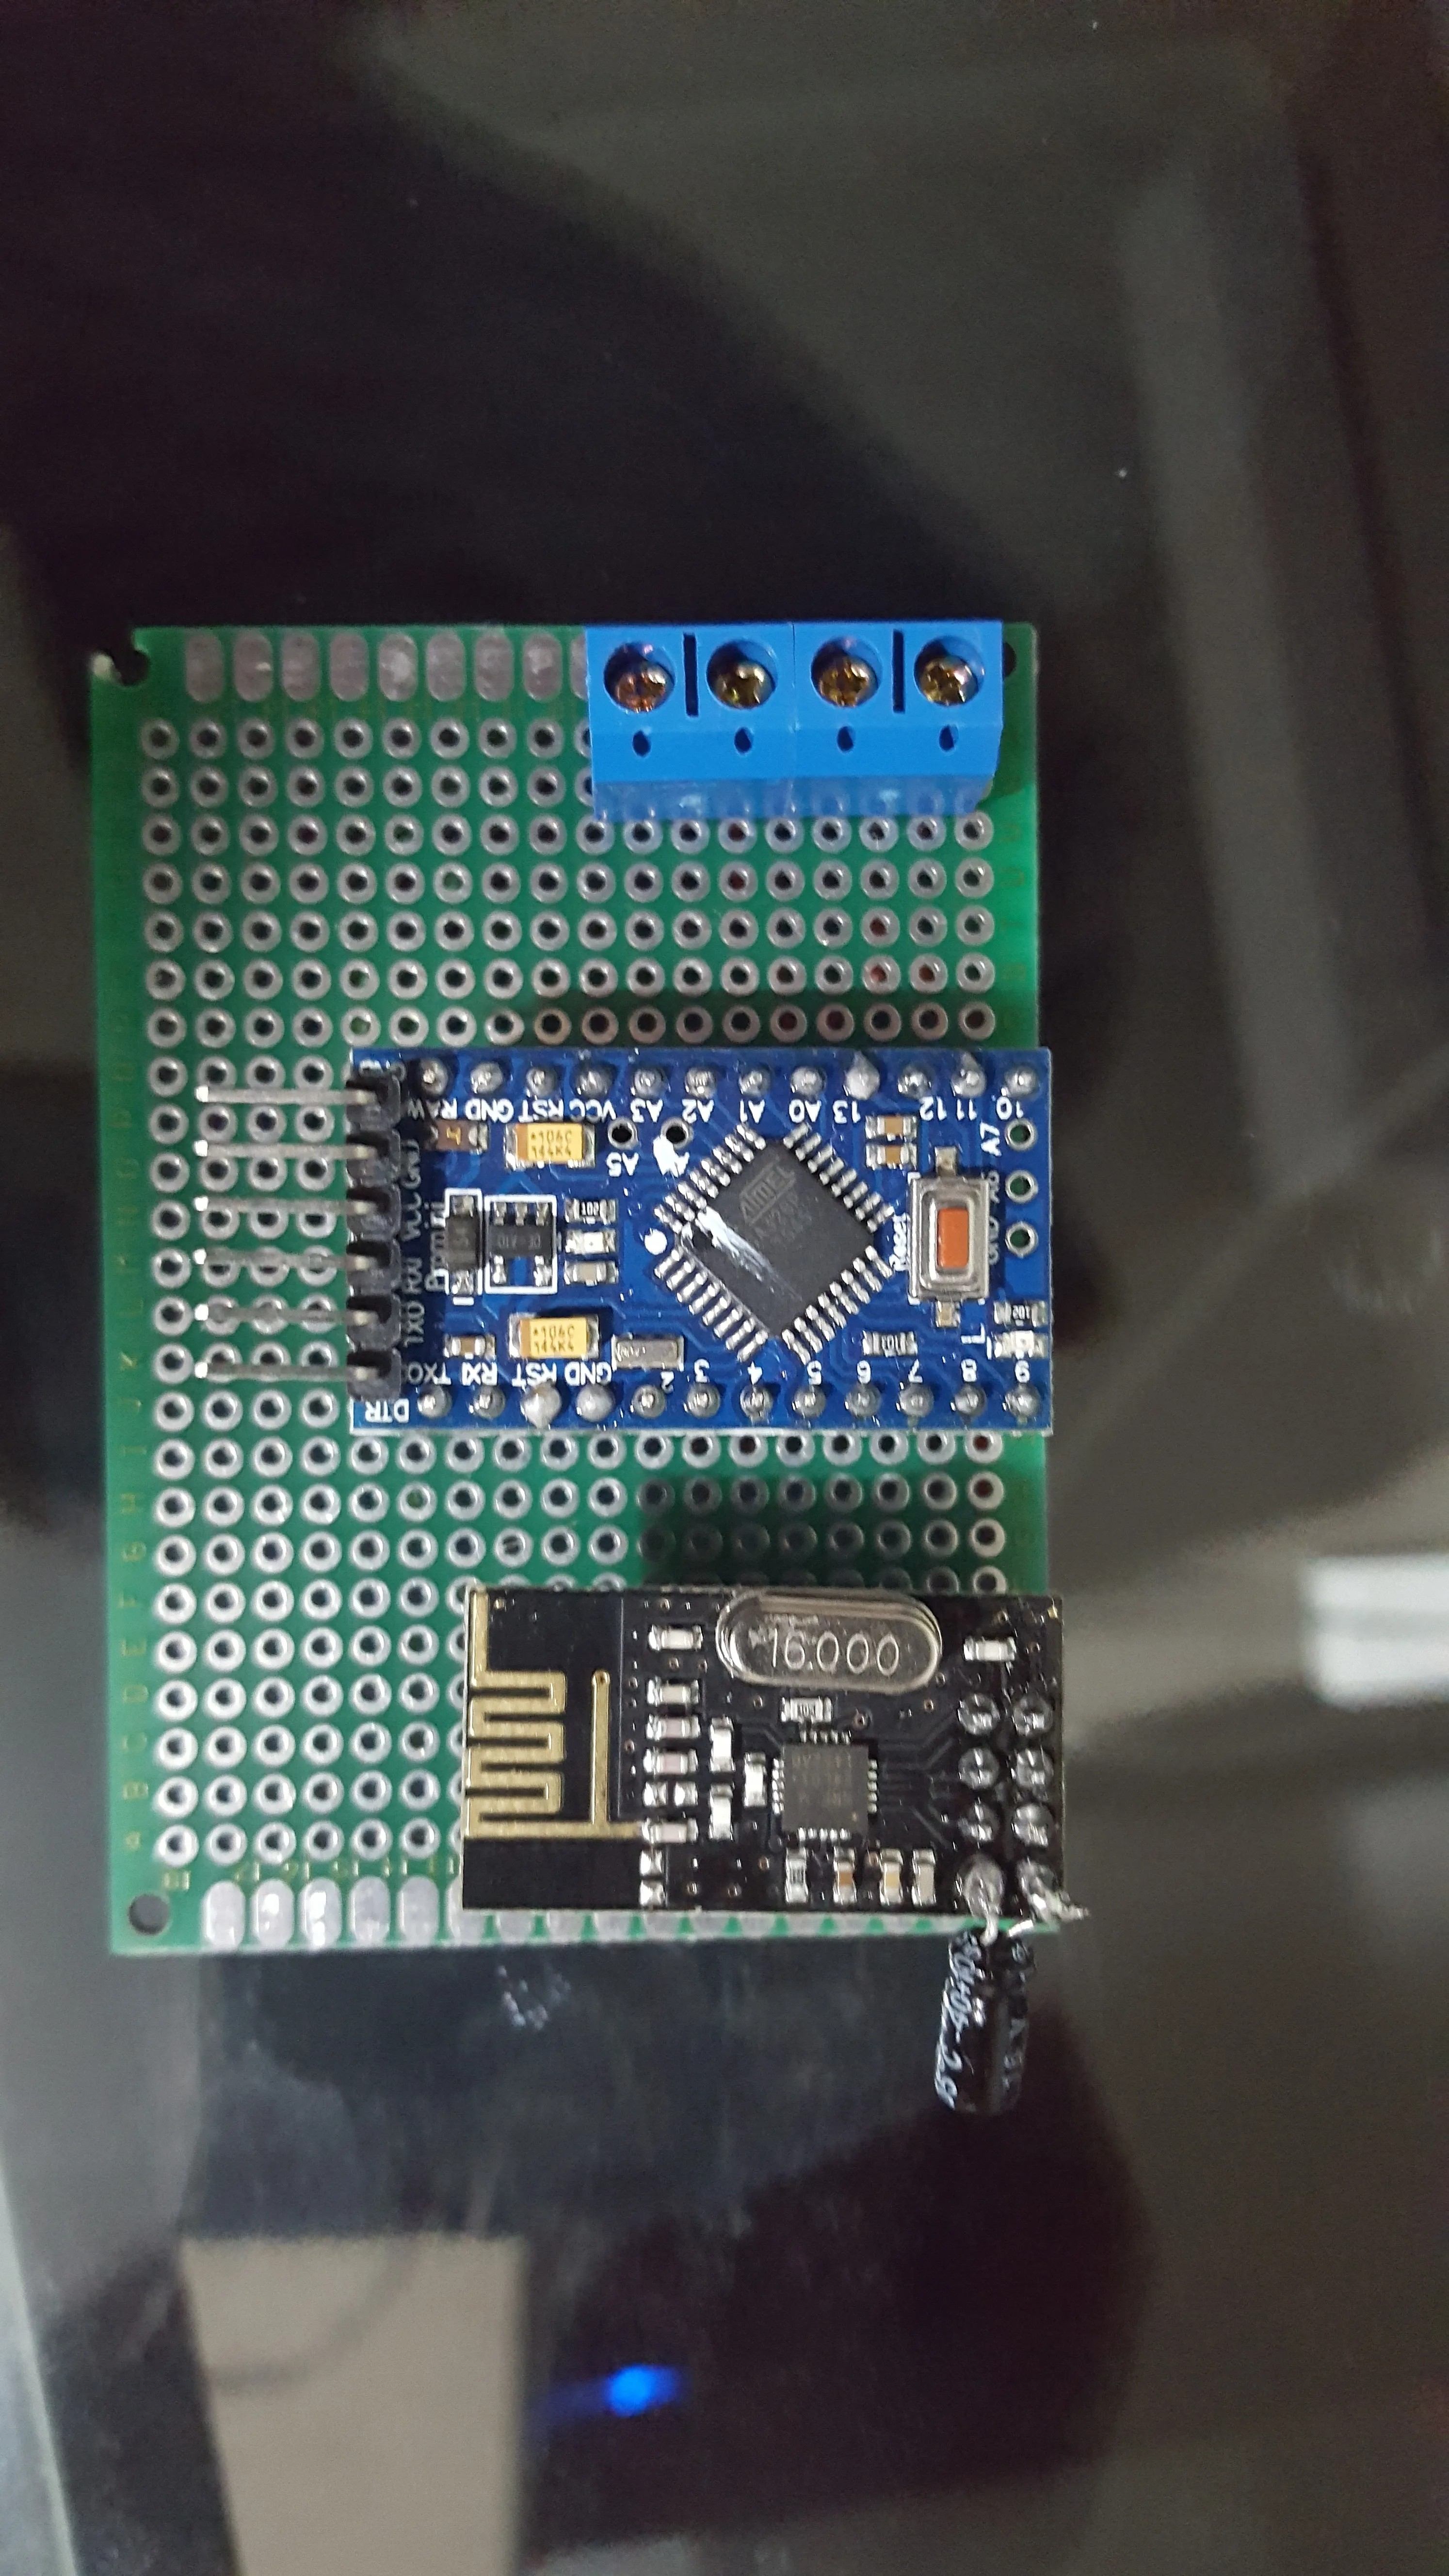
As part of the first build, I also attached the 3.3v Arduino’s RAW pin directly to the power of the PIR. I was positive it was only putting out 12v, but I never measured twice. Needless to say, the smoke was let out. This is why the build image above has a separate 3.3v regulator. The AMS1117-3.3 regulator can handle voltages above the 12v Arduino threshold
In the end, I opted for a simple phototransistor to report back on the status of the PIRs trigger LED. With the exception of power, this has full isolation from the PIRs core security function.
I think this is the sensor code!!! Please double check this one for your fit.
    /**
 * The MySensors Arduino library handles the wireless radio link and protocol
 * between your home built sensors/actuators and HA controller of choice.
 * The sensors forms a self healing radio network with optional repeaters. Each
 * repeater and gateway builds a routing tables in EEPROM which keeps track of the
 * network topology allowing messages to be routed to nodes.
 *
 * Created by Henrik Ekblad <henrik.ekblad@mysensors.org>
 * Copyright (C) 2013-2015 Sensnology AB
 * Full contributor list: https://github.com/mysensors/Arduino/graphs/contributors
 *
 * Documentation: http://www.mysensors.org
 * Support Forum: http://forum.mysensors.org
 *
 * This program is free software; you can redistribute it and/or
 * modify it under the terms of the GNU General Public License
 * version 2 as published by the Free Software Foundation.
 *
 *******************************
 *
 * DESCRIPTION
 *
 * Simple binary switch example
 * Connect button or door/window reed switch between
 * digitial I/O pin 3 (BUTTON_PIN below) and GND.
 * http://www.mysensors.org/build/binary
 */


// Enable debug prints to serial monitor
#define MY_DEBUG

// Enable and select radio type attached
#define MY_RADIO_NRF24
//#define MY_RADIO_RFM69

#include <SPI.h>
#include <MySensor.h>
#include <Bounce2.h>

#define MY_NODE_ID 54


#define CHILD_ID1 3
#define CHILD_ID2 4

#define IN_1  3  // Arduino Digital I/O pin for button/reed switch
#define IN_2  4  // Arduino Digital I/O pin for button/reed switch

#define OUT_1  7  // Arduino Digital I/O pin for button/reed switch
#define OUT_2  8  // Arduino Digital I/O pin for button/reed switch


Bounce debouncer1 = Bounce();
Bounce debouncer2 = Bounce();
int oldValue1=-1;
int oldValue2=-1;

// Change to V_LIGHT if you use S_LIGHT in presentation below
MyMessage msg1(CHILD_ID1,V_TRIPPED);
MyMessage msg2(CHILD_ID2,V_TRIPPED);

void setup()
{
  // Setup the pins
  pinMode(IN_1,INPUT);
  pinMode(IN_2,INPUT);

  pinMode(OUT_1,OUTPUT);
  pinMode(OUT_2,OUTPUT);

  // Activate internal pull-up
  digitalWrite(IN_1,HIGH);
  digitalWrite(IN_2,HIGH);

  // After setting up the button, setup debouncer
  debouncer1.attach(IN_1);
  debouncer1.interval(5);

  debouncer2.attach(IN_2);
  debouncer2.interval(5);

}

void presentation() {
  // Register binary input sensor to gw (they will be created as child devices)
  // You can use S_DOOR, S_MOTION or S_LIGHT here depending on your usage.
  // If S_LIGHT is used, remember to update variable type you send in. See "msg" above.
  present(CHILD_ID1, S_DOOR);
  present(CHILD_ID2, S_DOOR);
}


//  Check if digital input has changed and send in new value
void loop()
{
  debouncer1.update();
  debouncer2.update();
  // Get the update value
  int value1 = debouncer1.read();
  int value2 = debouncer2.read();


  digitalWrite(OUT_1, value1);
  digitalWrite(OUT_2, value2);

  if (value1 != oldValue1) {
     // Send in the new value
     send(msg1.set(value1==HIGH ? 1 : 0));
     oldValue1 = value1;
  }

  if (value2 != oldValue2) {
     // Send in the new value
     send(msg2.set(value2==HIGH ? 1 : 0));
     oldValue2 = value2;
  }

}
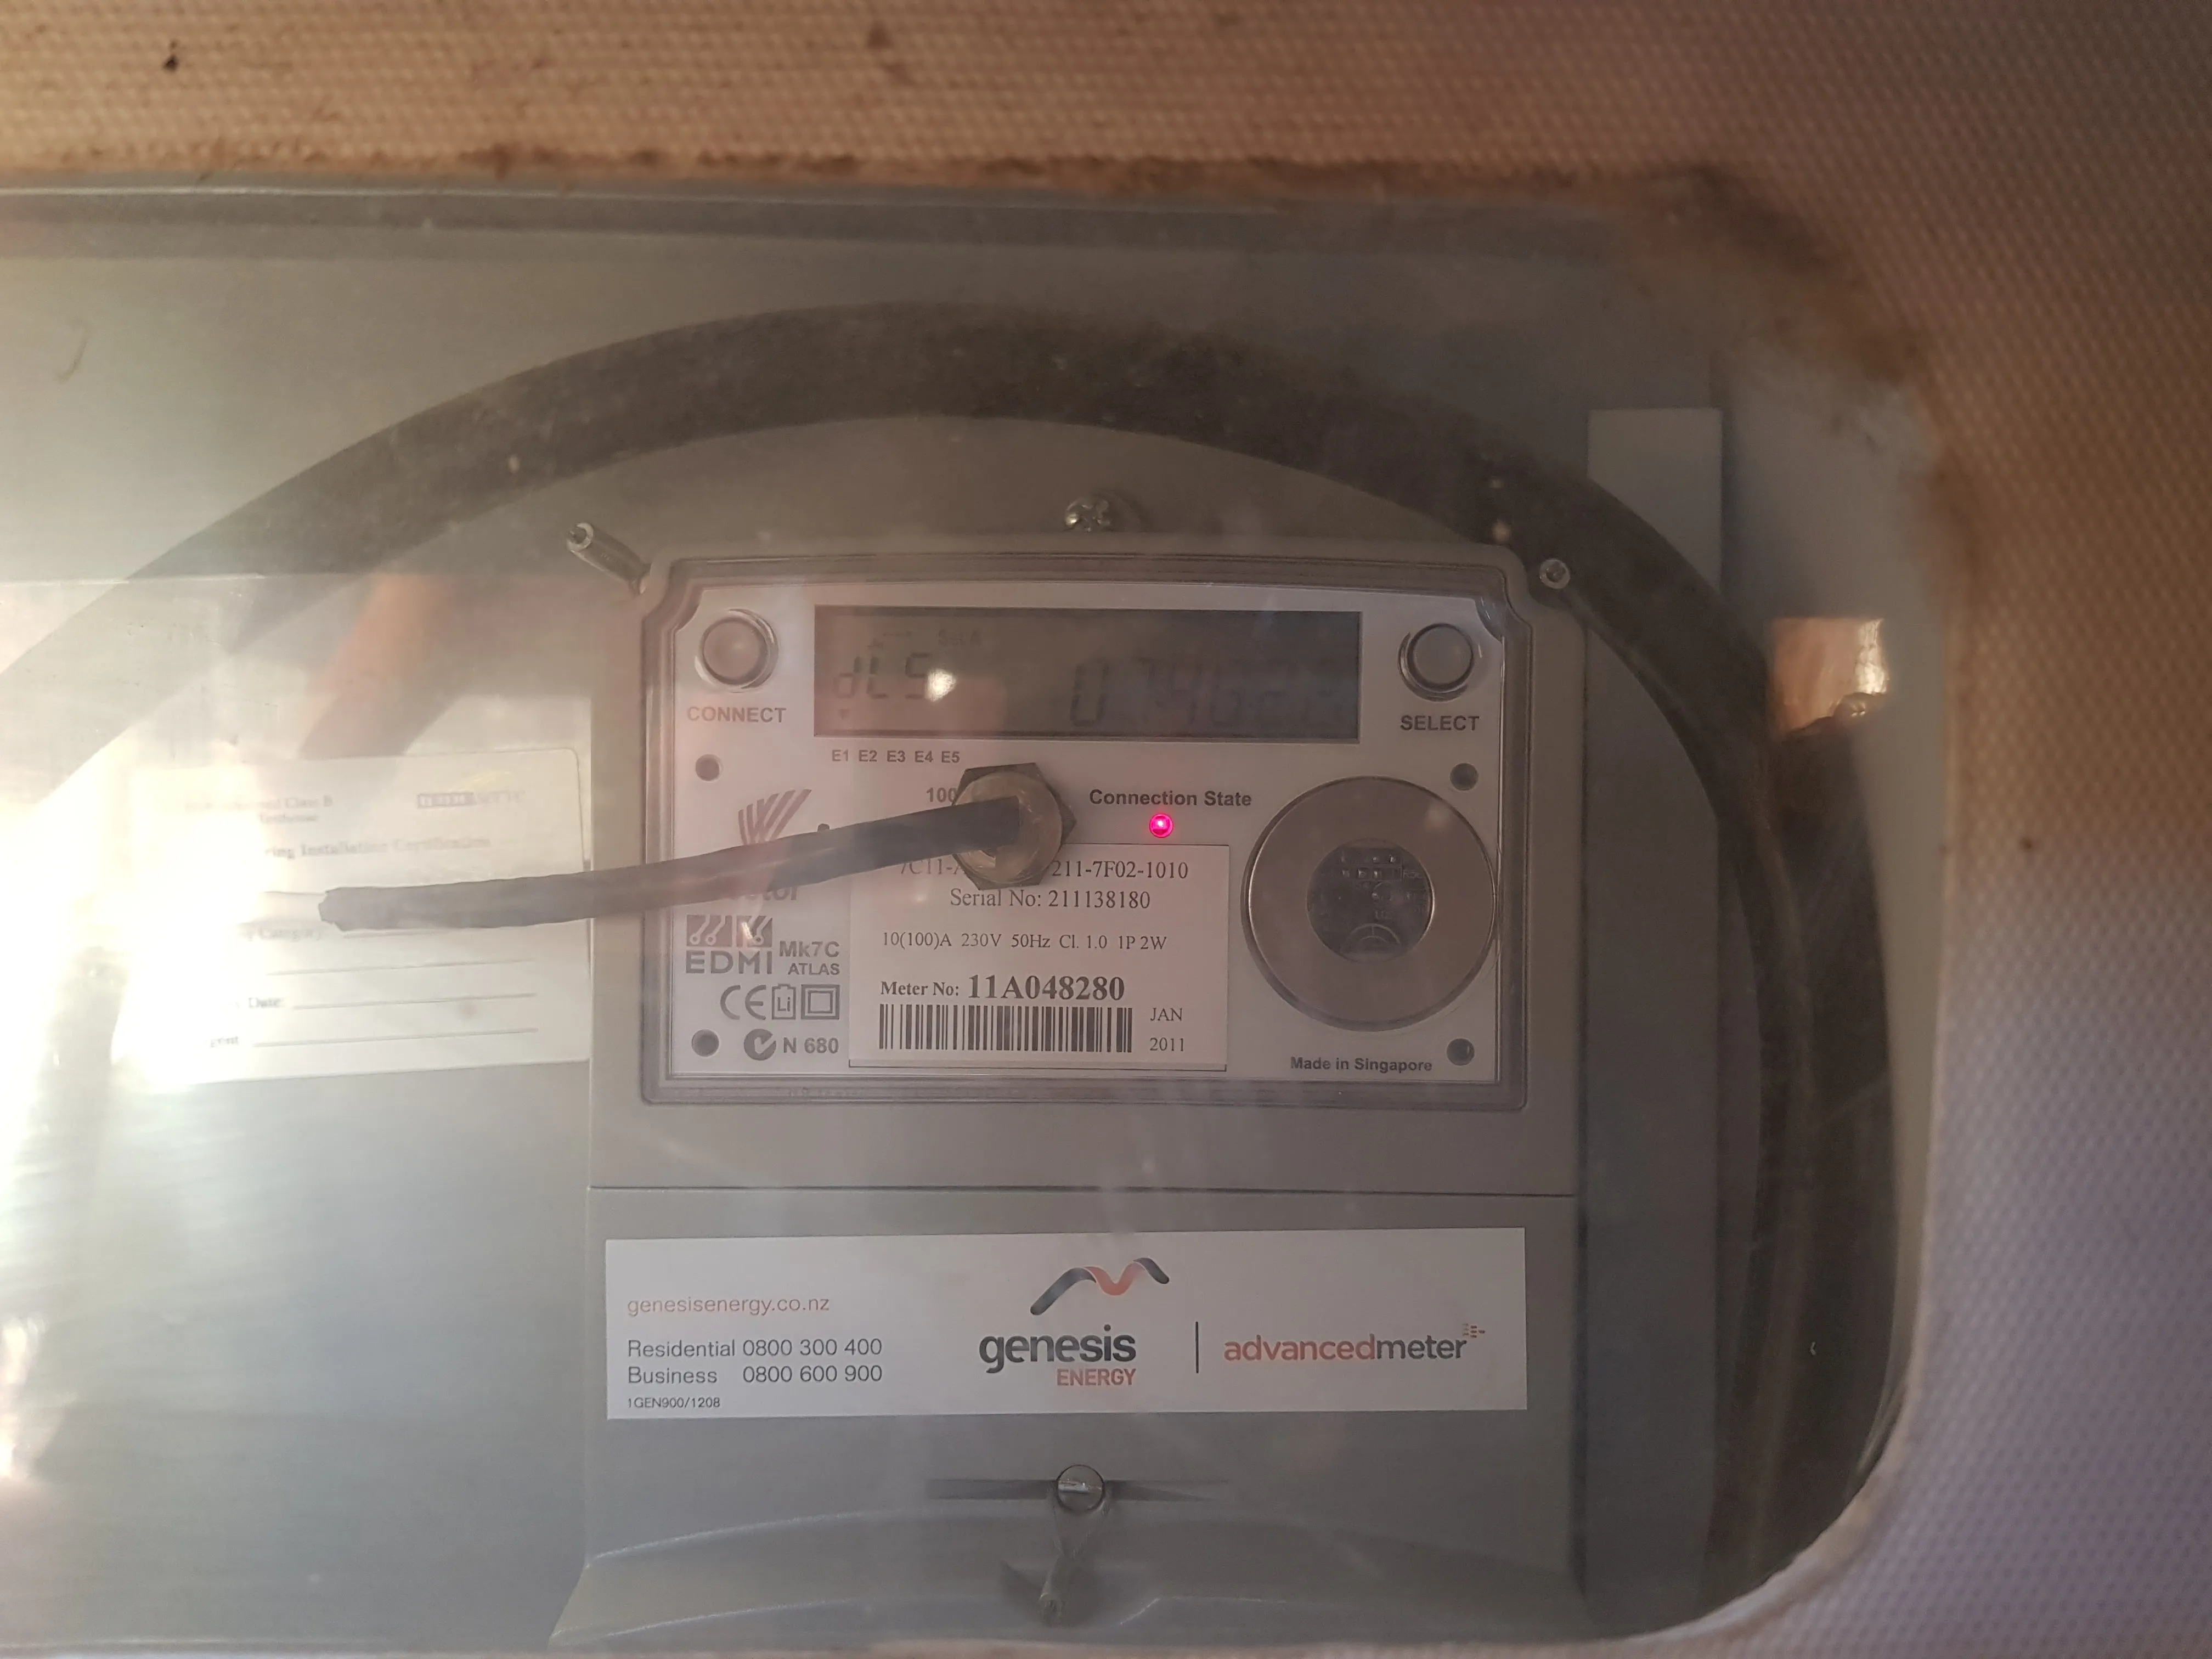
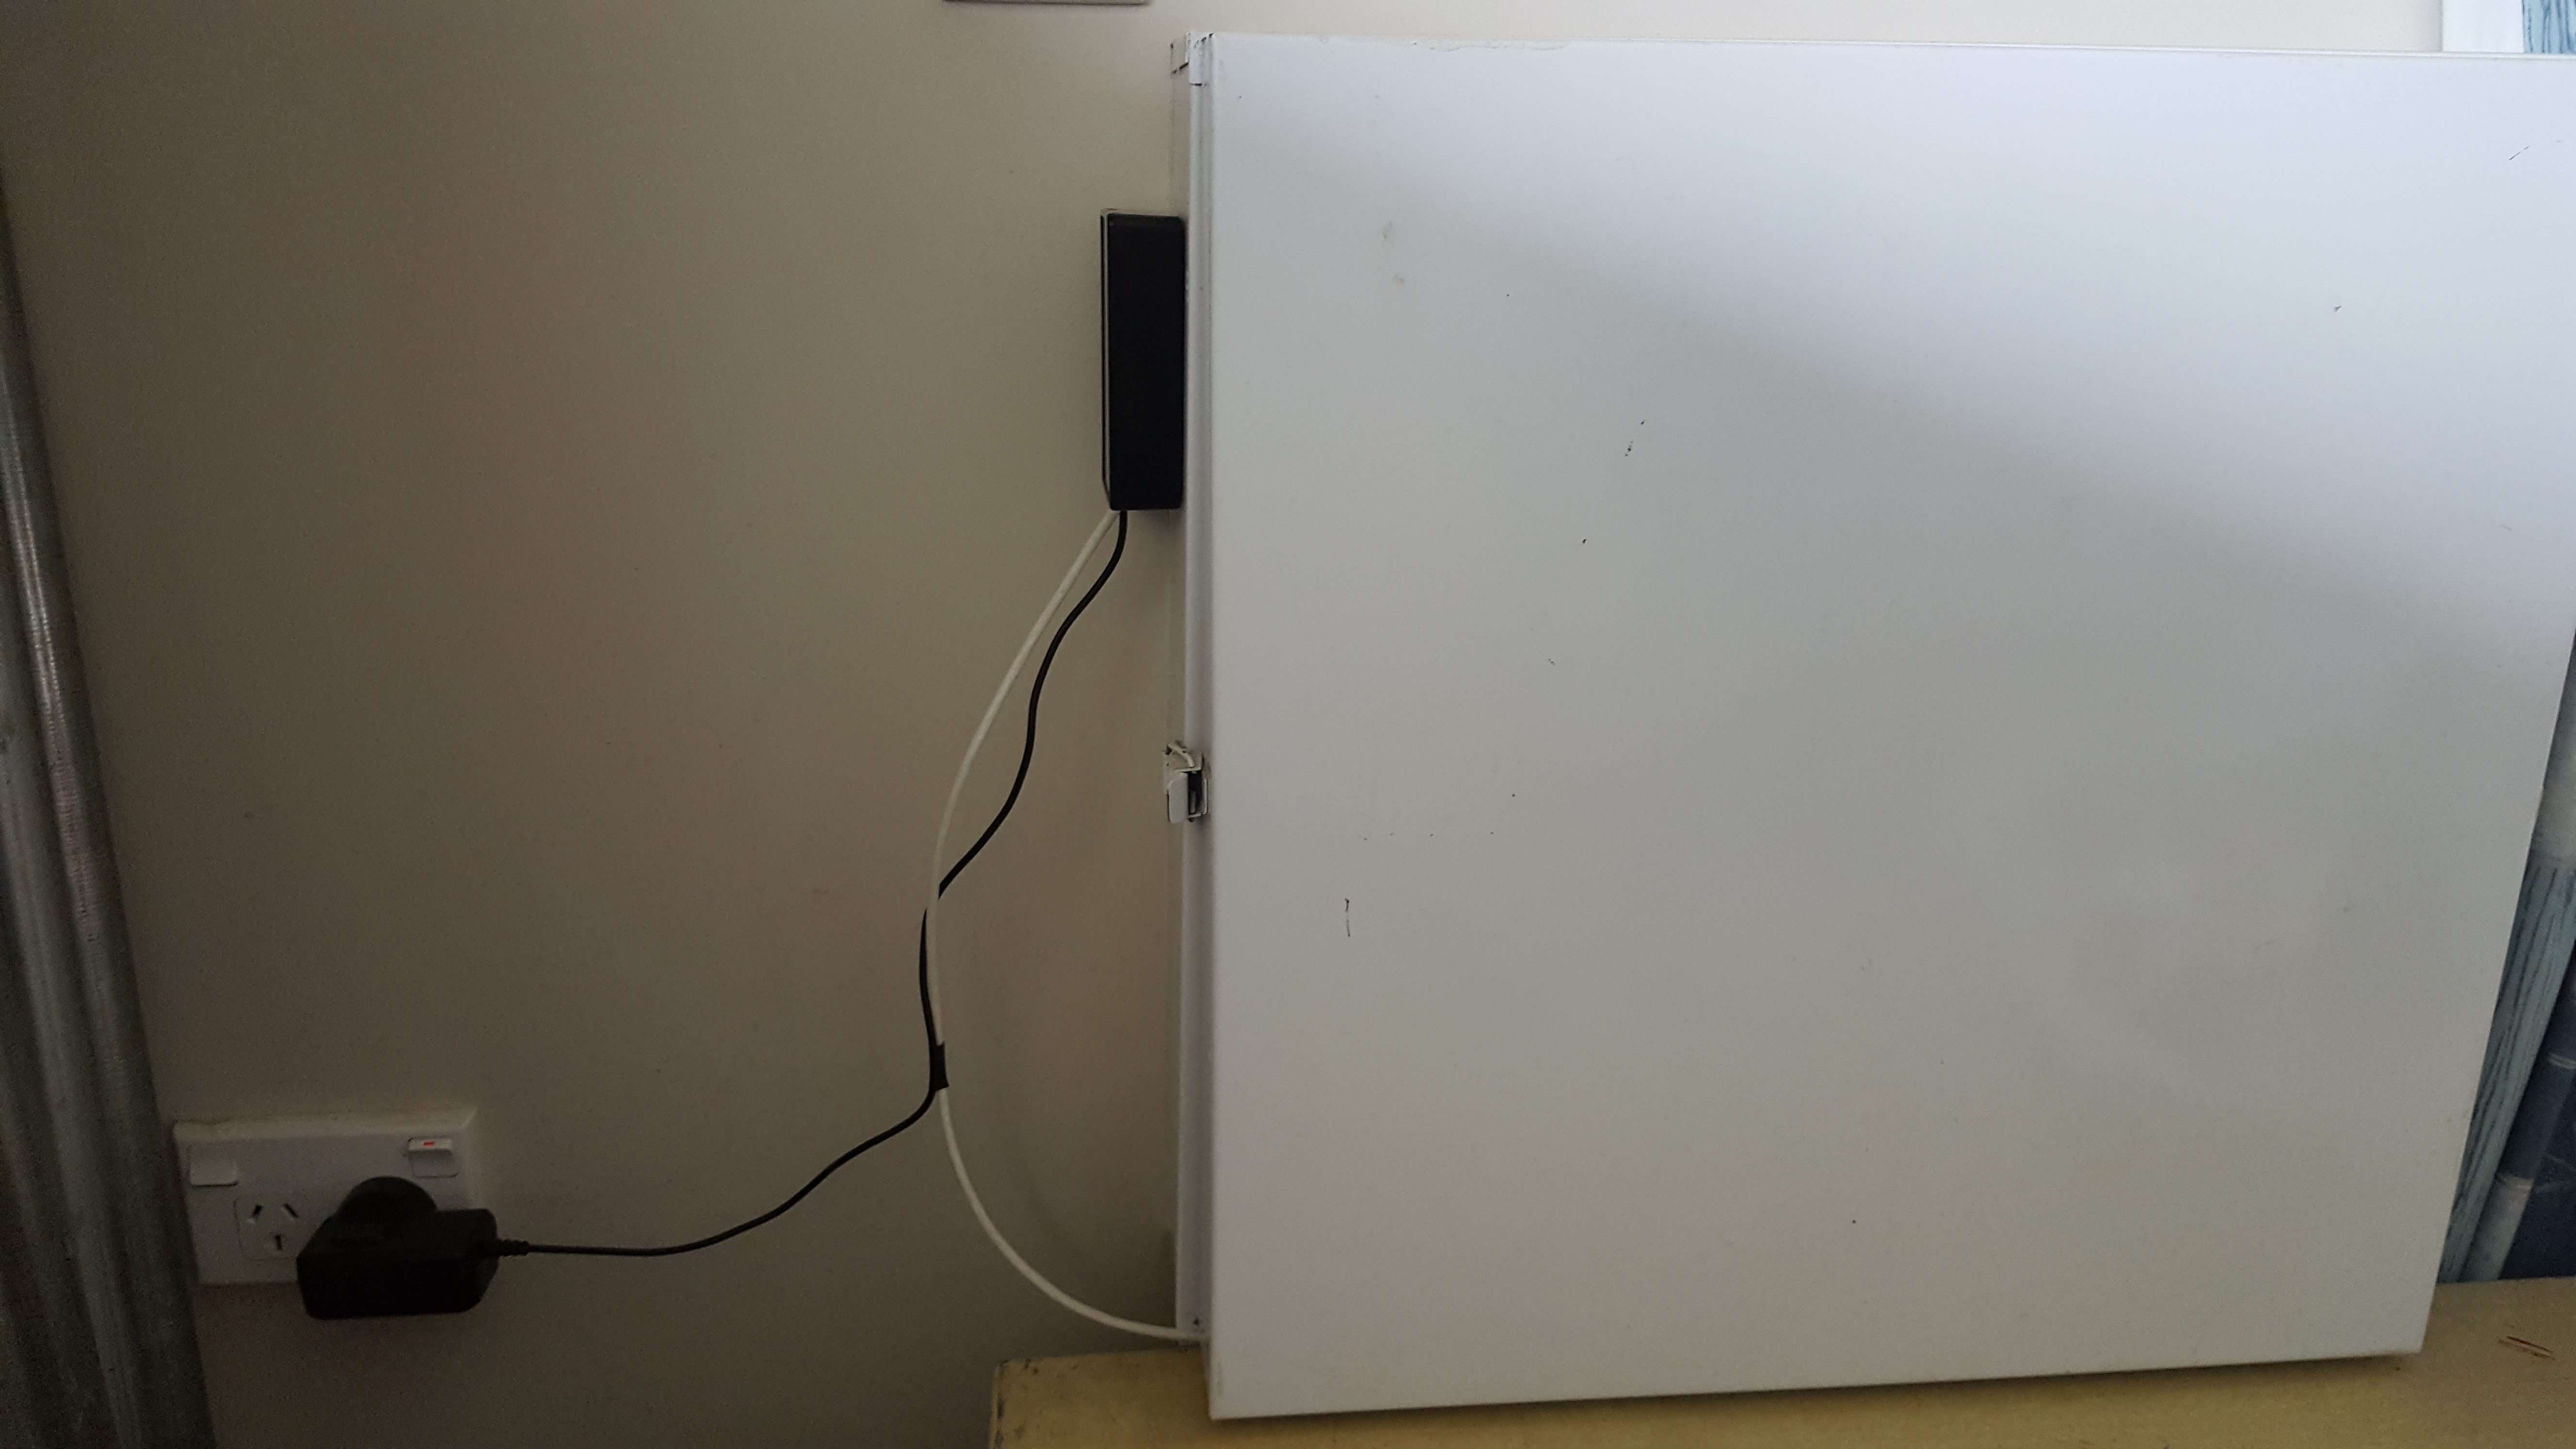
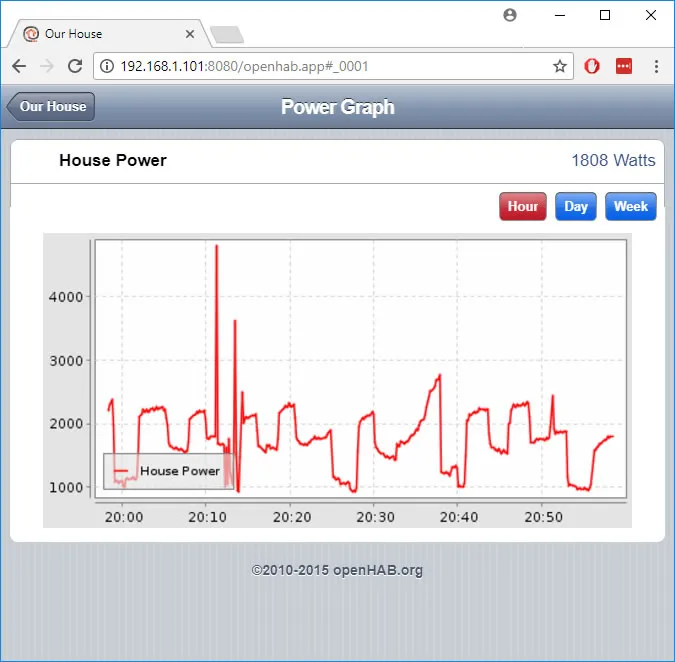
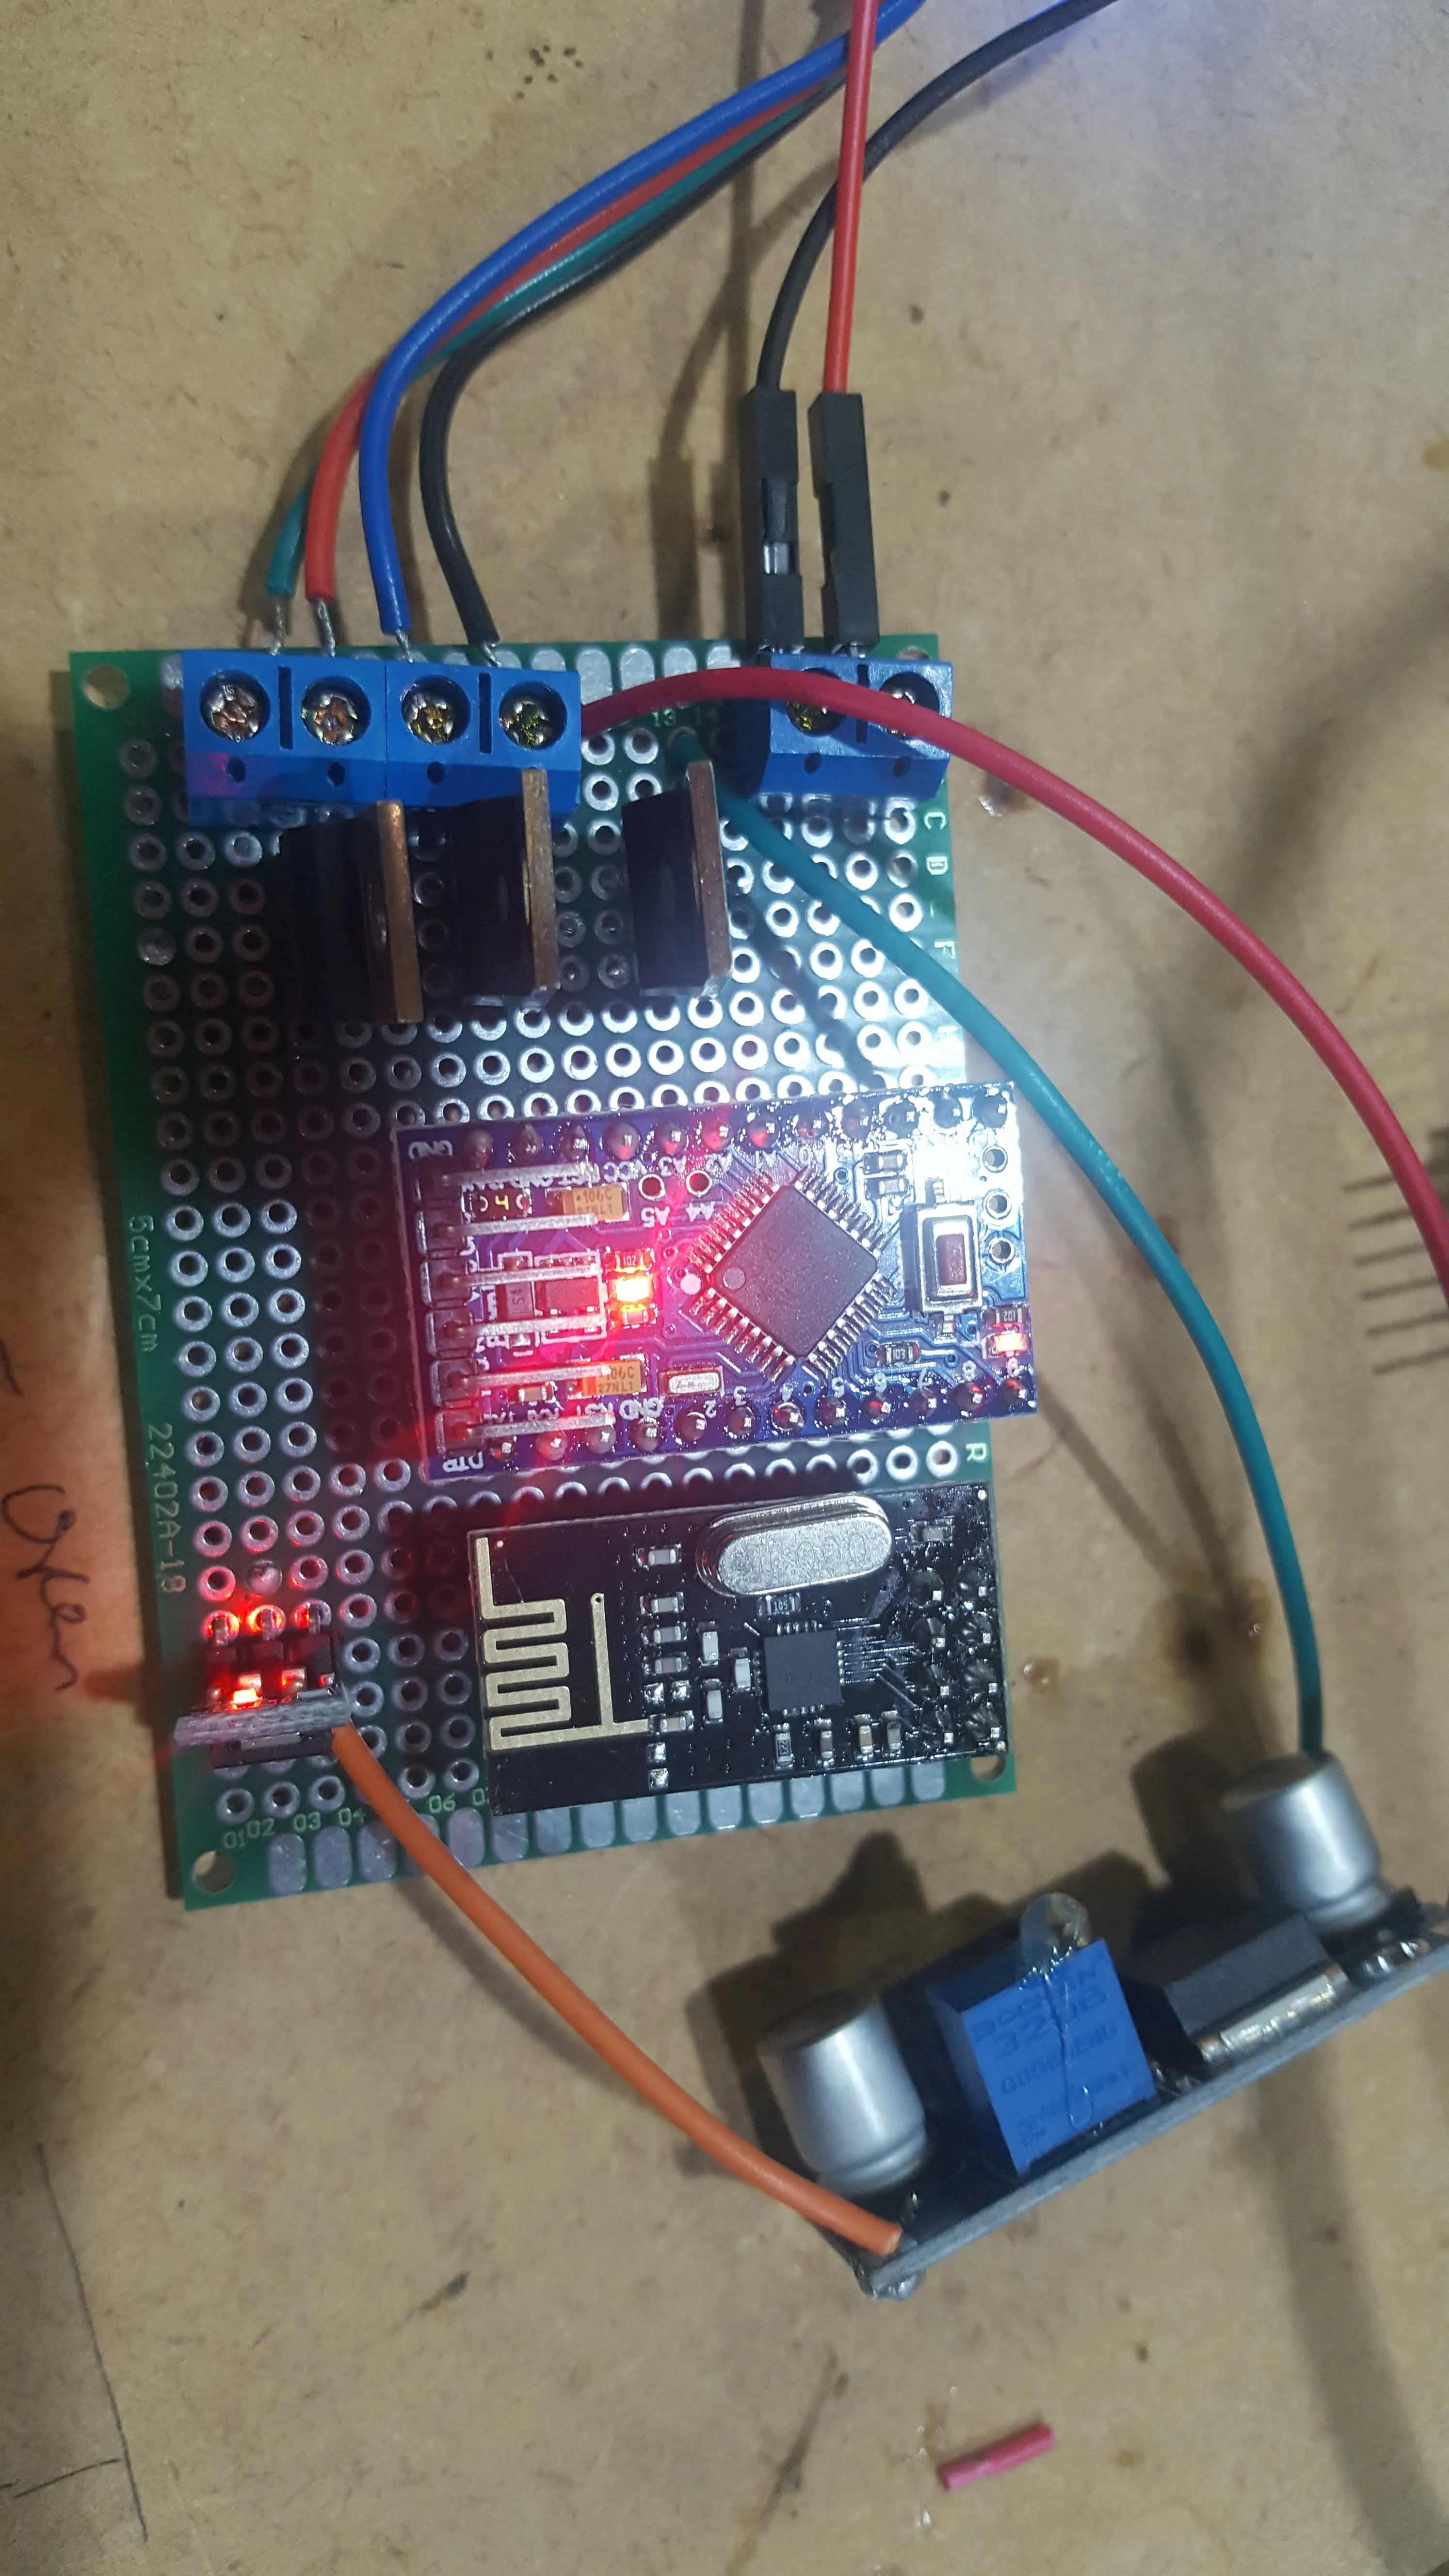
5 - Power Usage Sensor
Highlights
- Standard MySensors Pulse Meter
- 3DU5 phototransistor detects meter pulses
WARNING: This build works around high voltage.
My Company and I accept no liability whatsoever for your own well being or that of your electrical gear.
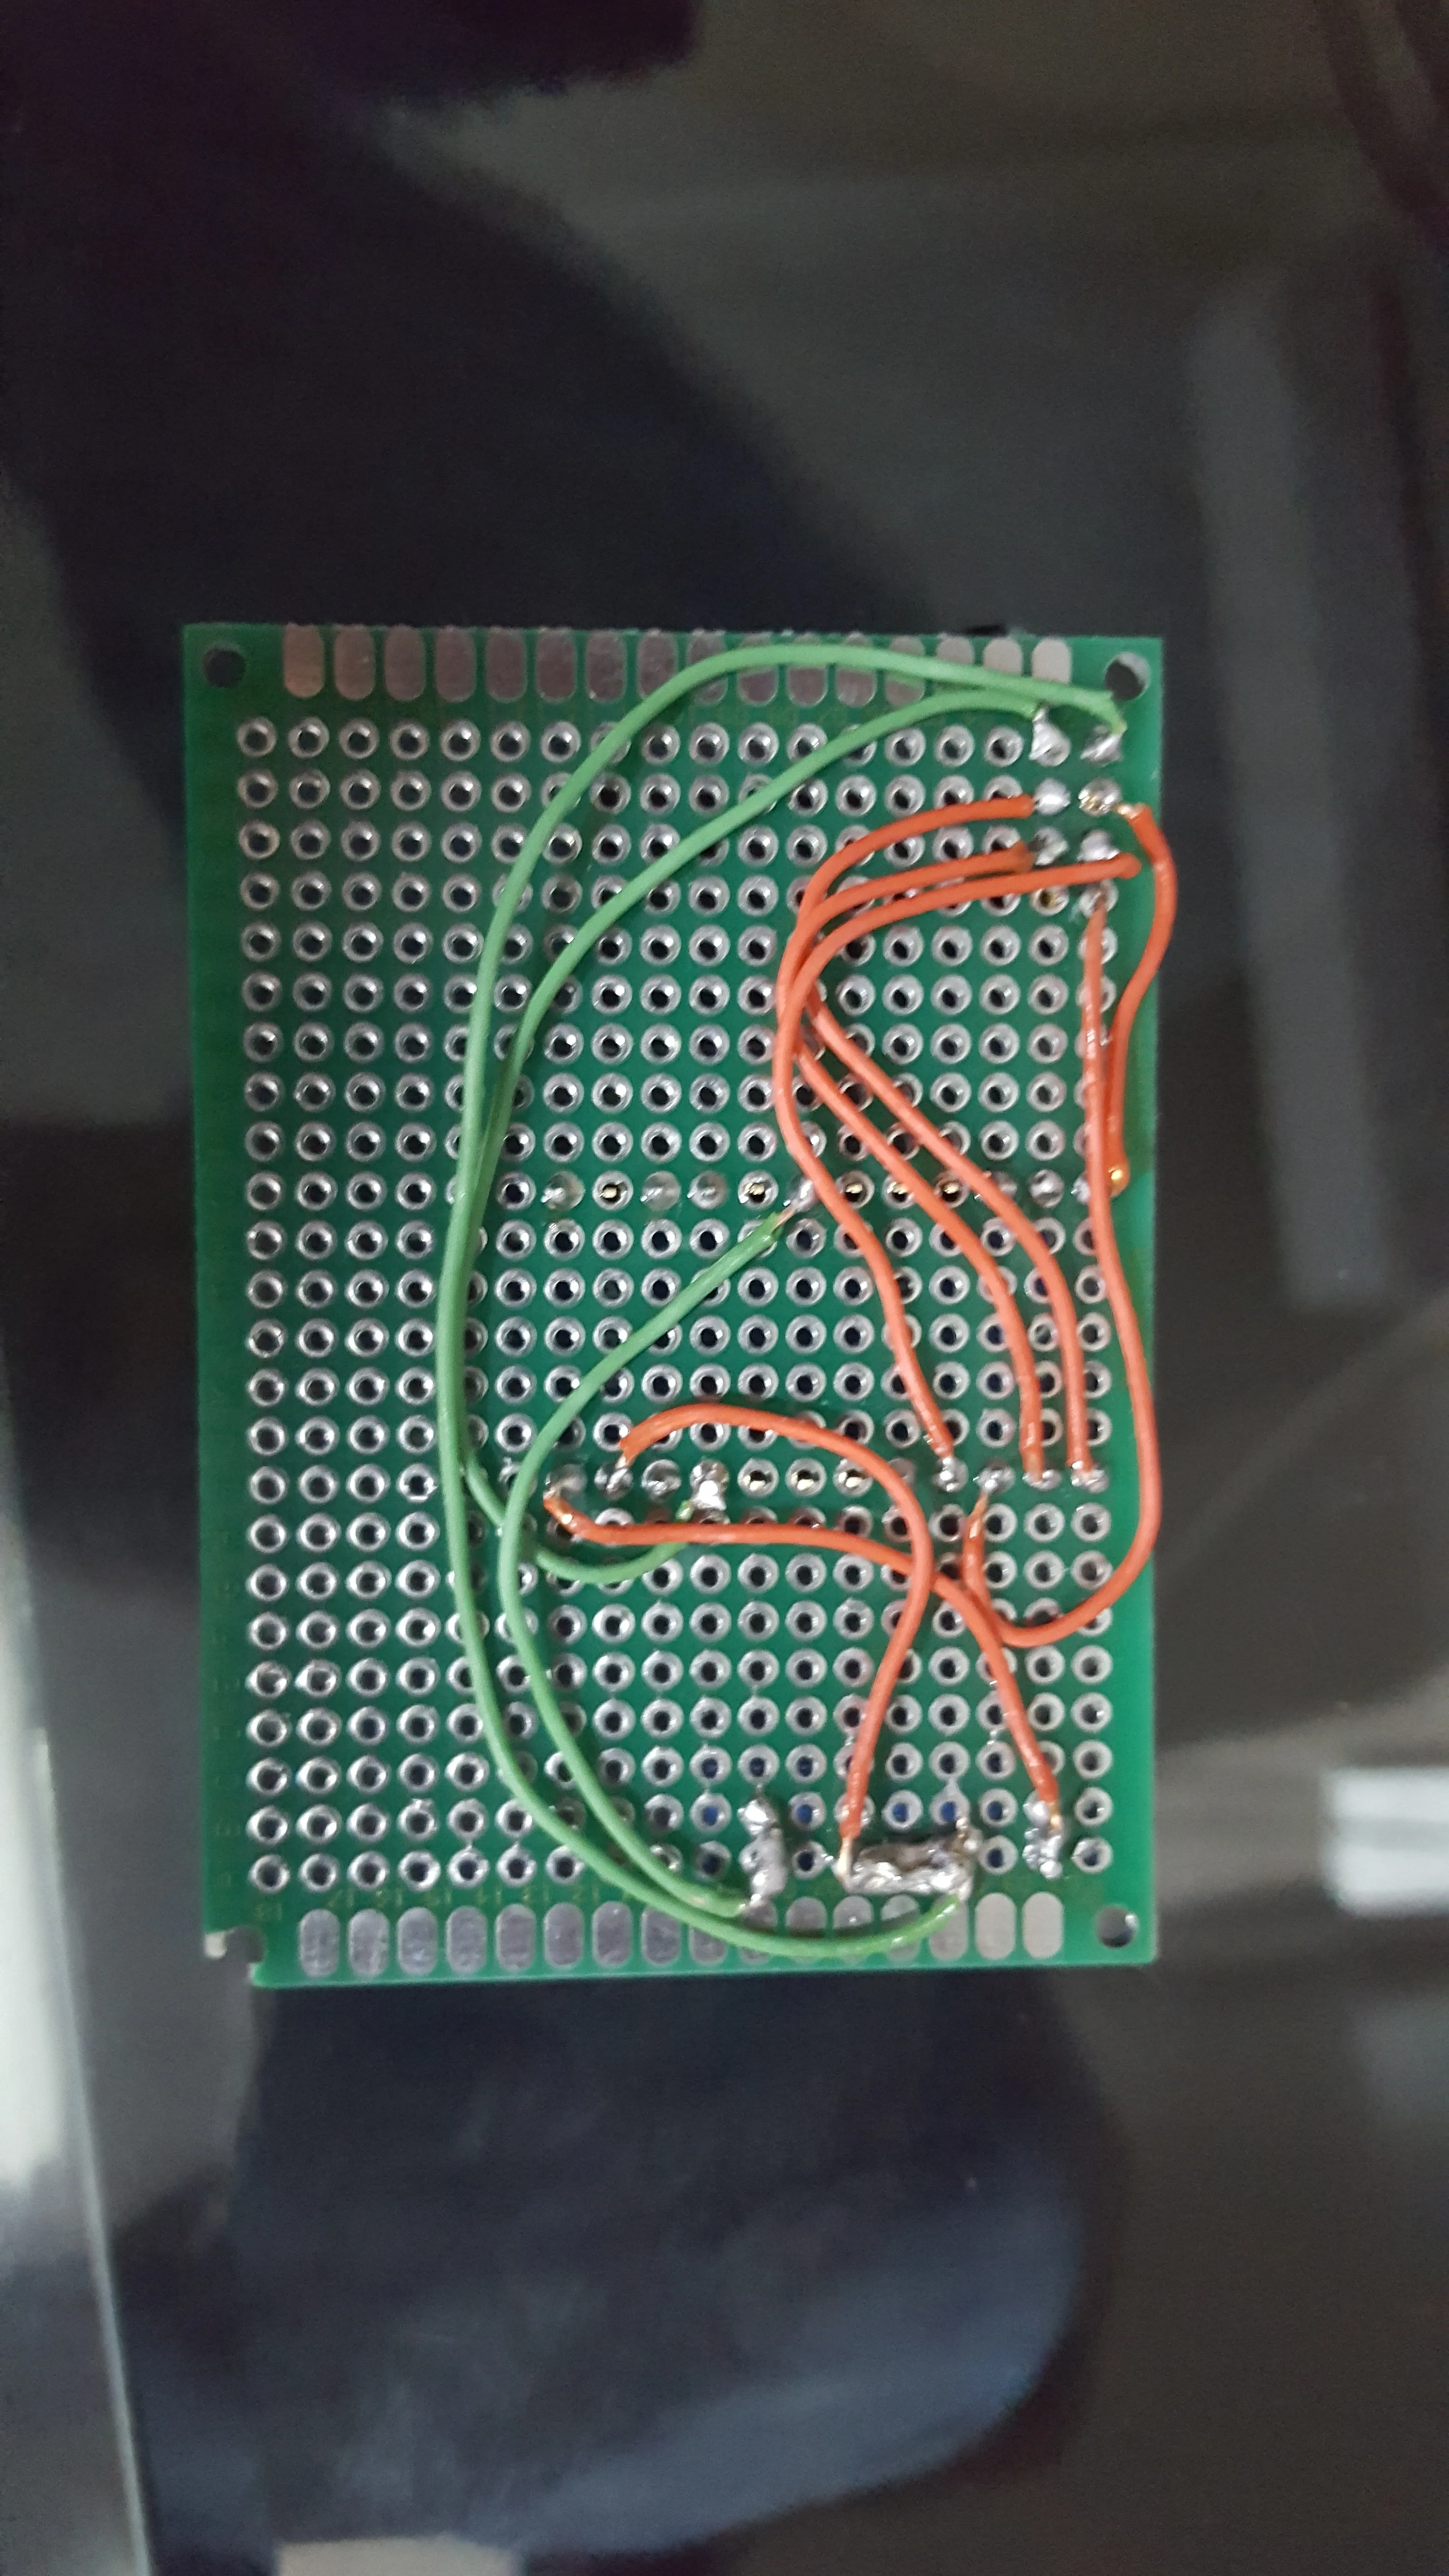


MySensors Energy Meter Pulse Sensor
/**
 * The MySensors Arduino library handles the wireless radio link and protocol
 * between your home built sensors/actuators and HA controller of choice.
 * The sensors forms a self healing radio network with optional repeaters. Each
 * repeater and gateway builds a routing tables in EEPROM which keeps track of the
 * network topology allowing messages to be routed to nodes.
 *
 * Created by Henrik Ekblad <henrik.ekblad@mysensors.org>
 * Copyright (C) 2013-2015 Sensnology AB
 * Full contributor list: https://github.com/mysensors/Arduino/graphs/contributors
 *
 * Documentation: http://www.mysensors.org
 * Support Forum: http://forum.mysensors.org
 *
 * This program is free software; you can redistribute it and/or
 * modify it under the terms of the GNU General Public License
 * version 2 as published by the Free Software Foundation.
 *
 *******************************
 *
 * REVISION HISTORY
 * Version 1.0 - Henrik EKblad
 *
 * DESCRIPTION
 * This sketch provides an example how to implement a distance sensor using HC-SR04
 * Use this sensor to measure KWH and Watt of your house meeter
 * You need to set the correct pulsefactor of your meeter (blinks per KWH).
 * The sensor starts by fetching current KWH value from gateway.
 * Reports both KWH and Watt back to gateway.
 *
 * Unfortunately millis() won't increment when the Arduino is in
 * sleepmode. So we cannot make this sensor sleep if we also want
 * to calculate/report watt-number.
 * http://www.mysensors.org/build/pulse_power
 */

// Enable debug prints
#define MY_DEBUG

// Enable and select radio type attached
#define MY_RADIO_NRF24
//#define MY_RADIO_RFM69

#define MY_NODE_ID 51

#include <SPI.h>
#include <MySensor.h>

#define DIGITAL_INPUT_SENSOR 3  // The digital input you attached your light sensor.  (Only 2 and 3 generates interrupt!)
#define PULSE_FACTOR 1000       // Nummber of blinks per KWH of your meeter
#define SLEEP_MODE false        // Watt-value can only be reported when sleep mode is false.
#define MAX_WATT 10000          // Max watt value to report. This filetrs outliers.
#define INTERRUPT DIGITAL_INPUT_SENSOR-2 // Usually the interrupt = pin -2 (on uno/nano anyway)
#define CHILD_ID 1              // Id of the sensor child

unsigned long SEND_FREQUENCY = 10000; // Minimum time between send (in milliseconds). We don't wnat to spam the gateway.
double ppwh = ((double)PULSE_FACTOR)/1000; // Pulses per watt hour
boolean pcReceived = true;
volatile unsigned long pulseCount = 0;
volatile unsigned long lastBlink = 0;
volatile unsigned long watt = 0;
unsigned long oldPulseCount = 0;
unsigned long oldWatt = 0;
double oldKwh;
unsigned long lastSend;
MyMessage wattMsg(CHILD_ID,V_WATT);
MyMessage kwhMsg(CHILD_ID,V_KWH);
MyMessage pcMsg(CHILD_ID,V_VAR1);


void setup()
{
  // Fetch last known pulse count value from gw
  request(CHILD_ID, V_VAR1);

  // Use the internal pullup to be able to hook up this sketch directly to an energy meter with S0 output
  // If no pullup is used, the reported usage will be too high because of the floating pin
  pinMode(DIGITAL_INPUT_SENSOR,INPUT_PULLUP);

  attachInterrupt(INTERRUPT, onPulse, RISING);
  lastSend=millis();
}

void presentation() {
  // Send the sketch version information to the gateway and Controller
  sendSketchInfo("Energy Meter", "1.0");

  // Register this device as power sensor
  present(CHILD_ID, S_POWER);
}

void loop()
{
  unsigned long now = millis();
  // Only send values at a maximum frequency or woken up from sleep
  bool sendTime = now - lastSend > SEND_FREQUENCY;
  if (pcReceived && (SLEEP_MODE || sendTime)) {
    // New watt value has been calculated
    if (!SLEEP_MODE && watt != oldWatt) {
      // Check that we dont get unresonable large watt value.
      // could hapen when long wraps or false interrupt triggered
      if (watt<((unsigned long)MAX_WATT)) {
        send(wattMsg.set(watt));  // Send watt value to gw
      }
      Serial.print("Watt:");
      Serial.println(watt);
      oldWatt = watt;
    }

    // Pulse cout has changed
    if (pulseCount != oldPulseCount) {
      send(pcMsg.set(pulseCount));  // Send pulse count value to gw
      double kwh = ((double)pulseCount/((double)PULSE_FACTOR));
      oldPulseCount = pulseCount;
      if (kwh != oldKwh) {
        send(kwhMsg.set(kwh, 4));  // Send kwh value to gw
        oldKwh = kwh;
      }
    }
    lastSend = now;
  } else if (sendTime && !pcReceived) {
    // No count received. Try requesting it again
    request(CHILD_ID, V_VAR1);
    lastSend=now;
  }

  if (SLEEP_MODE) {
    sleep(SEND_FREQUENCY);
  }
}

void receive(const MyMessage &message) {
  if (message.type==V_VAR1) {
    pulseCount = oldPulseCount = message.getLong();
    Serial.print("Received last pulse count from gw:");
    Serial.println(pulseCount);
    pcReceived = true;
  }
}

void onPulse()
{
  if (!SLEEP_MODE) {
    Serial.print("  pulse\n");
    unsigned long newBlink = micros();
    unsigned long interval = newBlink-lastBlink;
    if (interval<10000L) { // Sometimes we get interrupt on RISING
      return;
    }
    watt = (3600000000.0 /interval) / ppwh;
    lastBlink = newBlink;
  }
  pulseCount++;
}
6 - Rinnai Gas Heater (FTR557)
Highlights
- Turns heater off and on
- Transmits heater status back to Gateway even when manually controlled
- Powered internally by Rinnai heater (model 557FTR)
- 557FTR Service Manual: http://manualzz.com/doc/1237654/rinnai-rhfe-557ftr-service-manual
WARNING: This build works around high voltage, GAS(!!) and directly injects into your gas heater.
My Company and I accept no liability whatsoever for anything.
Rinnai Remote Thermostat product
Rinnai sells a remote thermostat which plugs into their heaters:
- https://rinnai.co.nz/Download/ProductFile?encid=3LlAHF7kVaWaug8yiGgvnIfbR4-NmaiQPNZVLYHILBk~
- https://www.rinnai-lms.com/resources/288/200000075-Remote%20Thermostat%20Installation%20Instructions.pdf
All those modules do is connect two Red and Blue wires together on the units main PCB using a relay. The module provides separate power system to isolate itself from the heater possibly so multiple heaters can be daisy-chained together. I’d suggest it is 24v so it can extended that chaining over large distances (one of the use cases is described as a church or hall).
First Build
My first build replicated the official Rinnai module as a MySensors node. Red and Blue were connected together via my Optocoupler in the build below. This uses far less energy than a relay and seeing as the Red/Blue connection has low voltage and current, this works fine.


However, there are two problems with this approach that didn’t satisfy my needs:
- There is no ‘actual’ status back to the MySensors Gateway – you would have to rely on the status of the ‘remote’ node (which may be fine to an extent)
- Connecting (Closing) Red and Blue Stops the Heater from working. Disconnecting (Opening) keeps the heater working. This appears opposite to initial thoughts, but given the header on the PCB is always Open anyway (if you don’t connect a remote thermostat), this makes perfect sense. The downside is that once the heater is under the control of the remote thermostat and Red and Blue are closed, you can’t control the heater manually via the button on the top control panel. This may be fine in that large hall environment, but it wouldn’t please my wife at home
Alternatively, I could have done an IR Blast to the heater for my sensor control, but as with the Heatpump build, I generally don’t do half measures.
Second Build
I wanted the node to provide status feedback to the network, remote control and the ability to control the heater locally. So I needed to understand more about the heater.
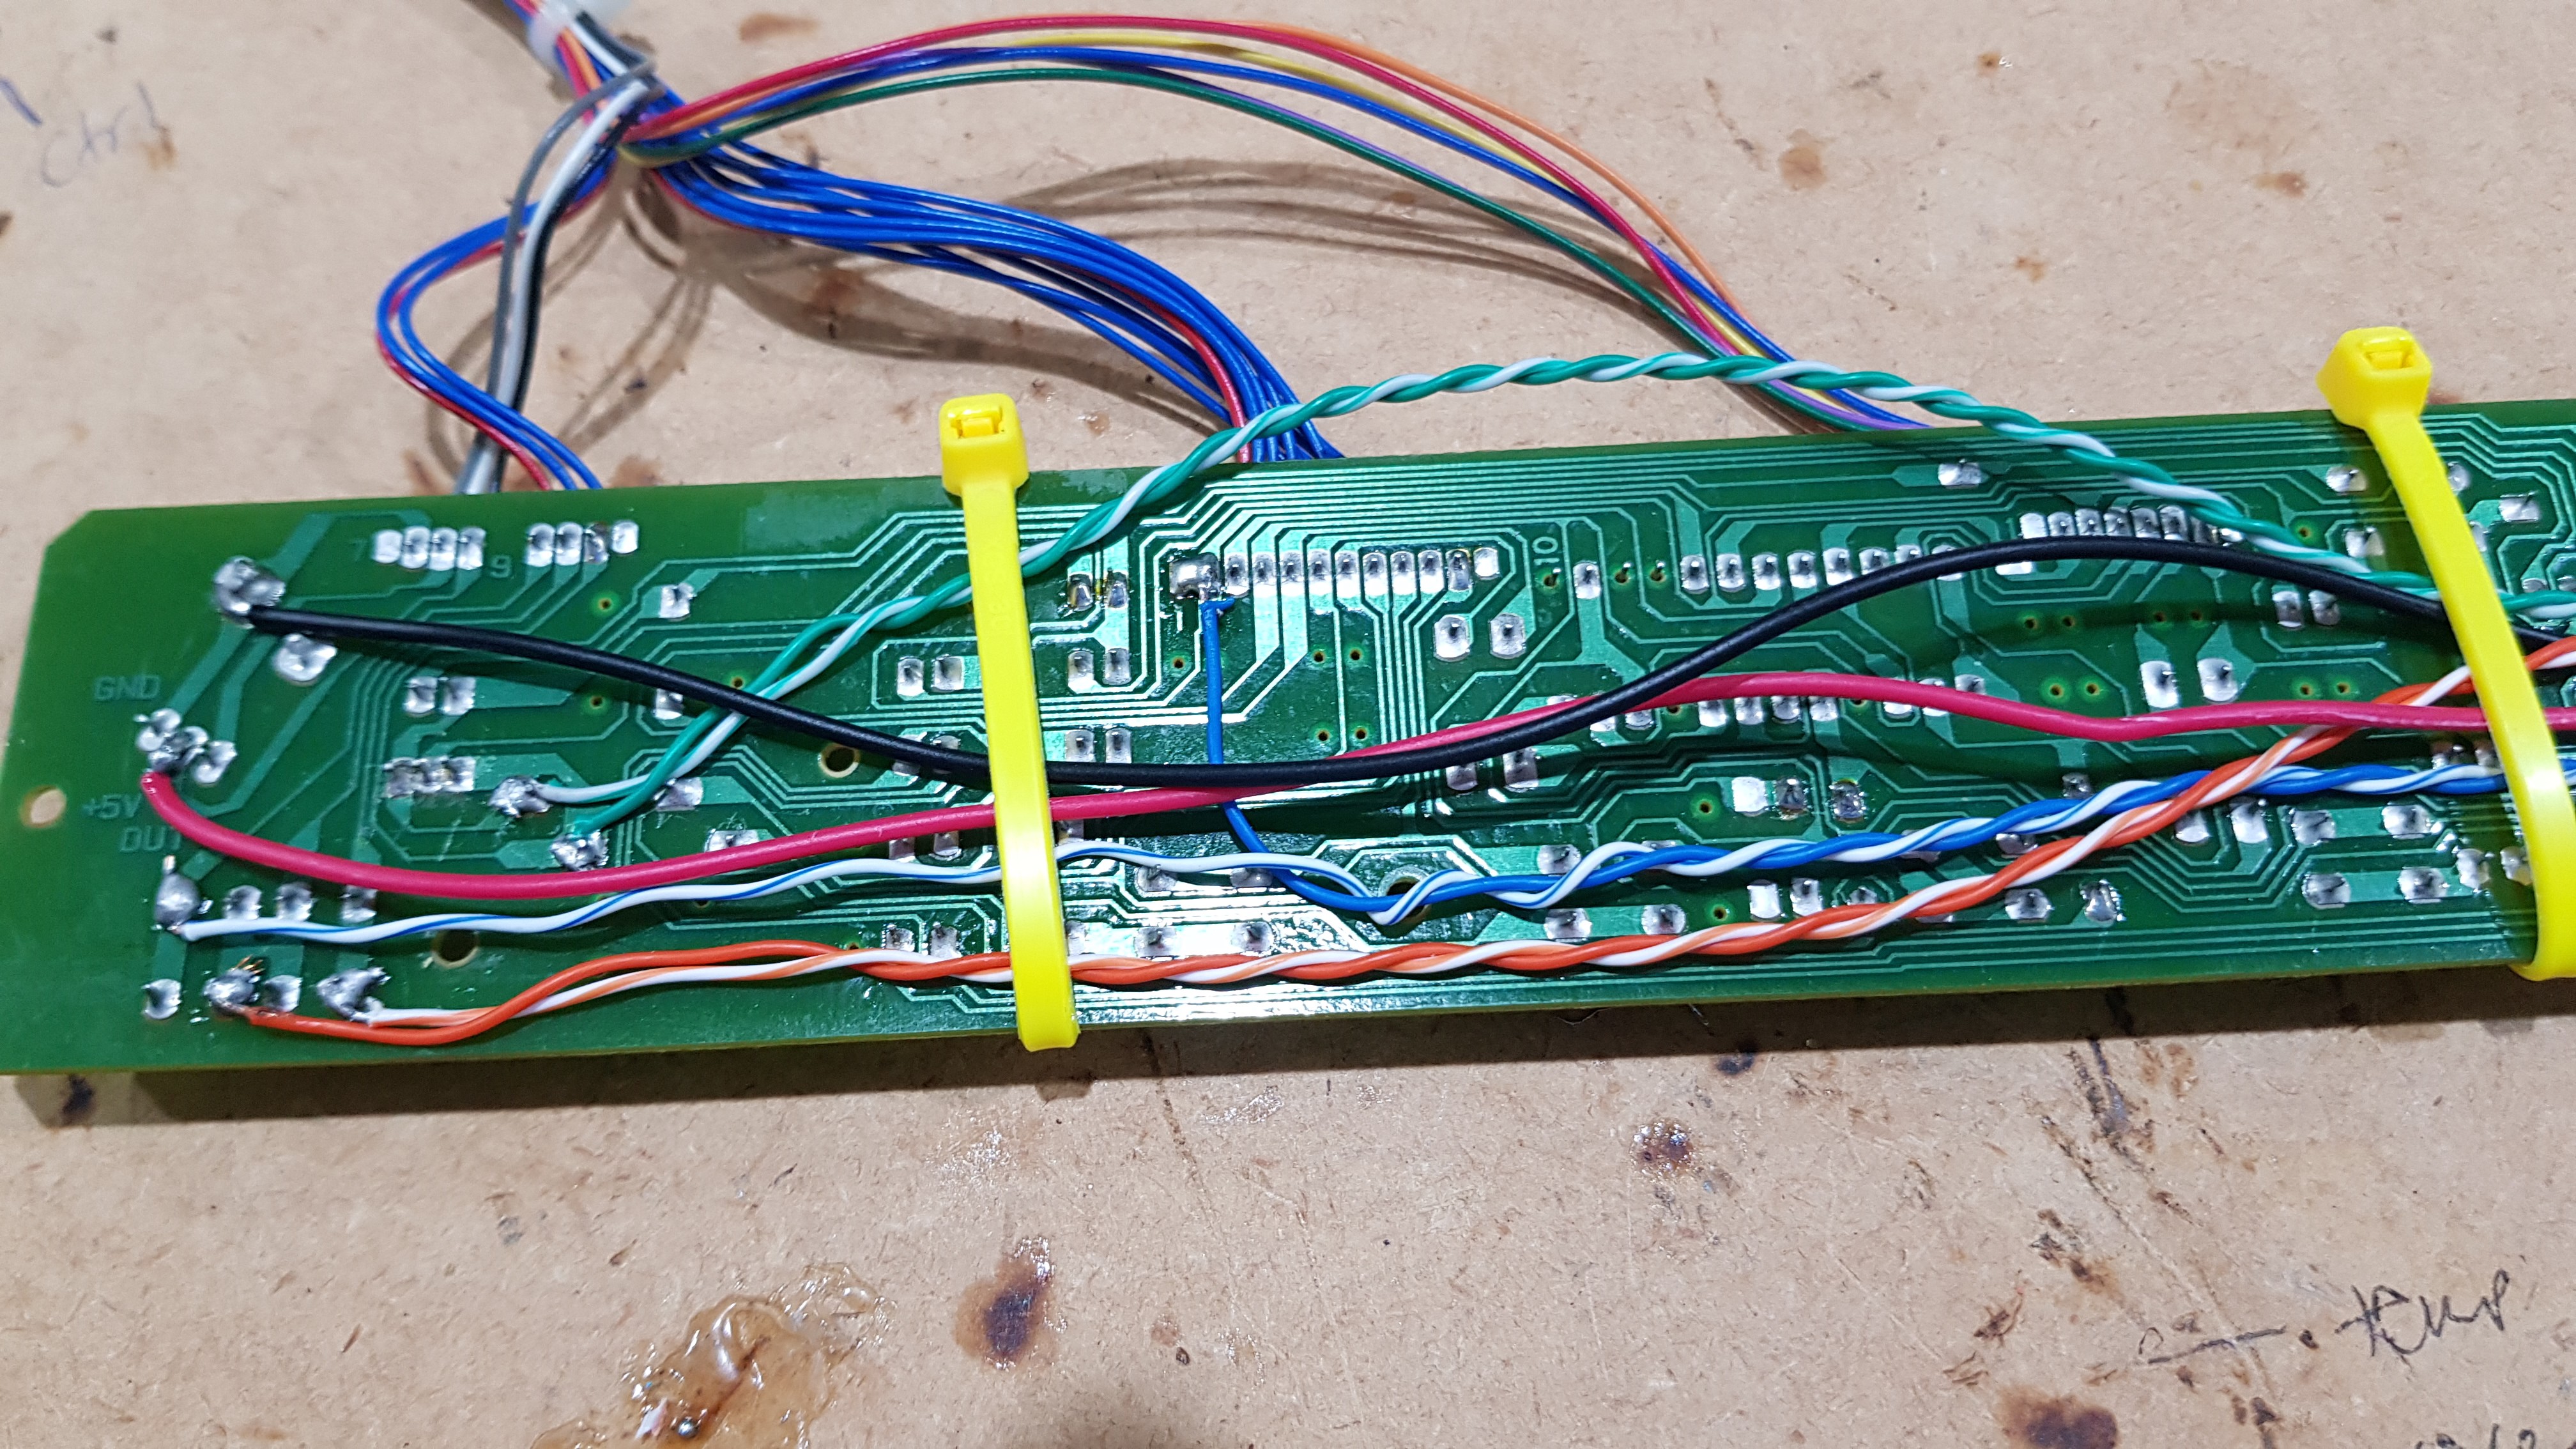
The 557FTR, and I imagine similar models, is initially quite complicated to hack:
- The Control Panel does not have an on-board CPU and most things on it don’t go to Ground. In fact a lot of the pieces connect to each other in seemingly an odd way. Given the complexity and number of items on the board and the limited number of wires going to it, it seems like some sort of XY/coordinate matrix arrangement has been used. There are also voltages at unusual places and these vary as different things happen. This makes it much harder to understand and much harder to hack as adding to the circuit will cause detrimental effects e.g. displays don’t work
- I also couldn’t find any easy-to-tap source of the overall heater status on the main PCB and when I initially placed a regular Optocoupler in parallel with the Control Panel’s status LED, it turned the main status LED off (again, detrimental effects).
- Even getting power to my new node was initially interesting. What seemed like a good source on the Control Panel wasn’t (due to the matrix!) and options on the main PCB were either very high voltage, AC or supplying motors with high current or critical safety features I wanted to stay well clear of e.g. gas control solenoids, spark circuits, overheat thermostats*
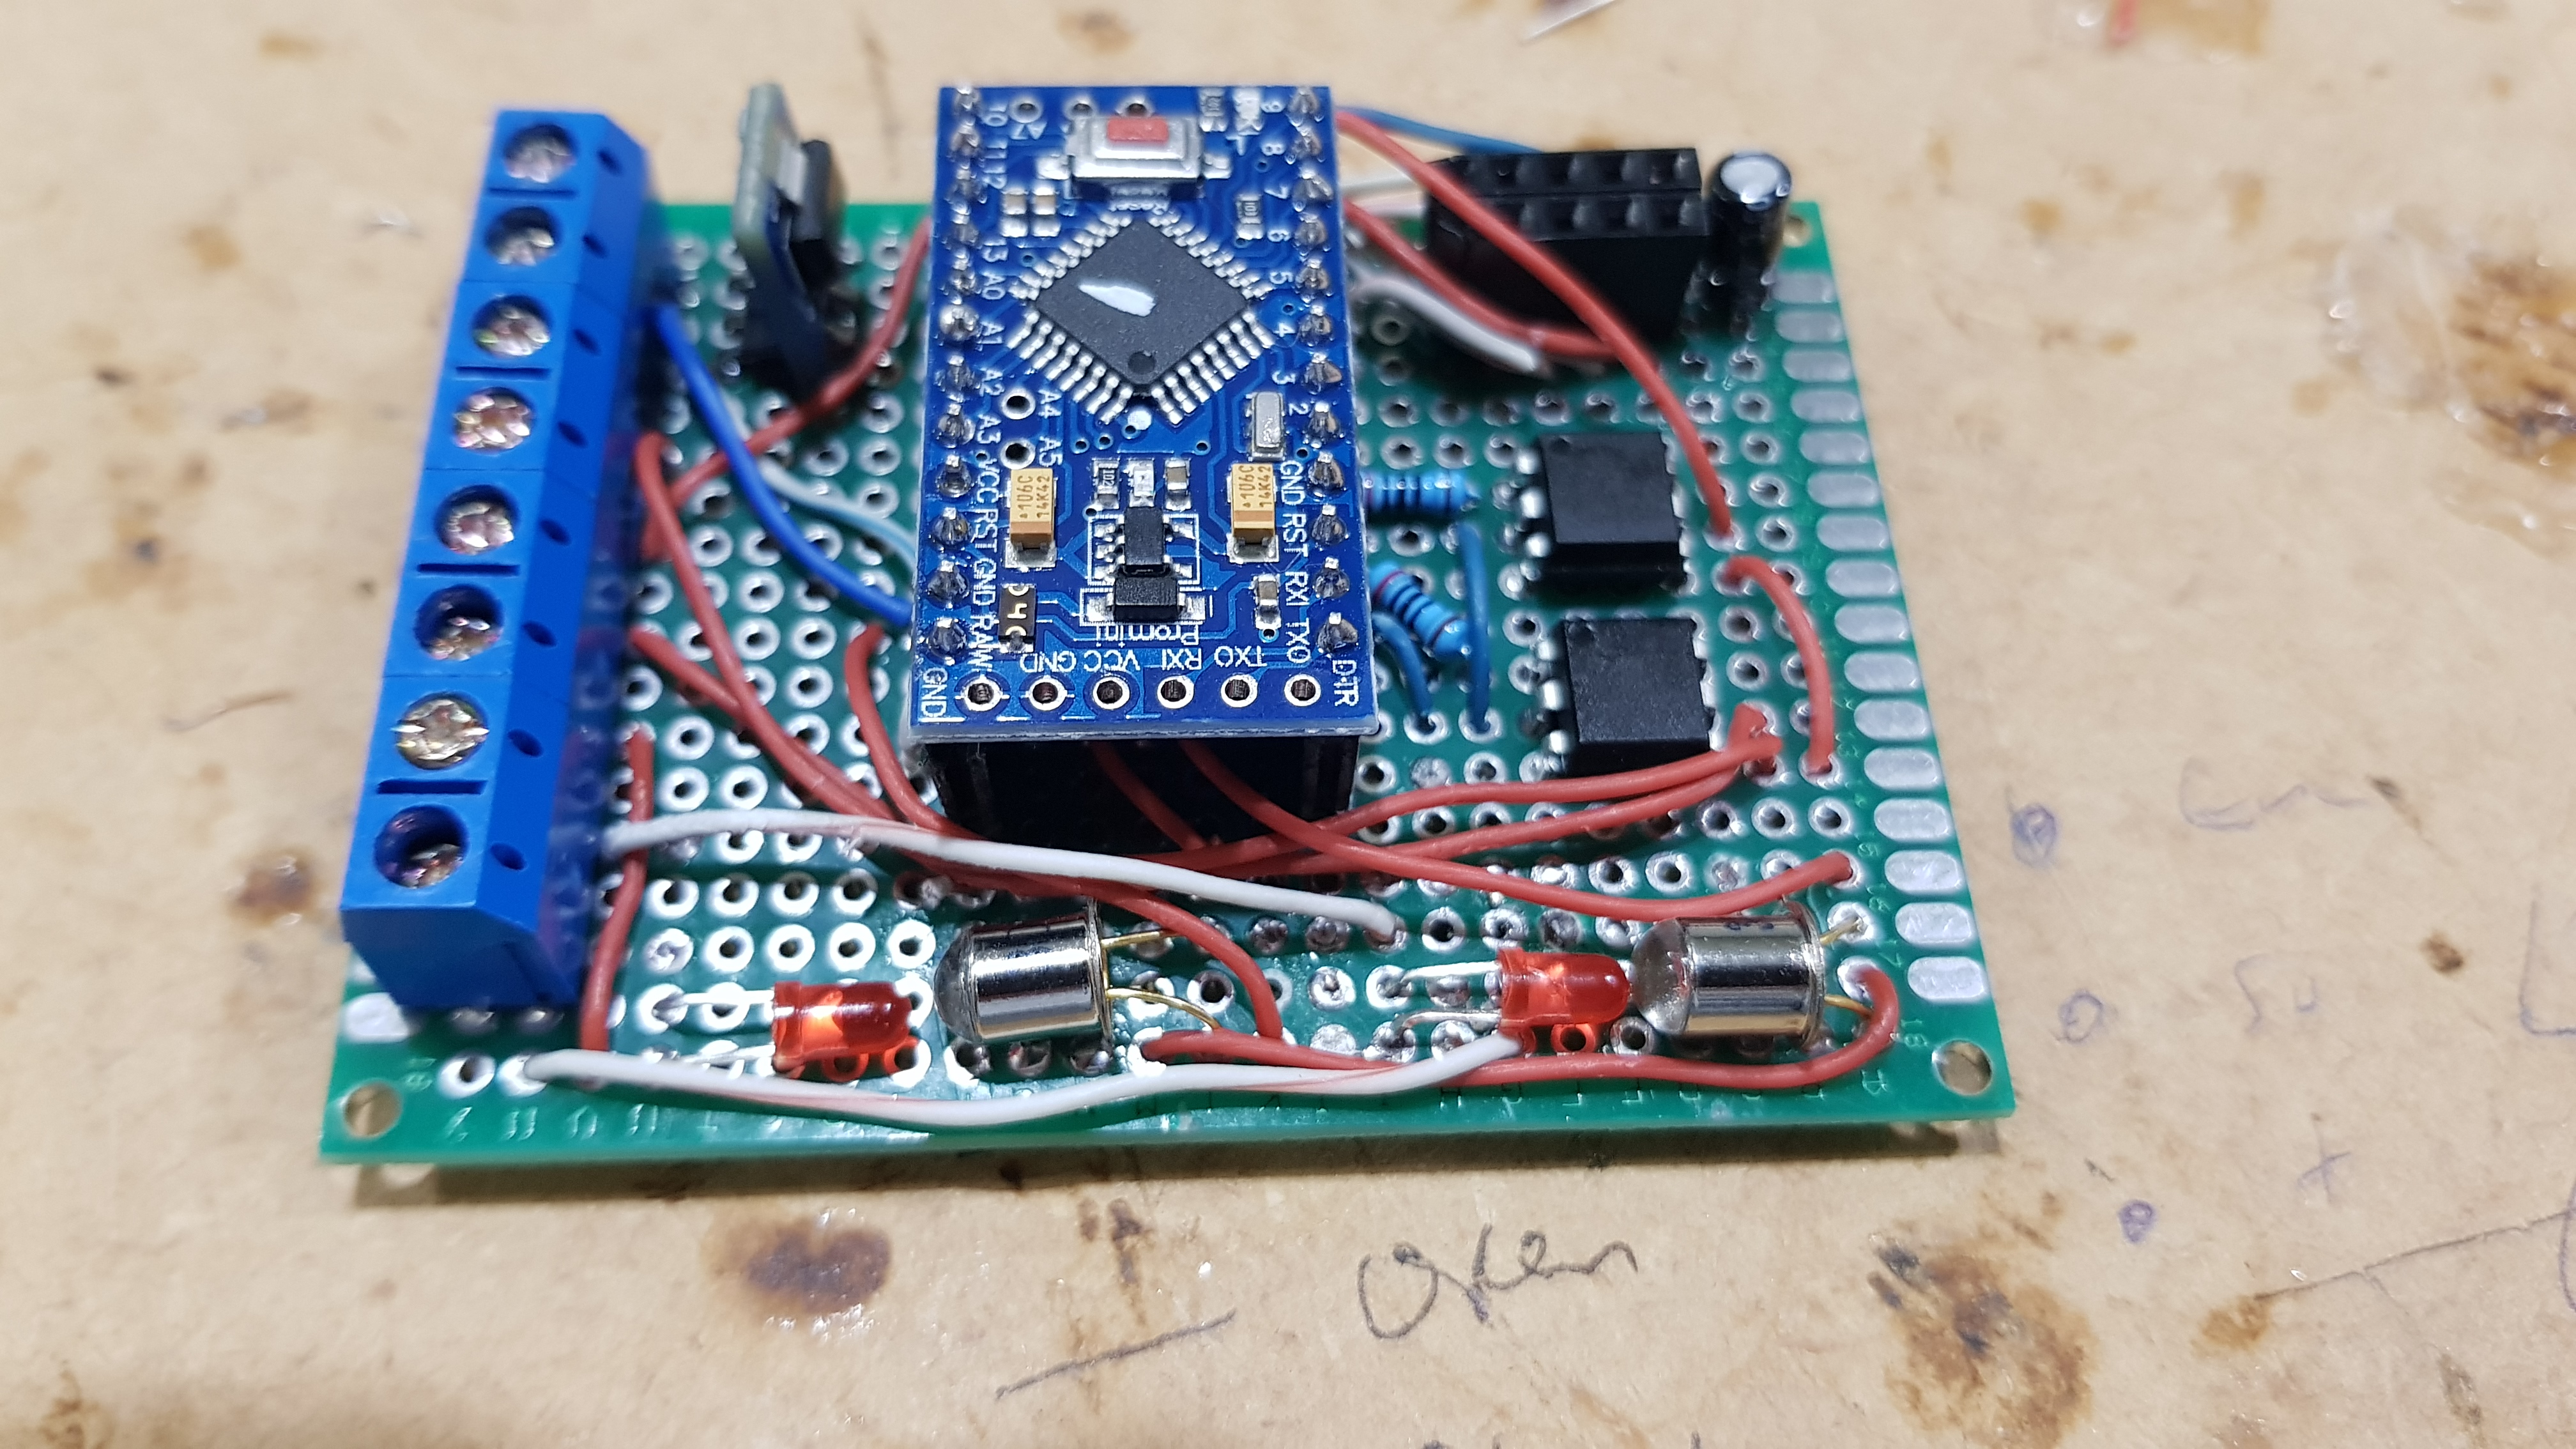
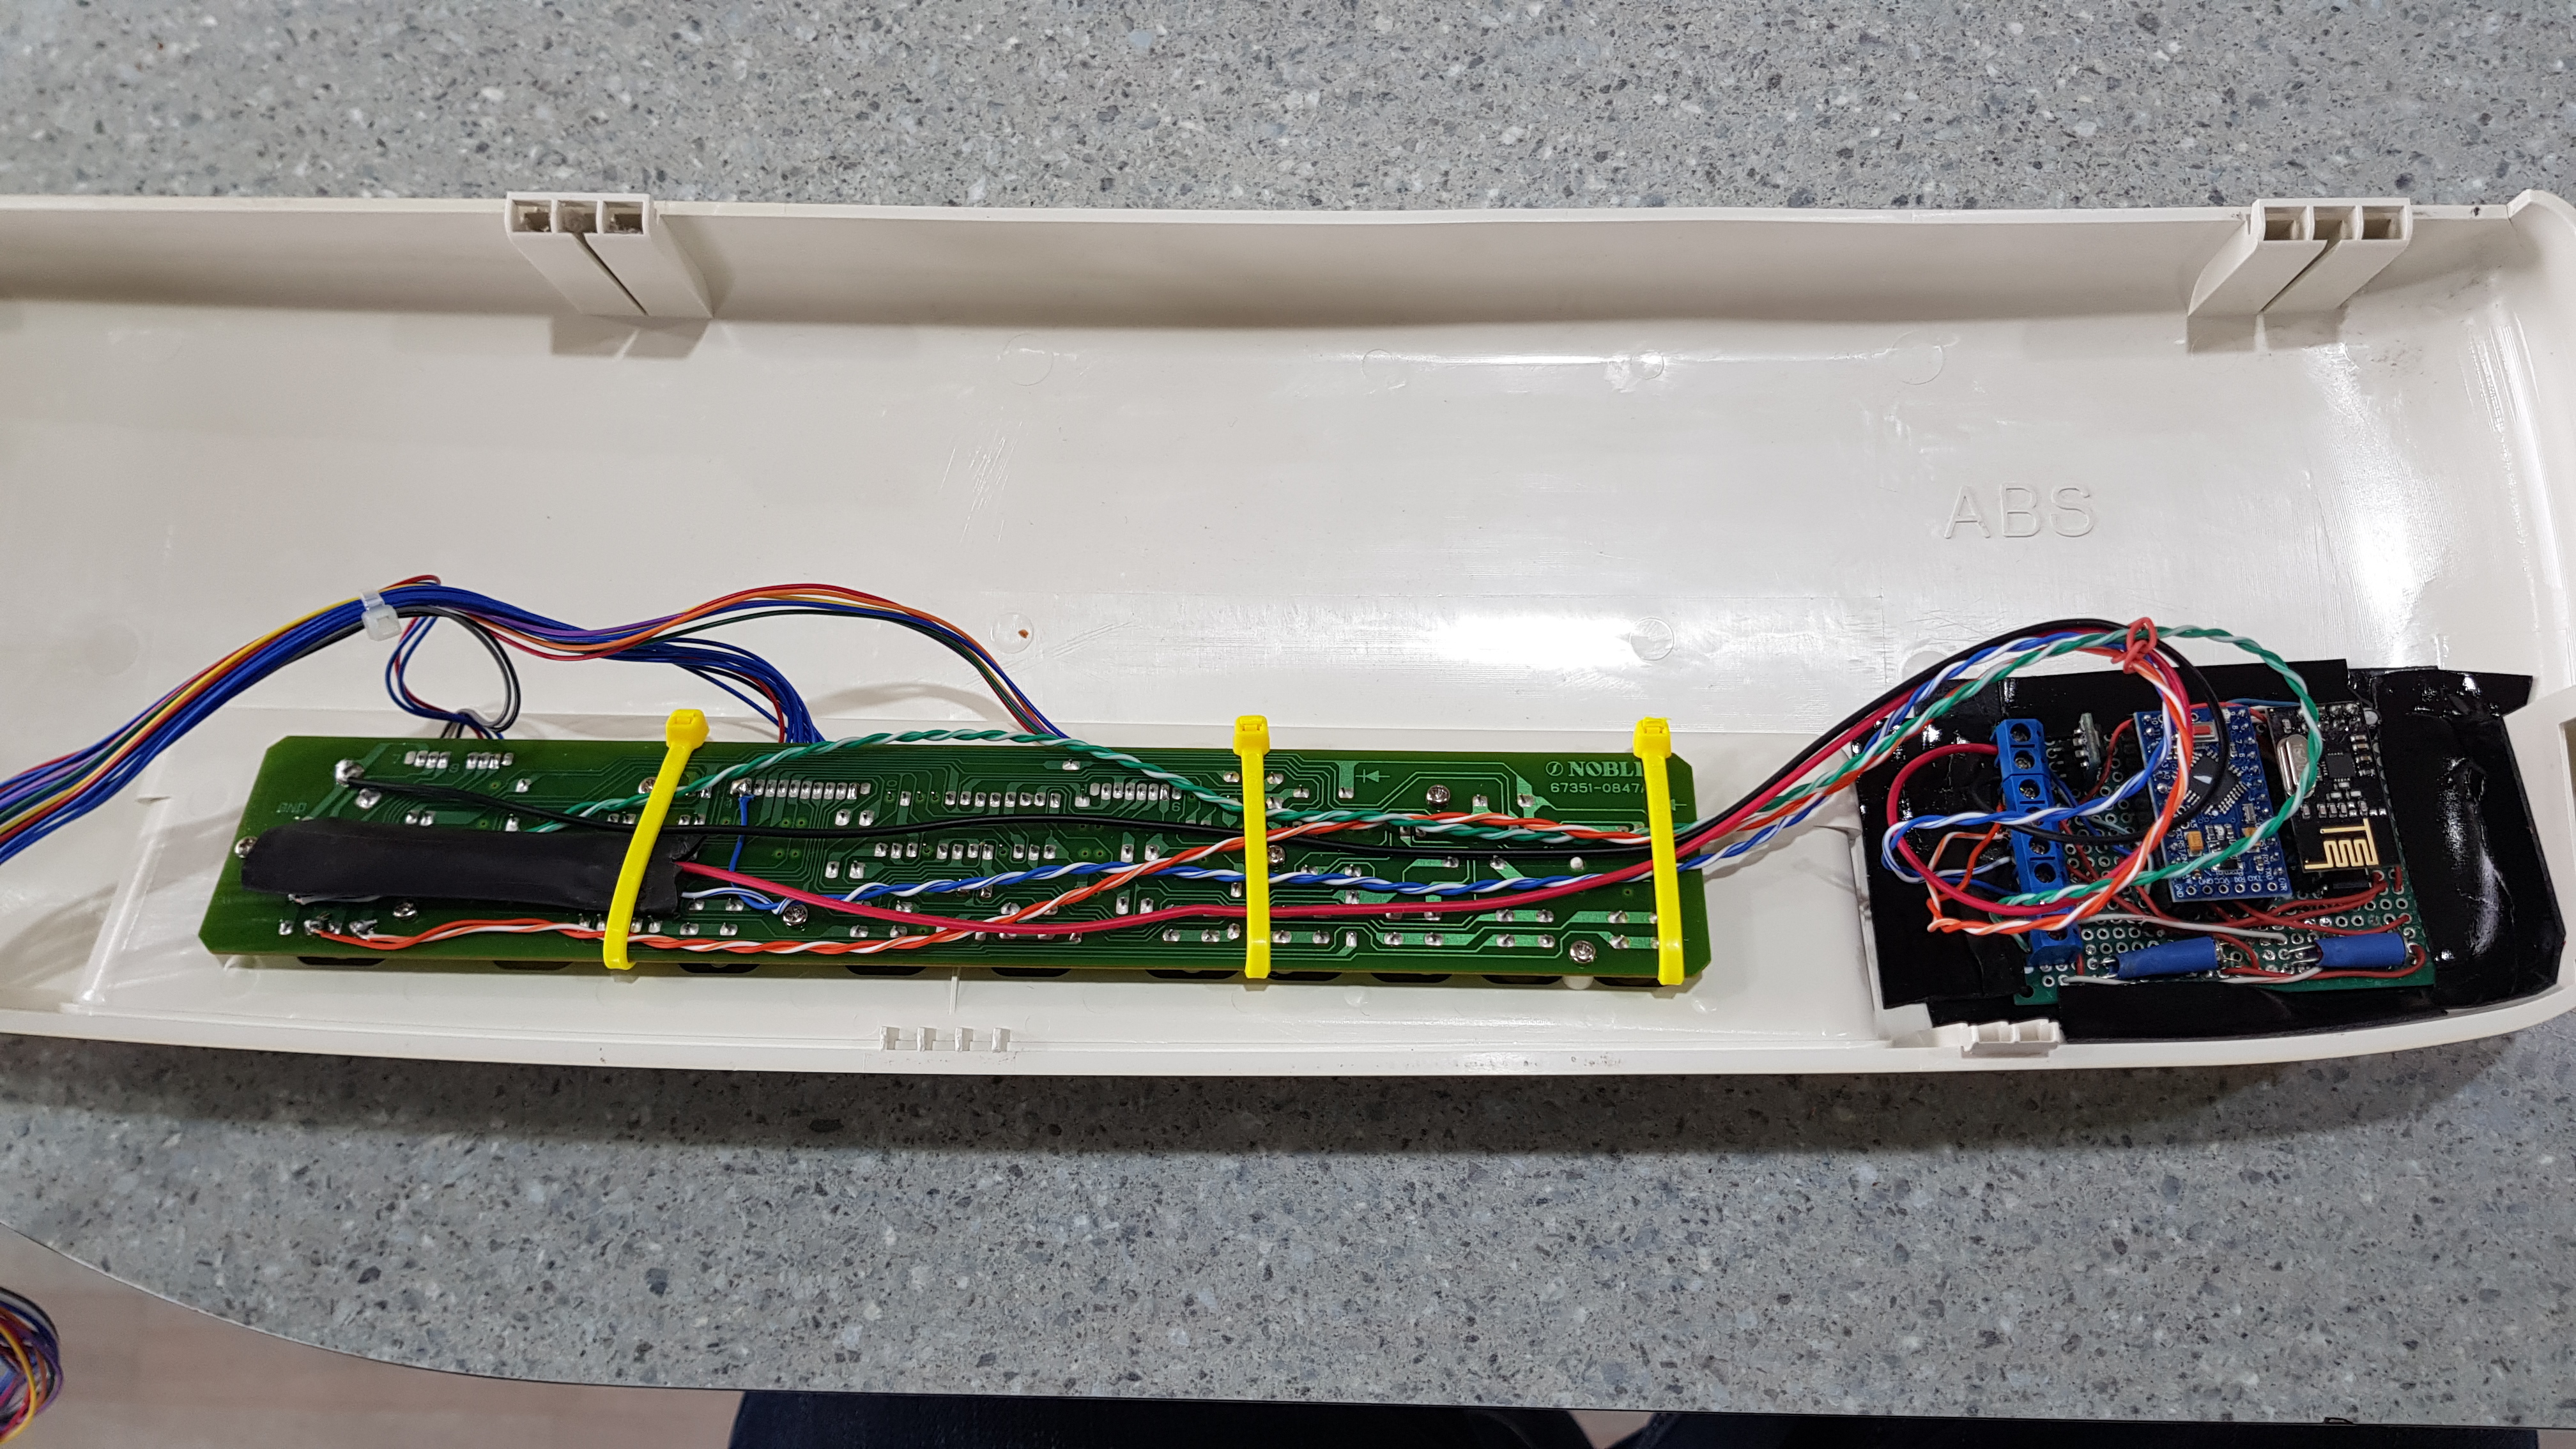
If you’re still keen, this is what I came up with:
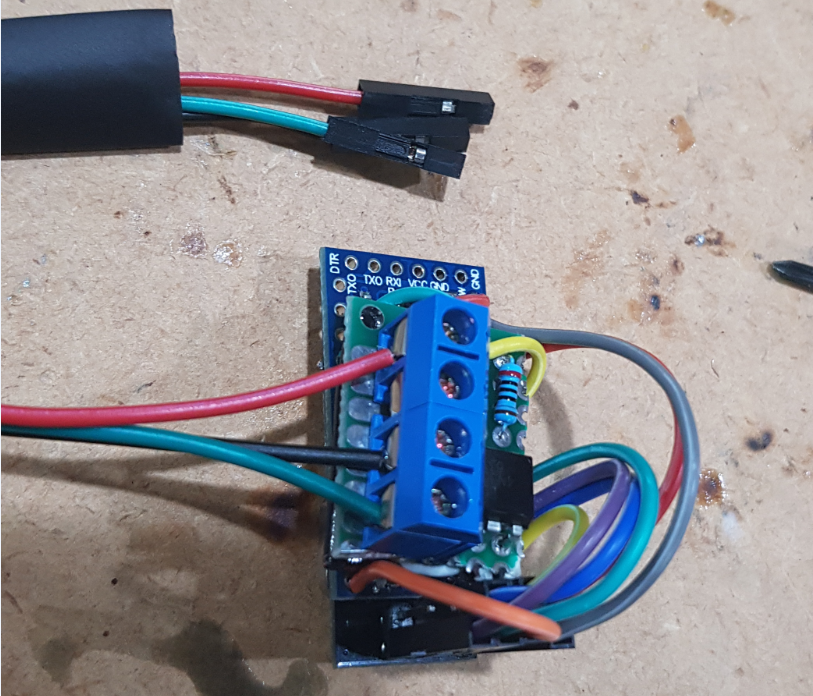
Powering the node
I am using a 3.3v Pro Mini in order to reduce the additional step down to 3.3 for the Radio. I’m also isolating the node from the heaters status and controls via optocouplers, so there’s no sharing of voltage or ground.
I initially used the 12v+ available elsewhere on the main PCB and at one stage even attempted to use a Buck Regulator instead of the AMS1117-3.3 stepdown I’m using now. For some reason the Buck never wanted to power the 3.3 arduino and radio – the voltage was there, but it never provided the 28mA require. It stayed around 3mA (I’ll probably come across this issue another day, but to date, I can only recall using them on the 5v arduinos).
Ultimately I tapped in the 5V that is available on the Control Panel which powers the IR Receiver.
Controlling the heater
While the Rinnai heater presents only a single Power button on the top of the Control Panel, it actually presses down on two surface mount micro switches. Both switches need to be pressed simultaneously for the unit to turn on, but pressing either one, turns it off. They share a common ground, but it wasn’t clear to me if the separate feeds was another safety feature.
Keeping with the approach of remaining isolated, I’ve simply bridged these two switches with the output of two EL4N35 optocouplers. I repeat, two. Don’t try and combine them. Simulating a physical button press then is as easy as activating both optocouplers at the same time from the Arduino for 200 milliseconds
Simulating two button presses for a short duration
    digitalWrite(SWITCH_PIN_1, 1);
    digitalWrite(SWITCH_PIN_2, 1);
    wait(200);
    digitalWrite(SWITCH_PIN_1, 0);
    digitalWrite(SWITCH_PIN_2, 0);
Obtaining the heater status
This was the hardest part of the build. Even just understanding how the Control Panel’s combined green & red LED worked was difficult. There was always voltage at both sides and the drop over an active LED showed 0.19v on my meter??? It wasn’t until I later figured out about the secret of the matrix that this made more sense.
These are the things that I tried and failed with along the way:
- Optocouplers across the Control Panel’s Red and Green LED wiring. This was originally wired up around the wrong as I had read just one side of the LED and made a high voltage assumption. Putting it around the correct way and the Control Panel’s status LED turned off (not a feature I would like to live with).
- At this point, I also had the Optocoupler connected to one of the Arduino’s digital pins in the same way I did with the Daikin heatpump’s status LED. But even with the Optocoupler seeming taking all the power from the LED, the output still didn’t trigger anything in the Arduino nor on my meter.
- Give up on the status LED and try elsewhere. Don’t try and tap into one of the Fan circuits! You’ll pop an optocoupler and not only let the smoke out of a resistor, but the flames too. My fault, I assumed the fan motor was running on a low voltage DC supply, but it was really a much higher AC supply just reading low on my meter. I really need to get a new meter!
- Consider using a non-intrusive current meter across an AC wire somewhere. However, the entire unit only seems to draw around 0.25A so this would probably be pretty hit, miss and prone to misreadings and interpretations. Plus the heater can still be considered on, but not actually flaming, heating and blowing (the things that would actually make a difference with current detection).
- Given that I could actually get a partially lit red 3mm LED in parallel to the Control Panel’s Red and Green, I came back to that and made my own Optocoupler using a 3DU5c Optotransistor. Unfortunately the dim lighting wasn’t enough to trigger the Optotransistor that I now had in place on the Aduino digital pin instead of the optocoupler. Other brightly lit Red LEDs worked fine. I tried other 3mm LED colors (most didn’t even light), an IR and a small, single 5050 RGB strip led. None had the light power to digitally trip the Optotransistor. Then the first penny dropped. Instead of digital to the Arduino, connect it to analog and read the output at a lower range. Voila!
Optotranistor to Arduino with a 3.3K ohm resistor to ground
Sampling above a reading of 0.3v and I could detect the dimly lit LED. However, it was pulsing. What?? Then the second penny dropped and with it, the reveal of the matrix’s secret!! In order for the coordinate based matrix to work, it would have to have a constant revolving coordinate cycle, or pulse, running through it. This is how a small amount of wires can control a large amount of LED outputs and input a large amount of switches.
While the status LEDs are digitally pulsing, the resulting blinking effect is too fast and not visible to the human eye. This is also how Pulse Width Modulation is used to reduced the brightness of LEDs. And this explains why the LEDs appeared to have 0.19v across them. They didn’t. They would have had more than this, but again only for a short amount of time. My cheap voltage meter doesn’t read this accurately and instead displays some lower, sampling level like average .
Catering for the pulse
Potentially I could have introduced a capacitor to smooth out the pulse. However, this would likely not charge enough for the time it would need to be off and it would likely leak current around the rest of the matrix and upset things. Instead, the issue needed to be solved in software.
End result. Sample 100 analog Optotransistor readings and if anyone of them is above 0.3v, consider the LED on. And do this only every two seconds, just to free up some cycles.
Sampling for heater status
void loop()
{
  if(millis() - statusTimer > 2000){
      statusTimer = millis();
      bool greenvalue = false;
      for(int x=0;x < 100;x++){             //Take 100 samples from the pulsing
        greenvalue = (volts(A2) > 0.3);     //Only one of these needs to be on
        if(greenvalue){                     //to consider the LED an
            break;
        }
      }

      if(greenvalue != oldGreenStatusLedValue){
          send(binGreenStatusLedmsg.set(greenvalue ? 1 : 0));
          oldGreenStatusLedValue = greenvalue;
          Serial.print("New Green value");
      }
  }
}
Now knowledgeable of this information, potentially the original optocoupler circuit could have worked if it was wired up the Analog input. And potentially not. It was only the 3mm red LED that visually worked in parallel and an orange one to some extent. Perhaps the LED inside the Optocoupler may not have worked either.
Completion
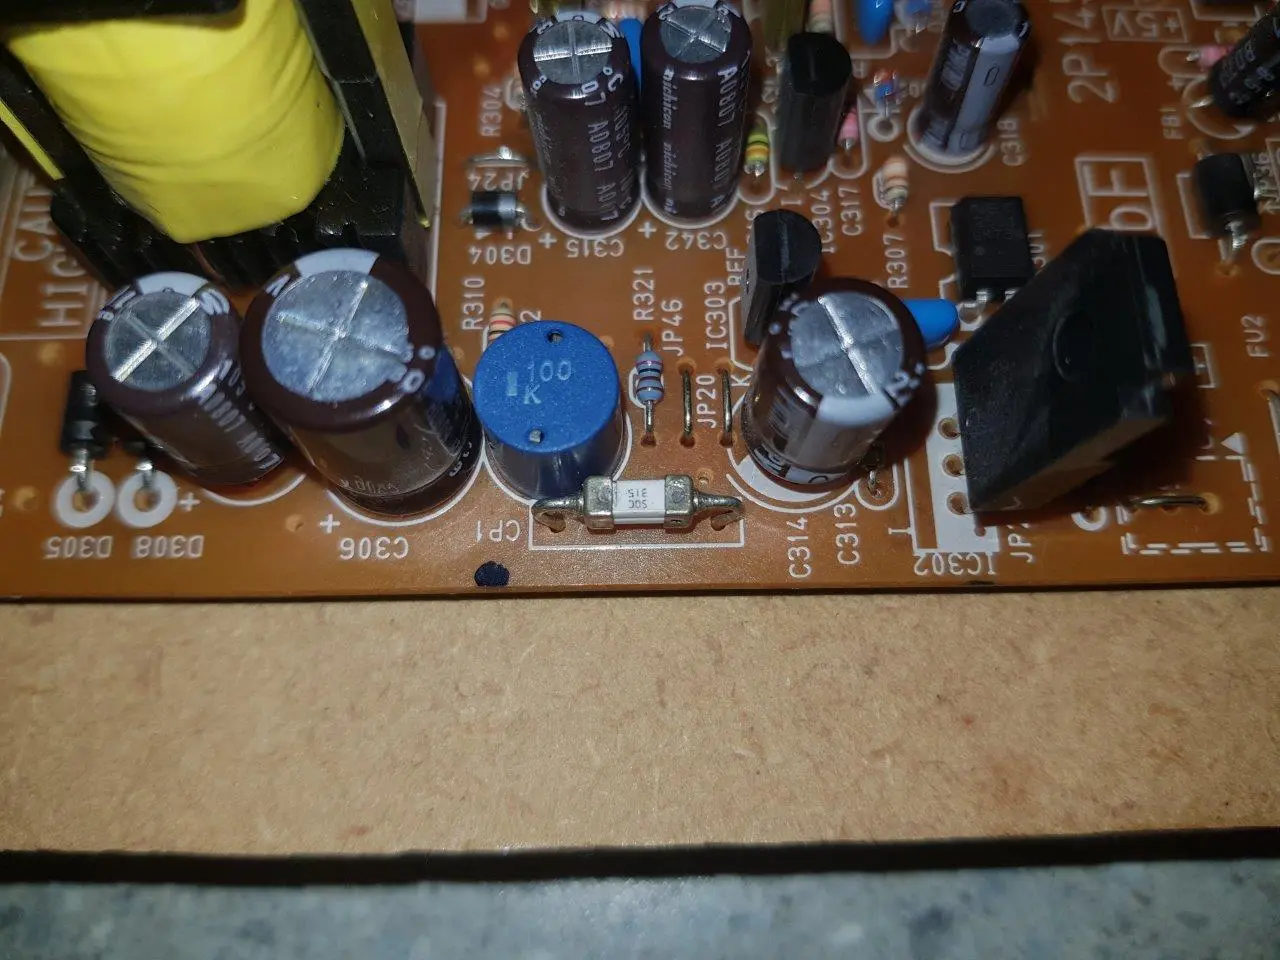
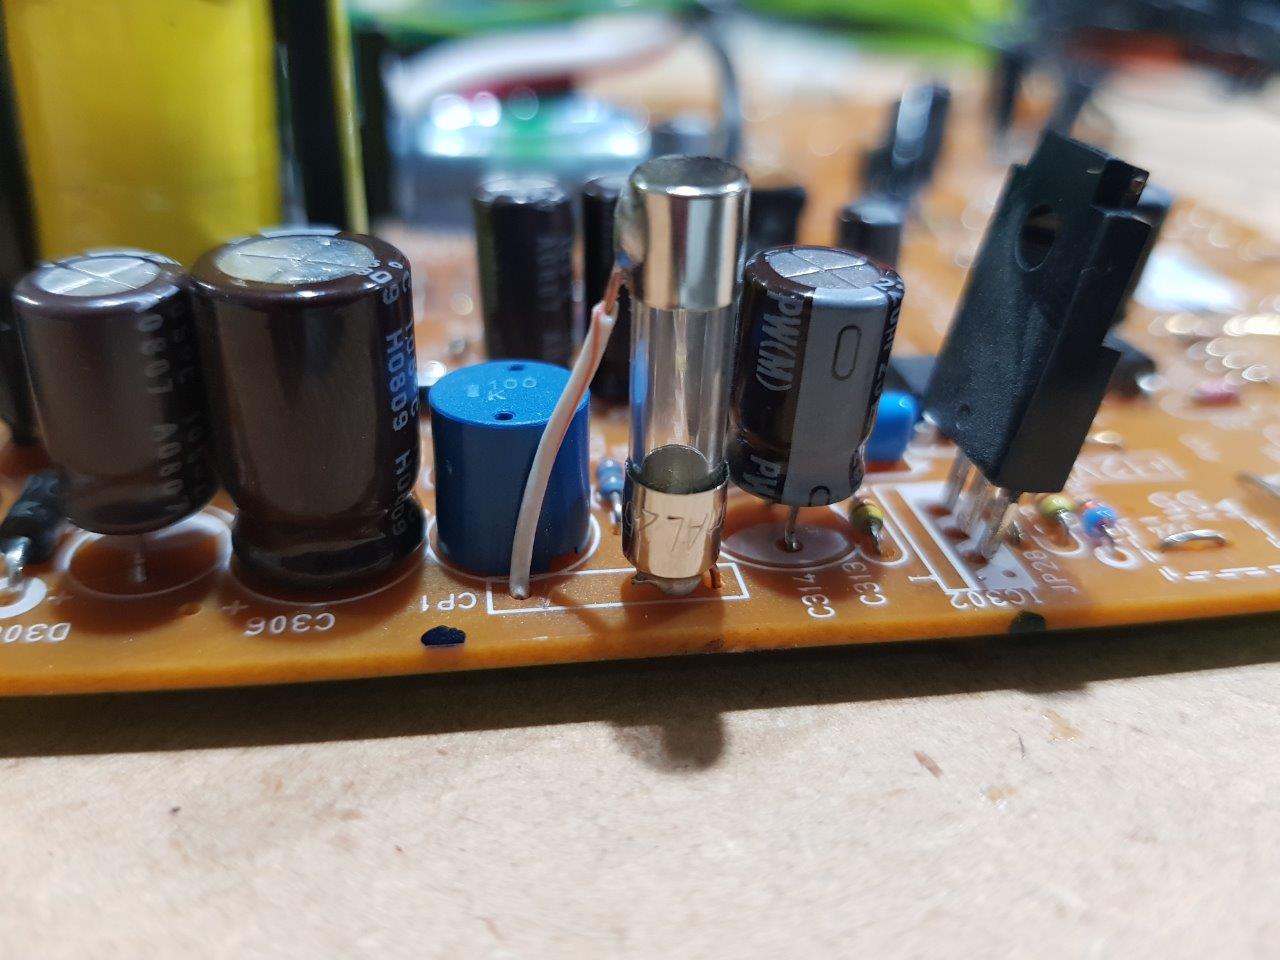
Putting it all back together and testing went easy enough. I put a fast blow 350mA fuse in the 5V+ supply line to the Arduino and mounted it at the very top of the heater under the plastic. If I had put it elsewhere in the metal heater, it’s likely a Farady Cage effect would have resulted.


Just One Problem
Unfortunately the build wasn’t entirely successful. When I now press the temperature Up on the heater, the Child Lock comes on and the temperature does not go up. Disconnecting the new build does not resolve this, so it must have been something I did earlier when probing for circuits etc. I’m reasonably confident the new components I have added have not directly done this nor negatively influenceed things, but you have been warned. The only way to get the temperature up now is via the IR remote. Luckily we rarely need to alter this.
OpenHAB Config
Switch Climate_Dining_Heater        "Diningroom Heater"             ["Switchable"]  {mqtt=">[mosquitto:mygateway1-in/61/1/0/0/2:command:*:default]"}
Number Climate_Dining_Heater_Green  "Diningroom Heater green [%d]"                  {mqtt="<[mosquitto:mygateway1-out/61/1/1/0/16:state:default]"}
Number Climate_Dining_Heater_Red    "Diningroom Heater red [%d]"                    {mqtt="<[mosquitto:mygateway1-out/61/2/1/0/16:state:default]"}
rule "Dining heater status changed" when
        Item Climate_Dining_Heater_Green changed or
        Item Climate_Dining_Heater_Red changed
then

        if(Climate_Dining_Heater_Green.state == 1 || Climate_Dining_Heater_Red.state == 1){
                logInfo("Climate Control", "Dining Heater updating to On. Green [{}], Red[{}]", Climate_Dining_Heater_Green.state, Climate_Dining_Heater_Red.state)
                Climate_Dining_Heater.postUpdate(ON)
        }else{
                logInfo("Climate Control", "Dining Heater updating to Off")
                Climate_Dining_Heater.postUpdate(OFF)
        }

end
TBD – automation logic something like turn on heater @ 7am if M-F and < 11 degrees outside
Sensor code
/**
* The MySensors Arduino library handles the wireless radio link and protocol
* between your home built sensors/actuators and HA controller of choice.
* The sensors forms a self healing radio network with optional repeaters. Each
* repeater and gateway builds a routing tables in EEPROM which keeps track of the
* network topology allowing messages to be routed to nodes.
*
* Created by Henrik Ekblad <henrik.ekblad@mysensors.org>
* Copyright (C) 2013-2015 Sensnology AB
* Full contributor list: https://github.com/mysensors/Arduino/graphs/contributors
*
* Documentation: http://www.mysensors.org
* Support Forum: http://forum.mysensors.org
*
* This program is free software; you can redistribute it and/or
* modify it under the terms of the GNU General Public License
* version 2 as published by the Free Software Foundation.
*
*******************************
*
*/

// Enable debug prints to serial monitor
#define MY_DEBUG

// Enable and select radio type attached
#define MY_RADIO_NRF24
//#define MY_RADIO_NRF5_ESB
//#define MY_RADIO_RFM69
//#define MY_RADIO_RFM95

// Enable repeater functionality for this node
#define MY_REPEATER_FEATURE


#define MY_NODE_ID 61

#include <MySensors.h>

#define SWITCH_PIN_1 2
#define SWITCH_PIN_2 4


#define GREEN_STATUS_LED_CHILD_ID 1
#define RED_STATUS_LED_CHILD_ID 2

bool oldGreenStatusLedValue=false;
bool oldRedStatusLedValue=false;

MyMessage binGreenStatusLedmsg(GREEN_STATUS_LED_CHILD_ID,V_TRIPPED);
MyMessage binRedStatusLedmsg(RED_STATUS_LED_CHILD_ID,V_TRIPPED);

unsigned long statusTimer;

void setup()
{
  // Then set relay pins in output mode
  pinMode(SWITCH_PIN_1, OUTPUT);
  pinMode(SWITCH_PIN_2, OUTPUT);

}


void presentation()
{
    // Send the sketch version information to the gateway and Controller
    sendSketchInfo("Dining Gas Heater", "1.0");

    present(1, S_BINARY, "Heater Switch");

    present(GREEN_STATUS_LED_CHILD_ID, S_BINARY, "Heater Green Status");
    present(RED_STATUS_LED_CHILD_ID, S_BINARY, "Heater Red Status");

}


void loop()
{
  if(millis() - statusTimer > 2000){
      statusTimer = millis();
      bool greenvalue = false;
      for(int x=0;x < 100;x++){             //Take 100 samples from the pulsing
        greenvalue = (volts(A2) > 0.3);     //Only one of these needs to be on
        if(greenvalue){                     //to consider the LED an
            break;
        }
      }

      if(greenvalue != oldGreenStatusLedValue){
          send(binGreenStatusLedmsg.set(greenvalue ? 1 : 0));
          oldGreenStatusLedValue = greenvalue;
          Serial.print("New Green value");
      }


      bool redvalue = false;
      for(int x=0;x < 100;x++){
        redvalue = (volts(A0) > 0.3);
        if(redvalue){
            break;
        }
      }

      if(redvalue != oldRedStatusLedValue){
          send(binRedStatusLedmsg.set(redvalue ? 1 : 0));
          oldRedStatusLedValue = redvalue;
          Serial.print("New Red value");
      }

  }

}


void receive(const MyMessage &message)
{
    // We only expect one type of message from controller. But we better check anyway.
    if (message.type==V_STATUS) {
        //Simulate button press for 200ms
        Serial.print("Incoming switch press");
        digitalWrite(SWITCH_PIN_1, 1);
        digitalWrite(SWITCH_PIN_2, 1);
        wait(200);
        digitalWrite(SWITCH_PIN_1, 0);
        digitalWrite(SWITCH_PIN_2, 0);
    }
}


float volts(int adPin)                       // Measures volts at adPin
{                                            // Returns floating point voltage
   return float(analogRead(adPin)) * 5.0 / 1024.0;
}
7 - Tropical Aquarium
Highlights
- MySensors actuator for Light Control.
- Light Off/On automation controlled by OpenHAB
- Aquarium Temperature sensor (DS18b20 Stainless Steel, Waterproof)
- Powered by 5v phone charger
- Alerts on High/Low temperatures


8 - TV Backlight
Highlights
- 5050 RGB LED strip
- 12V power supply
- 12V for the LED Strip
- LM2596 buck to drop the 12v down to 5v for the Arduino (because the node itself is left on all the time, I figured the buck is more efficient)
- RFP30N06LE Mosfets
I originally thought I wouldn’t be a fan of light behind the TV. This was due to a friends mum always placing an old lamp behind an old CRT. The eyes just never liked it.
However, I was blown away instantly by how much better it is watching a modern TV with a back light setup like this. The issue is, in a dark room when the TV screen normally switches between light and dark settings, your eyes have to constantly keep adjusting to change in light. Personally, I could feel this impact on my eyes. With the back light on, this ongoing eye adjustment ceases and the viewing experience is physically much more enjoyable. I highly recommend it!
The basics of the RGB wiring are described here https://learn.adafruit.com/rgb-led-strips/usage while the rest is MySensors radio work and power.

/**
 * The MySensors Arduino library handles the wireless radio link and protocol
 * between your home built sensors/actuators and HA controller of choice.
 * The sensors forms a self healing radio network with optional repeaters. Each
 * repeater and gateway builds a routing tables in EEPROM which keeps track of the
 * network topology allowing messages to be routed to nodes.
 *
 * Created by Henrik Ekblad <henrik.ekblad@mysensors.org>
 * Copyright (C) 2013-2015 Sensnology AB
 * Full contributor list: https://github.com/mysensors/Arduino/graphs/contributors
 *
 * Documentation: http://www.mysensors.org
 * Support Forum: http://forum.mysensors.org
 *
 * This program is free software; you can redistribute it and/or
 * modify it under the terms of the GNU General Public License
 * version 2 as published by the Free Software Foundation.
 *
 *******************************
 *
 * REVISION HISTORY
 * Version 1.0 - Created by vil1driver
 *
 * DESCRIPTION
 * RGB led strip controled with three dimmers + one On/Off for run/stop rgb color cycle :p
 *
 */

#define SN   "RGB TV Backlight"
#define SV   "v1"

// Enable debug prints to serial monitor
#define MY_DEBUG

// Enable and select radio type attached
#define MY_RADIO_NRF24
//#define MY_RADIO_RFM69

#define MY_NODE_ID 53

#include <SPI.h>
#include <MySensor.h>

// Arduino pin attached to MOSFET Gate pin
#define RED_PIN 3
#define GREEN_PIN 5
#define BLUE_PIN 6

// Define message name and type to send sensor info
MyMessage RedStatus(RED_PIN, V_DIMMER);
MyMessage GreenStatus(GREEN_PIN, V_DIMMER);
MyMessage BlueStatus(BLUE_PIN, V_DIMMER);
MyMessage Status(1, V_DIMMER);
MyMessage rgbShowState(0, V_LIGHT);

// Serial.print translate sensor id to sensor name
char color[][6] = {"","","","RED","","GREEN","BLUE"};

// Vars for rgbShow function
int redval = 0;
int greenval = 0;
int blueval = 0;
long time=0;
int isShow;

void setup()
{
  // Define pin mode (pin number, type)
  pinMode(RED_PIN, OUTPUT);
  pinMode(GREEN_PIN, OUTPUT);
  pinMode(BLUE_PIN, OUTPUT);

  // Correct saved RGB value for first start
  saveState(RED_PIN, constrain((int8_t)loadState(RED_PIN), 0, 100));
  saveState(GREEN_PIN, constrain((int8_t)loadState(GREEN_PIN), 0, 100));
  saveState(BLUE_PIN, constrain((int8_t)loadState(BLUE_PIN), 0, 100));

  // Get value from eeprom and write to output
  analogWrite(RED_PIN, 255 * loadState(RED_PIN) / 100);
  analogWrite(GREEN_PIN, 255 * loadState(GREEN_PIN) / 100);
  analogWrite(BLUE_PIN, 255 * loadState(BLUE_PIN) / 100);

  // Write some debug info
  Serial.print("Load from eeprom RED: ");
  Serial.print(loadState(RED_PIN));
  Serial.println("%");
  Serial.print("Load from eeprom GREEN: ");
  Serial.print(loadState(GREEN_PIN));
  Serial.println("%");
  Serial.print("Load from eeprom BLUE: ");
  Serial.print(loadState(BLUE_PIN));
  Serial.println("%");

  // Send RGB value to controler (request ack back: true/false)
  Serial.println("Send eeprom value to controler");
  send( RedStatus.set(loadState(RED_PIN)), false );
  send( GreenStatus.set(loadState(GREEN_PIN)), false );
  send( BlueStatus.set(loadState(BLUE_PIN)), false );

  // Correct RGB show state for first start and load it (set to 'On' at first start)
  saveState(0, constrain((int8_t)loadState(0), 0, 1));
  isShow=loadState(0);

  // Send RGB show state to controler (request ack back: true/false)
  send( rgbShowState.set(isShow), false);

  if (isShow==1){Serial.println("RGB show running..."); }
  Serial.println("Ready to receive messages...");
}

void presentation()  {
  // Present sketch (name, version)
  sendSketchInfo(SN, SV);

  // Register sensors (id, type, description, ack back)
  present(RED_PIN, S_DIMMER, "present RED light", false);
  present(GREEN_PIN, S_DIMMER, "present GREEN light", false);
  present(BLUE_PIN, S_DIMMER, "present BLUE light", false);
  present(0, S_LIGHT, "present Show button", false);
}

void loop()
{
  // Run RGB show if is set
  if (isShow==1)
  {
    	rgbShow();
  	analogWrite(RED_PIN, redval);
  	analogWrite(GREEN_PIN, greenval);
  	analogWrite(BLUE_PIN, blueval);
   }
}


void receive(const MyMessage &message)
{
  if (message.isAck())
  {
   	Serial.println("Got ack from gateway");
  }
  if (message.type == V_LIGHT)
  {
  	// Incoming on/off command sent from controller ("1" or "0")
  	int lightState = message.getString()[0] == '1';

  	// if receive RGB Show On commands, start the show
  	if (message.sensor==0 && lightState==1){ rgbShowOn();	}
        // if receive RGB Show Off commands, stop the show
  	else if (message.sensor==0 && lightState==0){	rgbShowOff();	}

  	// if receive RGB switch On command
  	else if (lightState==1)
  	{
  		// Write some debug info
          	Serial.print("Incoming change for ");
          	Serial.print(color[message.sensor]);
          	Serial.println(": On");
          	Serial.print("Load from eeprom: ");

  		if ( loadState(message.sensor) == 0)
  		{
  			// Pick up last saved dimmer level from the eeprom
            		analogWrite(message.sensor, 255 * loadState(10*message.sensor) / 100);
            		// Save loaded value to current
            		saveState(message.sensor, loadState(10*message.sensor));
            		Serial.print(loadState(10*message.sensor));
            		Serial.println("%");
            		// Send value to controler
            		Serial.println("Send value to controler");
            		send(Status.setSensor(message.sensor).set(loadState(10*message.sensor)),false);
          	}
          	else
          	{
            		// Pick up last saved dimmer level from the eeprom
            		analogWrite(message.sensor, 255 * loadState(message.sensor) / 100);
            		Serial.print(loadState(message.sensor));
            		Serial.println("%");
            		// Send value to controler
            		Serial.println("Send value to controler");
            		send(Status.setSensor(message.sensor).set(loadState(message.sensor)),false);
          	}
          	// Stop the show if it's running
          	if (isShow==1){ rgbShowStop(message.sensor); }
        }
  	// if recieve switch Off command
  	else if (lightState==0)
  	{
  		// Write output to 0 (Off)
          	analogWrite(message.sensor, 0);
          	// Save old value to eeprom if it'was not zero
          	if ( loadState(message.sensor) != 0 )
          	{
            		saveState(10*message.sensor, constrain((int8_t)loadState(message.sensor), 0, 100));
          	}
          	// Save new value to eeprom
          	saveState(message.sensor, 0);
          	// Write some debug info
  		Serial.print("Incoming change for ");
  		Serial.print(color[message.sensor]);
  		Serial.print(": ");
  		Serial.println("Off");
          	Serial.print("Store old value: ");
          	Serial.print(loadState(10*message.sensor));
          	Serial.println("%");
          	// Send value to controler
          	Serial.println("Send value to controler");
          	send(Status.setSensor(message.sensor).set(loadState(message.sensor)),false);
  		// Stop the show if it's running
  		if (isShow==1){ rgbShowStop(message.sensor); }
  	}
  }
  else if (message.type == V_DIMMER)
  {
    	uint8_t incomingDimmerStatus = message.getByte();
    	// limits range of sensor values to between 0 and 100
    	incomingDimmerStatus = constrain((int8_t)incomingDimmerStatus, 0, 100);
    	// Change Dimmer level
    	analogWrite(message.sensor, 255 * incomingDimmerStatus / 100);
    	//Save value to eeprom
    	saveState(message.sensor, incomingDimmerStatus);
    	// Write some debug info
    	Serial.print("Incoming change for ");
    	Serial.print(color[message.sensor]);
    	Serial.print(": ");
    	Serial.print(incomingDimmerStatus);
    	Serial.println("%");
        // Send value to controler
        Serial.println("Send value to controler");
        send(Status.setSensor(message.sensor).set(loadState(message.sensor)),false);
    	// Stop the show if it's running
    	if (isShow==1){ rgbShowStop(message.sensor); }
    }
}

void rgbShow()
{
  time = millis();
  redval = 128+250*cos(2*PI/300000*time);
  greenval = 128+250*cos(2*PI/300000*time-222);
  blueval = 128+250*cos(2*PI/300000*time-111);
  // limits range of sensor values to between 0 and 255
  redval = constrain(redval, 0, 255);
  greenval = constrain(greenval, 0, 255);
  blueval = constrain(blueval, 0, 255);
}

void rgbShowOn()
{
  // define show On
  isShow=1;
  // Save state
  saveState(0, 1);
  // Write some debug info
  Serial.println("Show must go on");
}

void rgbShowOff()
{
  // define show Off
  isShow=0;
  // Save state
  saveState(0, 0);
  // Save RGB value to eeprom
  saveState(RED_PIN, 100 * redval / 255);
  saveState(GREEN_PIN, 100 * greenval / 255);
  saveState(BLUE_PIN, 100 * blueval / 255);
  // Write some debug info
  Serial.println("Stop the show (rgbShowOff)");
  // Send actual RGB value and state to controler and request ack back (true/false)
  Serial.println("Send eeprom value to controler");
  send( RedStatus.set(loadState(RED_PIN)), false );
  send( GreenStatus.set(loadState(GREEN_PIN)), false );
  send( BlueStatus.set(loadState(BLUE_PIN)), false );
  send( rgbShowState.set(0), false);
}

void rgbShowStop(int sensor)
{
   // define show Off
   isShow=0;
   // Save state
   saveState(0, 0);
   // Write some debug info
   Serial.println("Stop the show (rgbShowStop)");
   // Send actual RGB value and state to controler and request ack back (true/false)
   Serial.println("Send eeprom value to controler");
   if (sensor != RED_PIN)
   {
        saveState(RED_PIN, 100 * redval / 255);
        send( RedStatus.set(loadState(RED_PIN)), false );
    }
    if (sensor != GREEN_PIN)
    {
        saveState(GREEN_PIN, 100 * greenval / 255);
        send( GreenStatus.set(loadState(GREEN_PIN)), false );
    }
    if (sensor != BLUE_PIN)
    {
        saveState(BLUE_PIN, 100 * blueval / 255);
        send( BlueStatus.set(loadState(BLUE_PIN)), false );
    }
    send( rgbShowState.set(0), false);
}
9 - Daikin Heatpumps
Highlights
- Powered by Daikin
- Direct injection to Daikin IR Receiver (no IR blaster)
- Direct feedback
- OpenHAB controlled to activate for heat when below 11 degrees and room has been marked as in use.
- Opposite will occur when I code for the opposite in summer time here.
- Heat pump remote can still be used and OpenHAB syncs to its state
WARNING: This build works around high voltage and directly injects into your heat pump.
My Company and I accept no liability whatsoever for your own well being or that of your heat pump.
Controlling the heat pump
In this modification, the Daikin heat pump is controlled directly from the Arduino. No IR Transmitter or blaster is used. It’s more technical, less portable, but more truly integrates and establishes the device as internet ready.
The basis of the code comes from the Arduino\Examples\HeatpumpIR\MySensorsNode example which in turn is based heavily on Ken Shirriff’s IRRemote library.
However, because we’re injecting directly into the IR Receiver and not using a transmitter, there are two small minor adjustments required.
- As the Arduino output connects directly to the Daikin’s IR receiver output pin, it only needs to transmit the coded signal, not the PWM carrier signal.Within the IRSender.cpp code, identify the setFrequency method. Set the output pin to High, then exit the method so the carrier is not established e.g.
void IRSender::setFrequency(int frequency)
{
  uint8_t pwmval8 = F_CPU / 2000 / (frequency);
  uint16_t pwmval16 = F_CPU / 2000 / (frequency);
  pinMode(_pin, OUTPUT);
//  digitalWrite(_pin, LOW); // When not sending PWM, we want it low
digitalWrite(_pin, HIGH); // Comment out the LOW above and set this to high
return; //Then return out of here so PWM is not activated<br>
  switch (_pin)
  {…
- To allow the standard IR remote, we must set the Arduino pin back to Input, so it doesn’t interfere with normal operations. In the main MySenors code after the heatpump instruction is send to this
heatpumpIR[model]->send(irSender, power, mode, fan, temp, VDIR_UP, HDIR_AUTO);
pinMode(3, INPUT); //When not sending IR signals, PIN 3 must be in INPUT mode so that the true Daikin remote control can send its IR signal.
Powering the MySensors Node
The node is running on 5V sourced from the Daikin unit’s IR Receiver. Ground is also from this. There’s a couple of pictures on this page describing and showing this connection and describing the pin out. As per further info below, don’t short this else you’ll be pulling the header units board out to replace fuse.
Regarding load on this voltage source and the mentioned fuse, I never had any issues with it, but to reduce potential & ensure no red light shines through the unit, I removed the Pro mini’s power LED (simply carefully crushed and pulled it off with my wire cutters). As I write this now though, I can’t recall if I did the same on the 3.3v regulator for the radio. That has a bright LED too. On one of the earlier builds, I simply covered that with a bit of paint 🙂
Obtaining the heat pump status
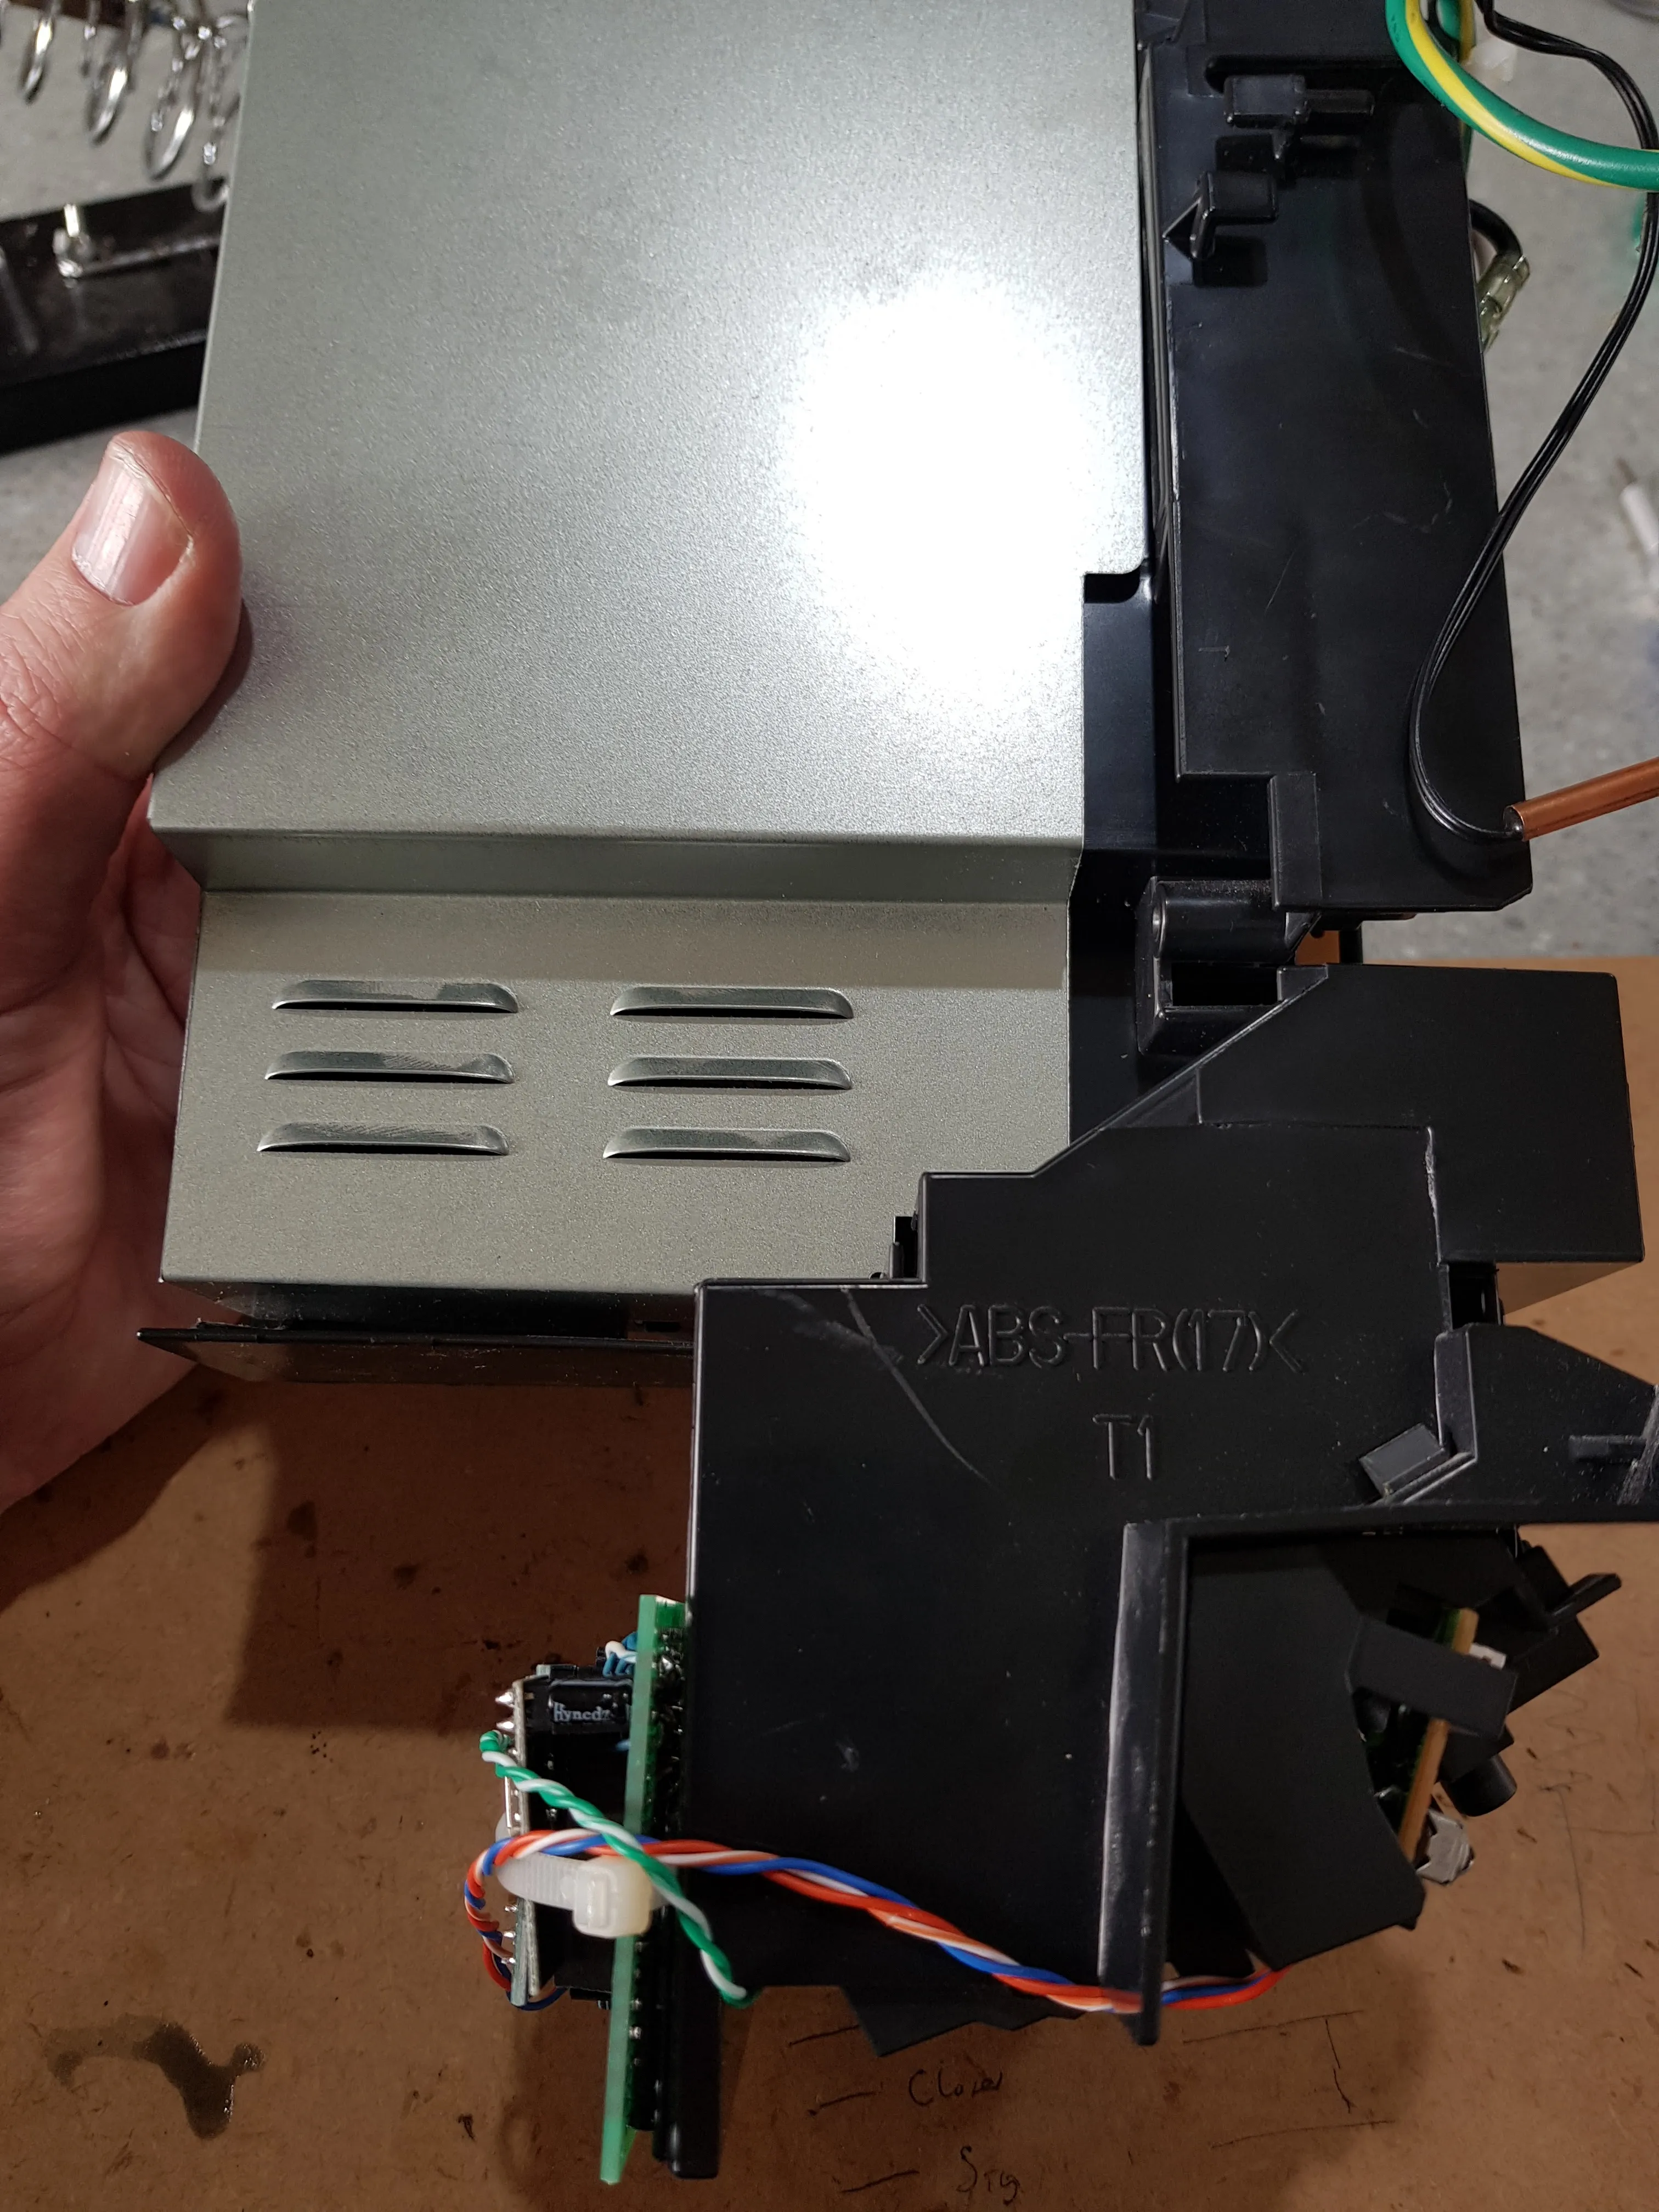
The heat pump status is obtained by connecting the heat pump status LED to the Arduino and a simple MySensors binary switch. However, the Daikin status LED has ~16v across it which is too high for the Arduino for a direct wiring. I used a EL4N35 Optocoupler in parallel with the LED to isolate the circuits.
In addition, to stop the Daikin status LED from dimming, a 330ohm resister was places in series with the optocopler.


I was extremely careful right through the prototyping stage to not cross the 5v wires from the heat pump. Unfortunately on the final wiring, they crossed and killed the Daikin board. After researching worst case alternatives & second hand ~$100 USD units from China, I set out to try and fix my board.


Two more nodes
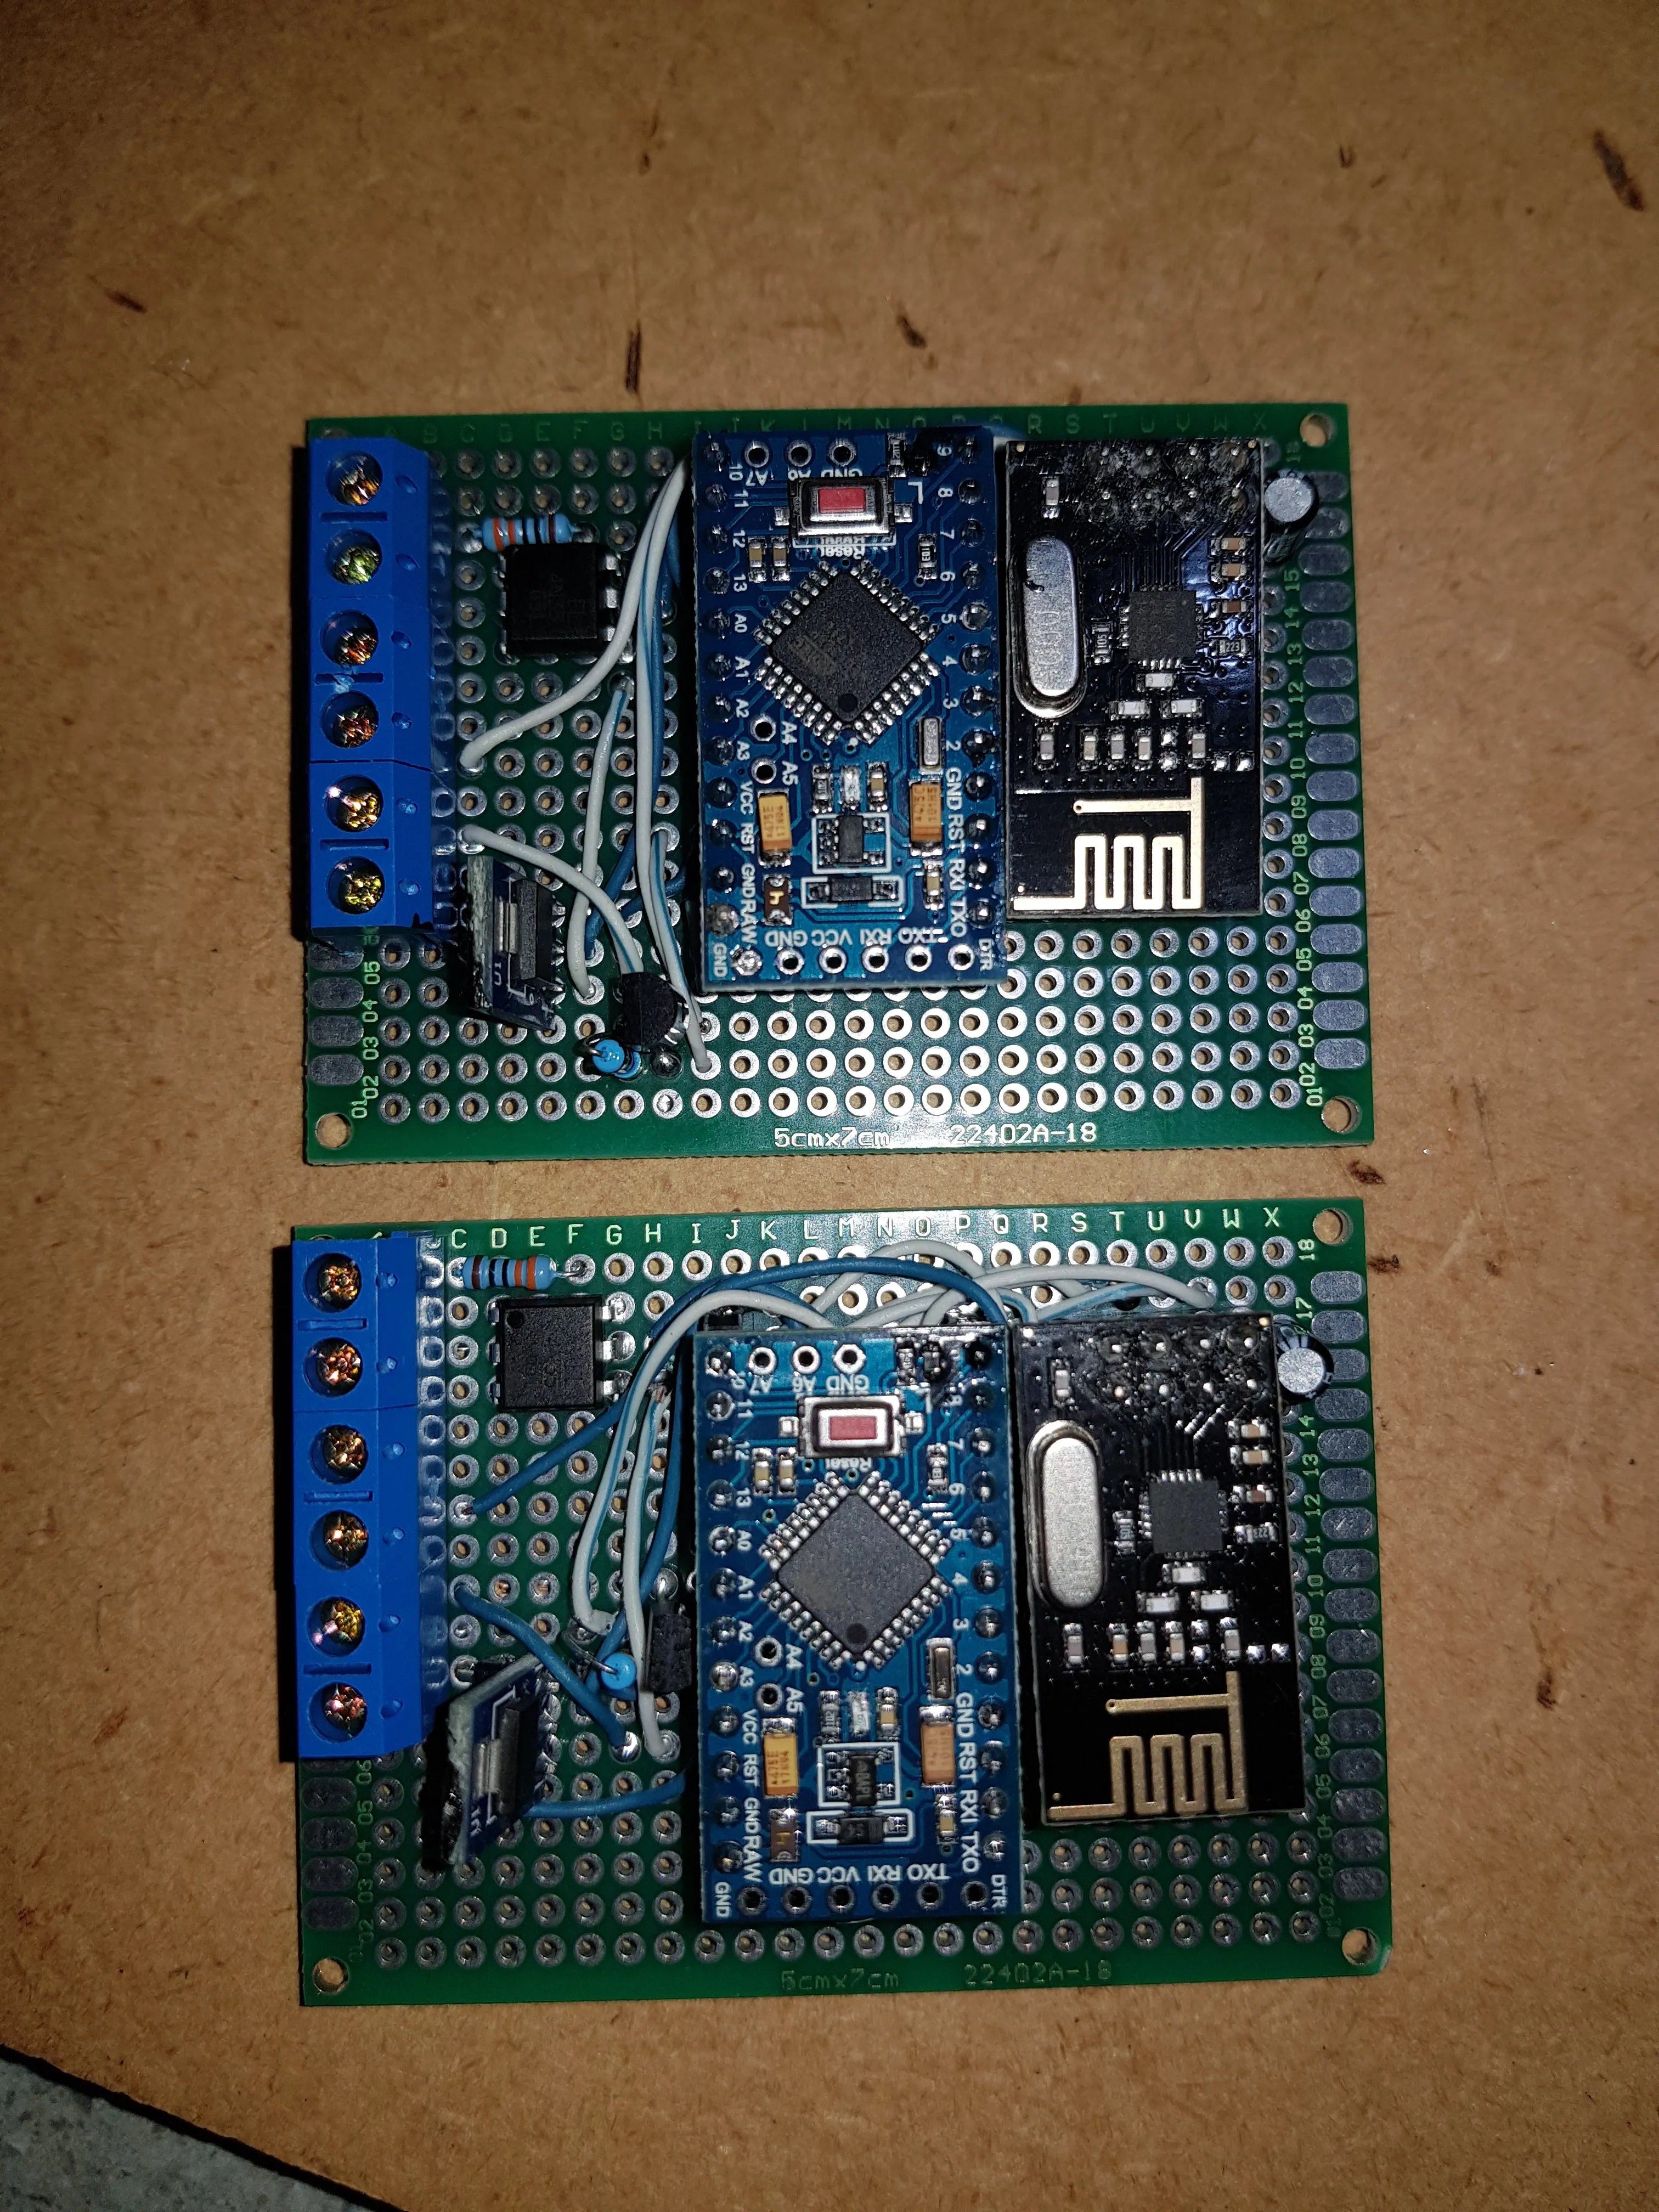


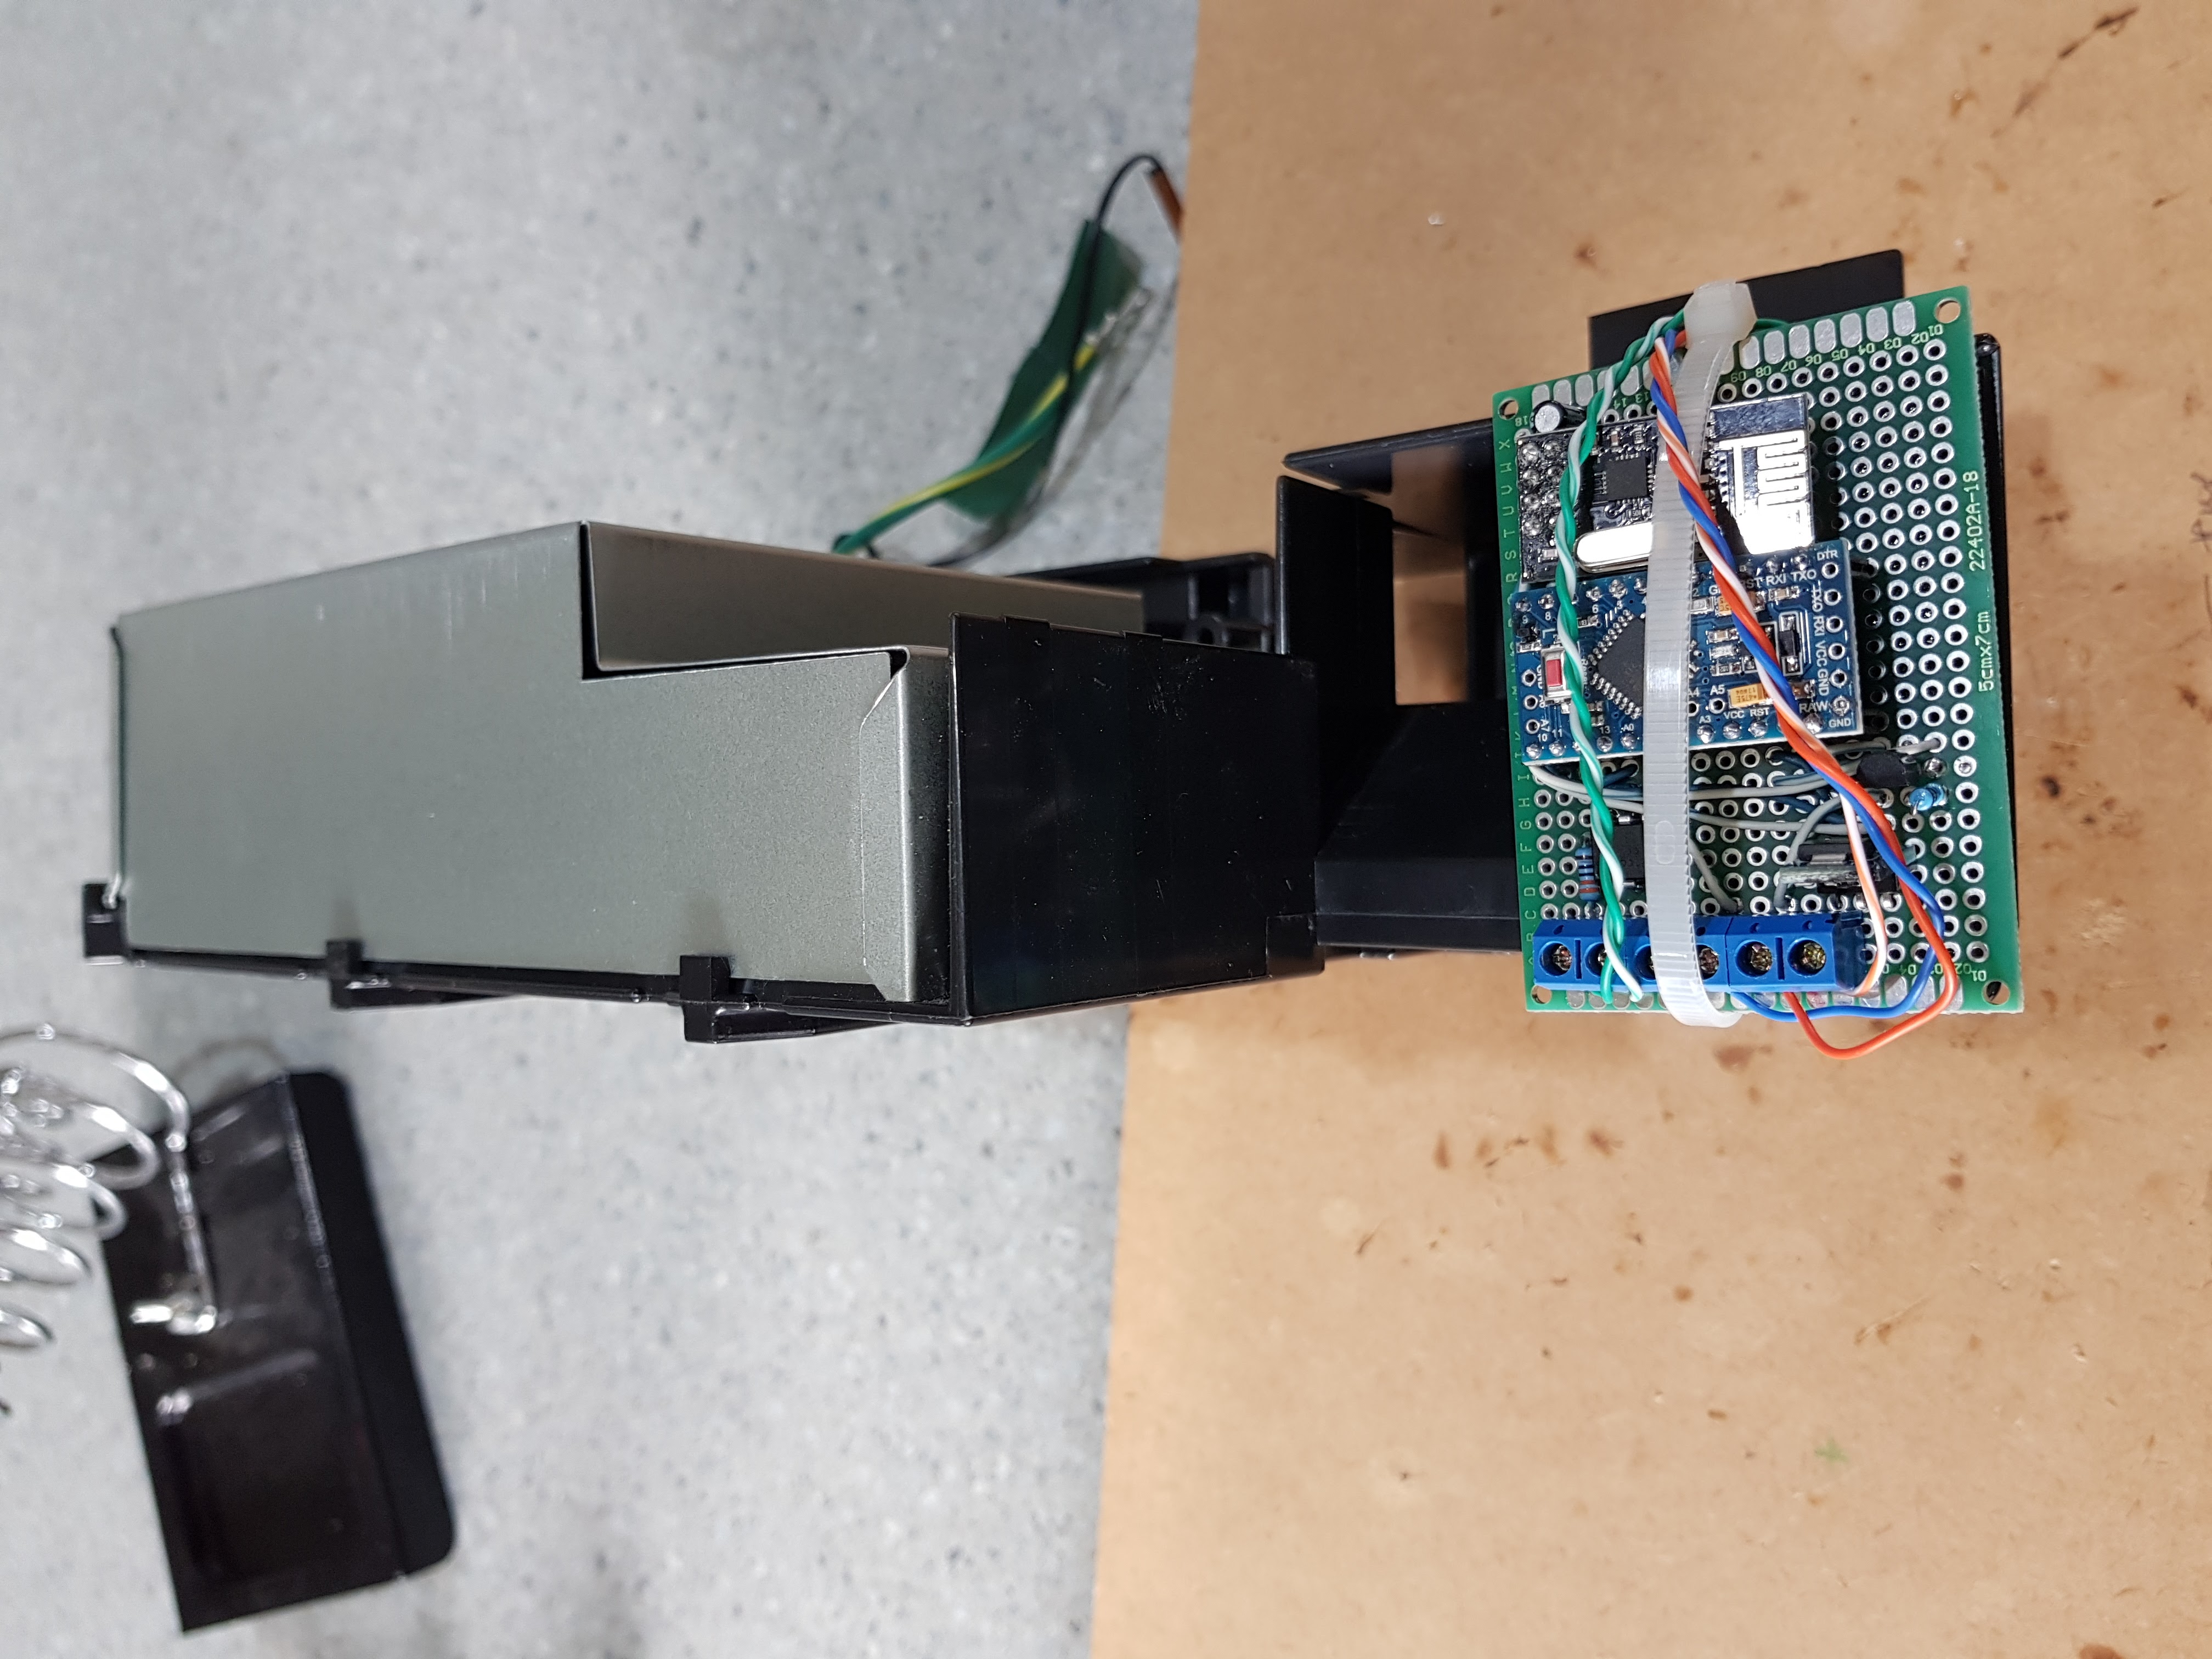


Regarding this video: This is absolutely not a normal thing to to. The board is open and on the kitchen bench because I had to replace the fuse.
It’s connected to 240v and as I turn it on, you see the on-board LED begin to flash. As the camera then shows the laptop screen, after several seconds, the MySensors node which is connected to the board, the establishes communication with the MySensors Gateway and MQTT.
The re-occuring 1s and 0s represents the flashing status LED back within the black plastic. It will be doing this because it’s not happy that it’s not installed properly. In normal operation, the status LED is represented properly as either 1 or 0, On or Off back in OpenHAB.
I really don’t recommend you do this sort of thing yourself. This video is only for interested people and is not a how to guide. You run the risk of either killing yourself or your electronics. I don’t want to hear about either!
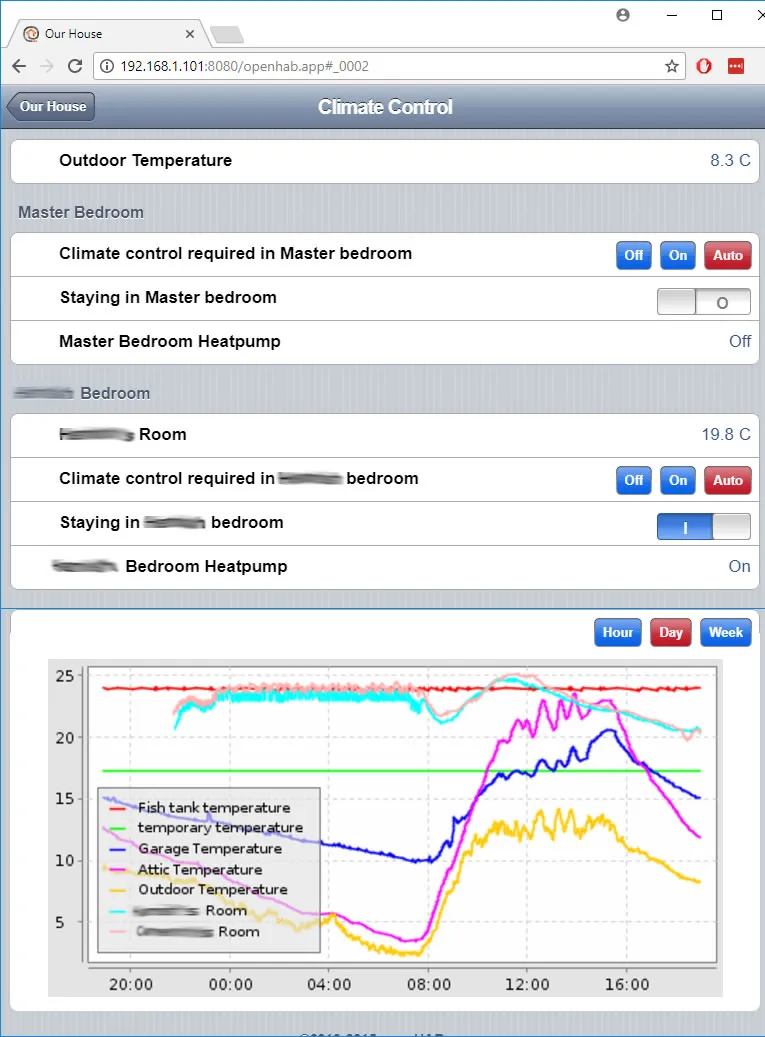
OpenHAB & Climate Control
We have a heat pump outlet in each bedroom. Each heat pump has 3 OpenHAB settings. Off, On & Auto. The first two are self explanatory and when using the standard Daikin remote, OpenHAB is synced automatically to the Off/On setting.
When OpenHAB has the heat pump set to Auto, this is when the fun begins. No longer do we control the heat pump, but instead we say that we are “Staying in the room”. This way, the house controls weather to turn on the heat pump or not. When the temperature outside goes below 11 degrees, the heat pump is turned on (and to Heat). When it rises above 12, it turns off again. There’s a 1 degree difference to stop is oscillating around 11 degrees while the night is still cooling.
I’ll configure the opposite controls when it gets to summer time here in New Zealand.
OpenHAB reports the current state of the heat pump.
The OpenHAB rules seem like a lot and they possibly are. However, I spent quite a lot of time getting them stable and to this point. I’m not to worried if there’s an extra line or two of logic in there. Certainly the tracing came in handy!
One day I’ll replace the manual “Staying in the room” selection with some smart presence detection. I’ll also be adding a rule that says around 9am in the morning, that regardless of the temperature outside, this switch will be set to false – basically, you should be out of bed!
OpenHAB Items
Group   gClimate                "Climate"               (All)<br>
Group   gClimateControls        "Climate Controls"      (All)


Number  Temperatures_Chart_Period                               "Chart Period"


Number Shed_Temperature2        "temporary temperature [%.1f C]"        <temperature>   (gClimate)              {mqtt="<[mosquitto:mygateway1-out/45/0/1/0/0:state:default]"}
Number Garage_Temperature       "Garage Temperature [%.1f C]"   <temperature>   (gClimate)              {mqtt="<[mosquitto:mygateway1-out/46/2/1/0/0:state:default]"}
Number Garage_Attic_Temperature "Attic Temperature [%.1f C]"    <temperature>   (gClimate)              {mqtt="<[mosquitto:mygateway1-out/46/0/1/0/0:state:default]"}
Number Outdoor_Temperature      "Outdoor Temperature [%.1f C]"  <temperature>   (gClimate)              {mqtt="<[mosquitto:mygateway1-out/46/1/1/0/0:state:default]"}


Number Climate_Control_Master_Bedroom   "Climate control required in Master bedroom"                    {}
Number Heatpump_Master_Bedroom_Status   "Master Bedroom Heatpump [MAP(on_off.map):%s]"  <light> (gClimateControls)      {mqtt="<[mosquitto:mygateway1-out/55/2/1/0/16:state:default]"}
String Heatpump_Master_Bedroom_Control  "[%s]"                                                                          {mqtt=">[mosquitto:mygateway1-in/55/1/0/0/32:command:*:default]"}
Switch Climate_Staying_Master_Bedroom   "Staying in Master bedroom"                                     {}

Number Climate_Control_xxxxx_Bedroom   "Climate control required in xxxxx bedroom"                    {}
Number Heatpump_xxxxx_Bedroom_Status   "xxxxx Bedroom Heatpump [MAP(on_off.map):%s]"  <light> (gClimateControls)      {mqtt="<[mosquitto:mygateway1-out/56/2/1/0/16:state:default]"}
String Heatpump_xxxxx_Bedroom_Control  "[%s]"                                                                          {mqtt=">[mosquitto:mygateway1-in/56/1/0/0/32:command:*:default]"}
Switch Climate_Staying_xxxxx_Bedroom   "Staying in xxxxx bedroom"                                     {}
Number Heatpump_xxxxx_Temperature      "xxxxxh's Room [%.1f C]"                <temperature>   (gClimate)              {mqtt="<[mosquitto:mygateway1-out/56/0/1/0/0:state:default]"}
OpenHAB Sitemap
Group label="Climate Control"{
Frame{
Text item=Outdoor_Temperature
}
Frame label="Master Bedroom"{
Switch item=Climate_Control_Master_Bedroom mappings=[0="Off", 1="On", 2="Auto"]
Switch item=Climate_Staying_Master_Bedroom
Text item=Heatpump_Master_Bedroom_Status
}
Frame label="xxxxx Bedroom"{
Text item=Heatpump_xxxxx_Temperature
Switch item=Climate_Control_xxxxx_Bedroom mappings=[0="Off", 1="On", 2="Auto"]
Switch item=Climate_Staying_xxxxx_Bedroom
Text item=Heatpump_xxxxx_Bedroom_Status
}
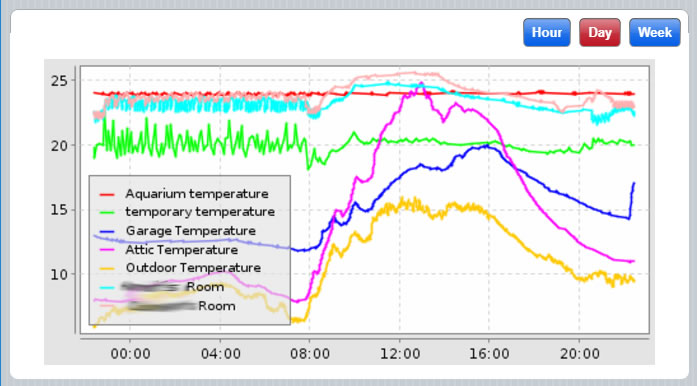
Frame {
Switch item=Temperatures_Chart_Period label="" mappings=[0="Hour", 1="Day", 2="Week"]
Chart item=gClimate period=h refresh=30000 visibility=[Temperatures_Chart_Period==0]
Chart item=gClimate period=D refresh=90000 visibility=[Temperatures_Chart_Period==1]
Chart item=gClimate period=W refresh=300000 visibility=[Temperatures_Chart_Period==2, Temperatures_Chart_Period=="Uninitialized"]
}
}
OpenHAB Rules
import org.openhab.core.library.types.*
import org.openhab.core.persistence.*
import org.openhab.model.script.actions.*
import org.java.math.*
import org.joda.time.*


var String heatpump_heat        = "00012112"
var String heatpump_off         = "00002112"

var String heatpump_setting     = ""
var int turn_off                = 0

var int cold_temperature        = 11


var int openhab_controlled_master_bedroom = 0
var DateTime last_set_by_openhab


rule "Climate Control"
when
        Item Outdoor_Temperature changed or
        Item Climate_Control_Master_Bedroom changed or
        Item Climate_Staying_Master_Bedroom changed or
        Item Climate_Control_xxxxx_Bedroom changed or
        Item Climate_Staying_xxxxx_Bedroom changed or
then
        logInfo("Climate Control", "Running Climate Control. Outdoor temperature is [{}]", Outdoor_Temperature.state)

        turn_off = 0

        if((Outdoor_Temperature.state < cold_temperature)
                || (Heatpump_Master_Bedroom_Status.state==1 && Outdoor_Temperature.state < cold_temperature + 1)){
                //the OR bit above ensures if the heatpump is on and the temperature flucuates above the
                //trigger by less than a degree, the pump remains on

                logInfo("Climate Control", "Outdoor temperature is below cold temperature. Heatpumps will be set to Heat if necessary")
                heatpump_setting = heatpump_heat
        }//else todo, outdoor > hot_temperature //I'll do this in the summer time!


        else{
                logInfo("Climate Control", "Neither hot, nor cold. Heatpumps will be turned off"
                turn_off = 1
        }


//0 = Off, 1=On, 2=Auto

        /* MASTER BEDROOM */
        if(Climate_Control_Master_Bedroom.state==0){
                logInfo("Climate Control", "Master Bedroom state has been selected to be off")
                if(Heatpump_Master_Bedroom_Status.state!=0){
                        logInfo("Climate Control", "Master bedroom is on, so turning it off")
                        last_set_by_openhab = now
                        Heatpump_Master_Bedroom_Control.sendCommand(heatpump_off)
               }

        }else if(Climate_Control_Master_Bedroom.state==1){
                logInfo("Climate Control", "Master Bedroom state has been selected to be On")
                if(Heatpump_Master_Bedroom_Status.state!=1){
                        logInfo("Climate Control", "Master bedroom is off, so turning it on")
                        last_set_by_openhab = now
                        Heatpump_Master_Bedroom_Control.sendCommand(heatpump_setting)
                //      Thread::sleep(1000)
                //      Heatpump_Master_Bedroom_Control.sendCommand(heatpump_setting)
                }

        }else if(Climate_Control_Master_Bedroom.state==2){
                logInfo("Climate Control", "Master Bedroom requries Auto climate control")

                if(Climate_Staying_Master_Bedroom.state==ON){

                        if(turn_off==1){
                                if(Heatpump_Master_Bedroom_Status.state==0){
                                        logInfo("Climate Control", "Master Bedroom presence, but heatpump should be off and it already is")
                                }else{
                                        logInfo("Climate Control", "Master Bedroom presence, but heatpump needs to be turned off. Sending [{}]", heatpump_setting)
                                        last_set_by_openhab = now
                                        Heatpump_Master_Bedroom_Control.sendCommand(heatpump_off)
                                }
                        }else{

                                if(Heatpump_Master_Bedroom_Status.state!=1){
                                        logInfo("Climate Control", "Master Bedroom presence, heatpump needs to be turned on. Sending [{}]", heatpump_setting)
                                        last_set_by_openhab = now
                                        Heatpump_Master_Bedroom_Control.sendCommand(heatpump_setting)
                                }else{
                                        logInfo("Climate Control", "Master Bedroom presence, heatpump is alreay in an on state")
                                }
                        }
                }else{
                        //No presence, turn off if necessary
                        if(Heatpump_Master_Bedroom_Status.state!=1){
                                logInfo("Climate Control", "Master Bedroom no presence, heatpump should be off and it already is")
                        }else{
                                logInfo("Climate Control", "Master Bedroom no presence, heatpump needs to be turned off. Sending [{}]", heatpump_setting)
                                last_set_by_openhab = now
                                Heatpump_Master_Bedroom_Control.sendCommand(heatpump_off)
                        }
                }
        }


/* xxxxx BEDROOM */
        if(Climate_Control_xxxxx_Bedroom.state==0){
                logInfo("Climate Control", "xxxxx Bedroom state has been selected to be off")
                if(Heatpump_xxxxx_Bedroom_Status.state!=0){
                        logInfo("Climate Control", "xxxxx bedroom is on, so turning it off")
                        last_set_by_openhab = now
                        Heatpump_xxxxx_Bedroom_Control.sendCommand(heatpump_off)
               }

        }else if(Climate_Control_xxxxx_Bedroom.state==1){
                logInfo("Climate Control", "xxxxx Bedroom state has been selected to be On")
                if(Heatpump_xxxxx_Bedroom_Status.state!=1){
                        logInfo("Climate Control", "xxxxx bedroom is off, so turning it on")
                        last_set_by_openhab = now
                        Heatpump_xxxxx_Bedroom_Control.sendCommand(heatpump_setting)
                //      Thread::sleep(1000)
                //      Heatpump_xxxxx_Bedroom_Control.sendCommand(heatpump_setting)
                }

        }else if(Climate_Control_xxxxx_Bedroom.state==2){
                logInfo("Climate Control", "xxxxx Bedroom requries Auto climate control")

                if(Climate_Staying_xxxxx_Bedroom.state==ON){

                        if(turn_off==1){
                                if(Heatpump_xxxxx_Bedroom_Status.state==0){
                                        logInfo("Climate Control", "xxxxx Bedroom presence, but heatpump should be off and it already is")
                                }else{
                                        logInfo("Climate Control", "xxxxx Bedroom presence, but heatpump needs to be turned off. Sending [{}]", heatpump_setting)
                                        last_set_by_openhab = now
                                        Heatpump_xxxxx_Bedroom_Control.sendCommand(heatpump_off)
                                }
                        }else{

                                if(Heatpump_xxxxx_Bedroom_Status.state!=1){
                                        logInfo("Climate Control", "xxxxx Bedroom presence, heatpump needs to be turned on. Sending [{}]", heatpump_setting)
                                        last_set_by_openhab = now
                                        Heatpump_xxxxx_Bedroom_Control.sendCommand(heatpump_setting)
                                }else{
                                        logInfo("Climate Control", "xxxxx Bedroom presence, heatpump is alreay in an on state")
                                }
                        }
                }else{
                        //No presence, turn off if necessary
                        if(Heatpump_xxxxx_Bedroom_Status.state!=1){
                                logInfo("Climate Control", "xxxxx Bedroom no presence, heatpump should be off and it already is")
                        }else{
                                logInfo("Climate Control", "xxxxx Bedroom no presence, heatpump needs to be turned off. Sending [{}]", heatpump_setting)
                                last_set_by_openhab = now
                                Heatpump_xxxxx_Bedroom_Control.sendCommand(heatpump_off)
                        }
                }
        }


end


rule "Heatpump_Master_Bedroom_Status changed" when
        Item Heatpump_Master_Bedroom_Status changed
then

        //if someone has set the heatpump and it wasn't openhab recently, then wait a little bit for any lights to stop flashing
        //and sync the state

        if(last_set_by_openhab == null || !last_set_by_openhab.plusSeconds(5).isAfter(now)){

                logInfo("Climate Control", "Heatpump_Master_Bedroom_Status changed and it wasn't by openhab")

                Thread::sleep(1500)

                //if new state is not on (off), set openhab to off
                if(Heatpump_Master_Bedroom_Status.state != 1
                        && Climate_Control_Master_Bedroom.state != 0){
                        logInfo("Climate Control", "Climate_Control_Master_Bedroom.postUpdate(0);"
                        Climate_Control_Master_Bedroom.postUpdate(0);
                }


                //if new state it not off (on), set openhab to on
                if(Heatpump_Master_Bedroom_Status.state != 0
                        && Climate_Control_Master_Bedroom.state != 1 ){

                        logInfo("Climate Control", "Climate_Control_Master_Bedroom.postUpdate(1);"

                        Climate_Control_Master_Bedroom.postUpdate(1);
                 }
        }else{
                logInfo("Climate Control", "Heatpump_Master_Bedroom_Status changed, but OpenHAB had changed it, so not syncing ")
        }

end


rule "Heatpump_xxxxx_Bedroom_Status changed" when
        Item Heatpump_xxxxx_Bedroom_Status changed
then

        //if someone has set the heatpump and it wasn't openhab recently, then wait a little bit for any lights to stop flashing
        //and sync the state

        if(last_set_by_openhab == null || !last_set_by_openhab.plusSeconds(5).isAfter(now)){

                logInfo("Climate Control", "Heatpump_xxxxx_Bedroom_Status changed and it wasn't by openhab")

                Thread::sleep(1500)

                //if new state is not on (off), set openhab to off
                if(Heatpump_xxxxx_Bedroom_Status.state != 1
                        && Climate_Control_xxxxx_Bedroom.state != 0){
                        logInfo("Climate Control", "Climate_Control_xxxxx_Bedroom.postUpdate(0);"
                        Climate_Control_xxxxx_Bedroom.postUpdate(0);
                }


                //if new state it not off (on), set openhab to on
                if(Heatpump_xxxxx_Bedroom_Status.state != 0
                        && Climate_Control_xxxxx_Bedroom.state != 1 ){

                        logInfo("Climate Control", "Climate_Control_xxxxx_Bedroom.postUpdate(1);"

                        Climate_Control_xxxxx_Bedroom.postUpdate(1);
                 }
        }else{
                logInfo("Climate Control", "Heatpump_xxxxx_Bedroom_Status changed, but OpenHAB had changed it, so not syncing ")
        }

end
Software on the MySensors Node
import org.openhab.core.library.types.*
import org.openhab.core.persistence.*
import org.openhab.model.script.actions.*
import org.java.math.*
import org.joda.time.*


var String heatpump_heat        = "00012112"
var String heatpump_off         = "00002112"

var String heatpump_setting     = ""
var int turn_off                = 0

var int cold_temperature        = 11


var int openhab_controlled_master_bedroom = 0
var DateTime last_set_by_openhab


rule "Climate Control"
when
        Item Outdoor_Temperature changed or
        Item Climate_Control_Master_Bedroom changed or
        Item Climate_Staying_Master_Bedroom changed or
        Item Climate_Control_xxxxx_Bedroom changed or
        Item Climate_Staying_xxxxx_Bedroom changed or
then
        logInfo("Climate Control", "Running Climate Control. Outdoor temperature is [{}]", Outdoor_Temperature.state)

        turn_off = 0

        if((Outdoor_Temperature.state < cold_temperature)
                || (Heatpump_Master_Bedroom_Status.state==1 && Outdoor_Temperature.state < cold_temperature + 1)){
                //the OR bit above ensures if the heatpump is on and the temperature flucuates above the
                //trigger by less than a degree, the pump remains on

                logInfo("Climate Control", "Outdoor temperature is below cold temperature. Heatpumps will be set to Heat if necessary")
                heatpump_setting = heatpump_heat
        }//else todo, outdoor > hot_temperature //I'll do this in the summer time!


        else{
                logInfo("Climate Control", "Neither hot, nor cold. Heatpumps will be turned off"
                turn_off = 1
        }


//0 = Off, 1=On, 2=Auto

        /* MASTER BEDROOM */
        if(Climate_Control_Master_Bedroom.state==0){
                logInfo("Climate Control", "Master Bedroom state has been selected to be off")
                if(Heatpump_Master_Bedroom_Status.state!=0){
                        logInfo("Climate Control", "Master bedroom is on, so turning it off")
                        last_set_by_openhab = now
                        Heatpump_Master_Bedroom_Control.sendCommand(heatpump_off)
               }

        }else if(Climate_Control_Master_Bedroom.state==1){
                logInfo("Climate Control", "Master Bedroom state has been selected to be On")
                if(Heatpump_Master_Bedroom_Status.state!=1){
                        logInfo("Climate Control", "Master bedroom is off, so turning it on")
                        last_set_by_openhab = now
                        Heatpump_Master_Bedroom_Control.sendCommand(heatpump_setting)
                //      Thread::sleep(1000)
                //      Heatpump_Master_Bedroom_Control.sendCommand(heatpump_setting)
                }

        }else if(Climate_Control_Master_Bedroom.state==2){
                logInfo("Climate Control", "Master Bedroom requries Auto climate control")

                if(Climate_Staying_Master_Bedroom.state==ON){

                        if(turn_off==1){
                                if(Heatpump_Master_Bedroom_Status.state==0){
                                        logInfo("Climate Control", "Master Bedroom presence, but heatpump should be off and it already is")
                                }else{
                                        logInfo("Climate Control", "Master Bedroom presence, but heatpump needs to be turned off. Sending [{}]", heatpump_setting)
                                        last_set_by_openhab = now
                                        Heatpump_Master_Bedroom_Control.sendCommand(heatpump_off)
                                }
                        }else{

                                if(Heatpump_Master_Bedroom_Status.state!=1){
                                        logInfo("Climate Control", "Master Bedroom presence, heatpump needs to be turned on. Sending [{}]", heatpump_setting)
                                        last_set_by_openhab = now
                                        Heatpump_Master_Bedroom_Control.sendCommand(heatpump_setting)
                                }else{
                                        logInfo("Climate Control", "Master Bedroom presence, heatpump is alreay in an on state")
                                }
                        }
                }else{
                        //No presence, turn off if necessary
                        if(Heatpump_Master_Bedroom_Status.state!=1){
                                logInfo("Climate Control", "Master Bedroom no presence, heatpump should be off and it already is")
                        }else{
                                logInfo("Climate Control", "Master Bedroom no presence, heatpump needs to be turned off. Sending [{}]", heatpump_setting)
                                last_set_by_openhab = now
                                Heatpump_Master_Bedroom_Control.sendCommand(heatpump_off)
                        }
                }
        }


/* xxxxx BEDROOM */
        if(Climate_Control_xxxxx_Bedroom.state==0){
                logInfo("Climate Control", "xxxxx Bedroom state has been selected to be off")
                if(Heatpump_xxxxx_Bedroom_Status.state!=0){
                        logInfo("Climate Control", "xxxxx bedroom is on, so turning it off")
                        last_set_by_openhab = now
                        Heatpump_xxxxx_Bedroom_Control.sendCommand(heatpump_off)
               }

        }else if(Climate_Control_xxxxx_Bedroom.state==1){
                logInfo("Climate Control", "xxxxx Bedroom state has been selected to be On")
                if(Heatpump_xxxxx_Bedroom_Status.state!=1){
                        logInfo("Climate Control", "xxxxx bedroom is off, so turning it on")
                        last_set_by_openhab = now
                        Heatpump_xxxxx_Bedroom_Control.sendCommand(heatpump_setting)
                //      Thread::sleep(1000)
                //      Heatpump_xxxxx_Bedroom_Control.sendCommand(heatpump_setting)
                }

        }else if(Climate_Control_xxxxx_Bedroom.state==2){
                logInfo("Climate Control", "xxxxx Bedroom requries Auto climate control")

                if(Climate_Staying_xxxxx_Bedroom.state==ON){

                        if(turn_off==1){
                                if(Heatpump_xxxxx_Bedroom_Status.state==0){
                                        logInfo("Climate Control", "xxxxx Bedroom presence, but heatpump should be off and it already is")
                                }else{
                                        logInfo("Climate Control", "xxxxx Bedroom presence, but heatpump needs to be turned off. Sending [{}]", heatpump_setting)
                                        last_set_by_openhab = now
                                        Heatpump_xxxxx_Bedroom_Control.sendCommand(heatpump_off)
                                }
                        }else{

                                if(Heatpump_xxxxx_Bedroom_Status.state!=1){
                                        logInfo("Climate Control", "xxxxx Bedroom presence, heatpump needs to be turned on. Sending [{}]", heatpump_setting)
                                        last_set_by_openhab = now
                                        Heatpump_xxxxx_Bedroom_Control.sendCommand(heatpump_setting)
                                }else{
                                        logInfo("Climate Control", "xxxxx Bedroom presence, heatpump is alreay in an on state")
                                }
                        }
                }else{
                        //No presence, turn off if necessary
                        if(Heatpump_xxxxx_Bedroom_Status.state!=1){
                                logInfo("Climate Control", "xxxxx Bedroom no presence, heatpump should be off and it already is")
                        }else{
                                logInfo("Climate Control", "xxxxx Bedroom no presence, heatpump needs to be turned off. Sending [{}]", heatpump_setting)
                                last_set_by_openhab = now
                                Heatpump_xxxxx_Bedroom_Control.sendCommand(heatpump_off)
                        }
                }
        }


end


rule "Heatpump_Master_Bedroom_Status changed" when
        Item Heatpump_Master_Bedroom_Status changed
then

        //if someone has set the heatpump and it wasn't openhab recently, then wait a little bit for any lights to stop flashing
        //and sync the state

        if(last_set_by_openhab == null || !last_set_by_openhab.plusSeconds(5).isAfter(now)){

                logInfo("Climate Control", "Heatpump_Master_Bedroom_Status changed and it wasn't by openhab")

                Thread::sleep(1500)

                //if new state is not on (off), set openhab to off
                if(Heatpump_Master_Bedroom_Status.state != 1
                        && Climate_Control_Master_Bedroom.state != 0){
                        logInfo("Climate Control", "Climate_Control_Master_Bedroom.postUpdate(0);"
                        Climate_Control_Master_Bedroom.postUpdate(0);
                }


                //if new state it not off (on), set openhab to on
                if(Heatpump_Master_Bedroom_Status.state != 0
                        && Climate_Control_Master_Bedroom.state != 1 ){

                        logInfo("Climate Control", "Climate_Control_Master_Bedroom.postUpdate(1);"

                        Climate_Control_Master_Bedroom.postUpdate(1);
                 }
        }else{
                logInfo("Climate Control", "Heatpump_Master_Bedroom_Status changed, but OpenHAB had changed it, so not syncing ")
        }

end


rule "Heatpump_xxxxx_Bedroom_Status changed" when
        Item Heatpump_xxxxx_Bedroom_Status changed
then

        //if someone has set the heatpump and it wasn't openhab recently, then wait a little bit for any lights to stop flashing
        //and sync the state

        if(last_set_by_openhab == null || !last_set_by_openhab.plusSeconds(5).isAfter(now)){

                logInfo("Climate Control", "Heatpump_xxxxx_Bedroom_Status changed and it wasn't by openhab")

                Thread::sleep(1500)

                //if new state is not on (off), set openhab to off
                if(Heatpump_xxxxx_Bedroom_Status.state != 1
                        && Climate_Control_xxxxx_Bedroom.state != 0){
                        logInfo("Climate Control", "Climate_Control_xxxxx_Bedroom.postUpdate(0);"
                        Climate_Control_xxxxx_Bedroom.postUpdate(0);
                }


                //if new state it not off (on), set openhab to on
                if(Heatpump_xxxxx_Bedroom_Status.state != 0
                        && Climate_Control_xxxxx_Bedroom.state != 1 ){

                        logInfo("Climate Control", "Climate_Control_xxxxx_Bedroom.postUpdate(1);"

                        Climate_Control_xxxxx_Bedroom.postUpdate(1);
                 }
        }else{
                logInfo("Climate Control", "Heatpump_xxxxx_Bedroom_Status changed, but OpenHAB had changed it, so not syncing ")
        }

end