Rinnai Gas Heater (FTR557)
Highlights
- Turns heater off and on
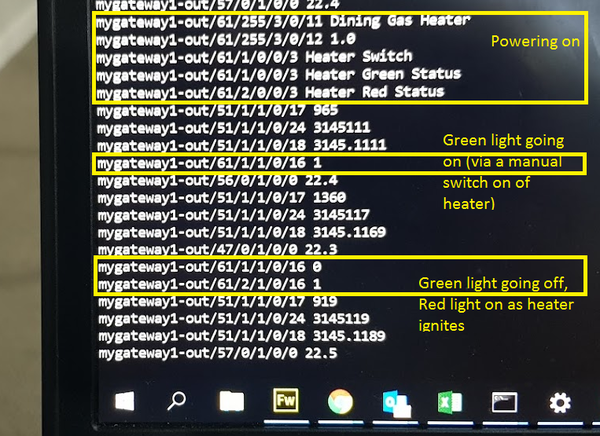
- Transmits heater status back to Gateway even when manually controlled
- Powered internally by Rinnai heater (model 557FTR)
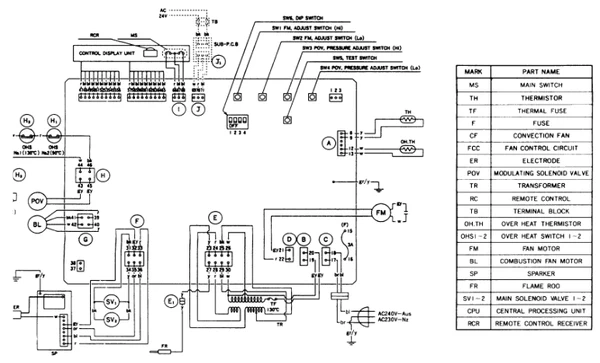
- 557FTR Service Manual: http://manualzz.com/doc/1237654/rinnai-rhfe-557ftr-service-manual
WARNING: This build works around high voltage, GAS(!!) and directly injects into your gas heater.
My Company and I accept no liability whatsoever for anything.
Rinnai Remote Thermostat product
Rinnai sells a remote thermostat which plugs into their heaters:
- https://rinnai.co.nz/Download/ProductFile?encid=3LlAHF7kVaWaug8yiGgvnIfbR4-NmaiQPNZVLYHILBk~
- https://www.rinnai-lms.com/resources/288/200000075-Remote%20Thermostat%20Installation%20Instructions.pdf
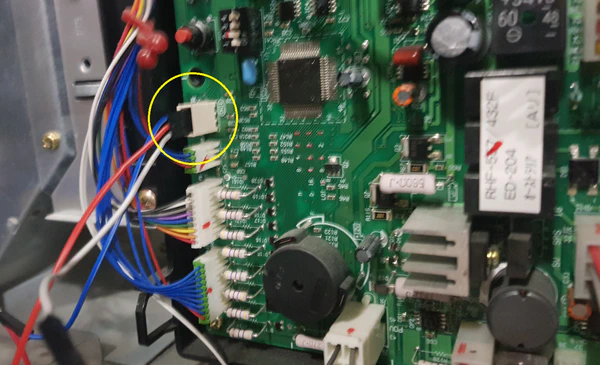
All those modules do is connect two Red and Blue wires together on the units main PCB using a relay. The module provides separate power system to isolate itself from the heater possibly so multiple heaters can be daisy-chained together. I’d suggest it is 24v so it can extended that chaining over large distances (one of the use cases is described as a church or hall).
First Build
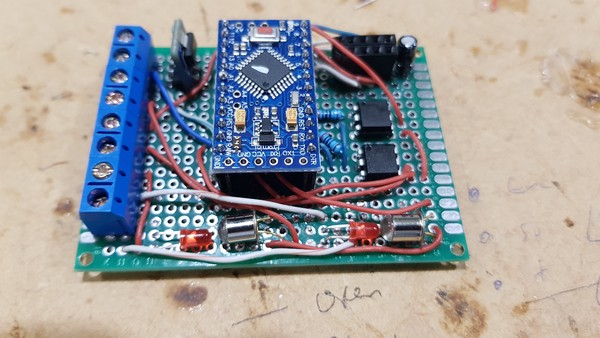
My first build replicated the official Rinnai module as a MySensors node. Red and Blue were connected together via my Optocoupler in the build below. This uses far less energy than a relay and seeing as the Red/Blue connection has low voltage and current, this works fine.
However, there are two problems with this approach that didn’t satisfy my needs:
- There is no ‘actual’ status back to the MySensors Gateway – you would have to rely on the status of the ‘remote’ node (which may be fine to an extent)
- Connecting (Closing) Red and Blue Stops the Heater from working. Disconnecting (Opening) keeps the heater working. This appears opposite to initial thoughts, but given the header on the PCB is always Open anyway (if you don’t connect a remote thermostat), this makes perfect sense. The downside is that once the heater is under the control of the remote thermostat and Red and Blue are closed, you can’t control the heater manually via the button on the top control panel. This may be fine in that large hall environment, but it wouldn’t please my wife at home
Alternatively, I could have done an IR Blast to the heater for my sensor control, but as with the Heatpump build, I generally don’t do half measures.
Second Build
I wanted the node to provide status feedback to the network, remote control and the ability to control the heater locally. So I needed to understand more about the heater.
The 557FTR, and I imagine similar models, is initially quite complicated to hack:
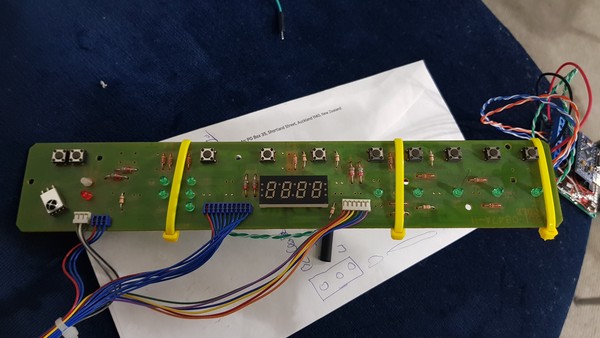
- The Control Panel does not have an on-board CPU and most things on it don’t go to Ground. In fact a lot of the pieces connect to each other in seemingly an odd way. Given the complexity and number of items on the board and the limited number of wires going to it, it seems like some sort of XY/coordinate matrix arrangement has been used. There are also voltages at unusual places and these vary as different things happen. This makes it much harder to understand and much harder to hack as adding to the circuit will cause detrimental effects e.g. displays don’t work
- I also couldn’t find any easy-to-tap source of the overall heater status on the main PCB and when I initially placed a regular Optocoupler in parallel with the Control Panel’s status LED, it turned the main status LED off (again, detrimental effects).
- Even getting power to my new node was initially interesting. What seemed like a good source on the Control Panel wasn’t (due to the matrix!) and options on the main PCB were either very high voltage, AC or supplying motors with high current or critical safety features I wanted to stay well clear of e.g. gas control solenoids, spark circuits, overheat thermostats*
If you’re still keen, this is what I came up with:
Powering the node
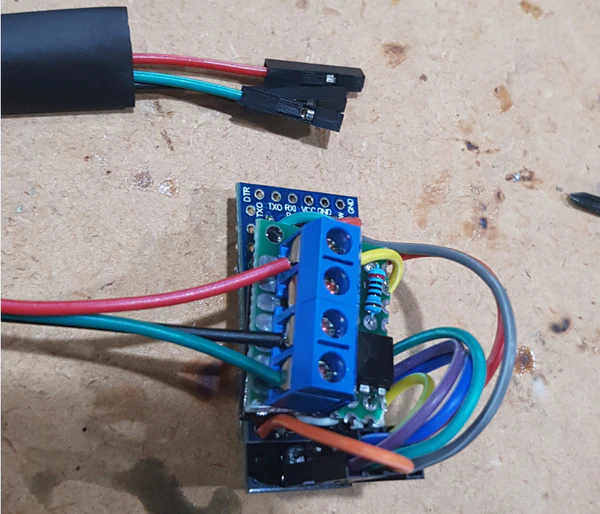
I am using a 3.3v Pro Mini in order to reduce the additional step down to 3.3 for the Radio. I’m also isolating the node from the heaters status and controls via optocouplers, so there’s no sharing of voltage or ground.
I initially used the 12v+ available elsewhere on the main PCB and at one stage even attempted to use a Buck Regulator instead of the AMS1117-3.3 stepdown I’m using now. For some reason the Buck never wanted to power the 3.3 arduino and radio – the voltage was there, but it never provided the 28mA require. It stayed around 3mA (I’ll probably come across this issue another day, but to date, I can only recall using them on the 5v arduinos).
Ultimately I tapped in the 5V that is available on the Control Panel which powers the IR Receiver.
Controlling the heater
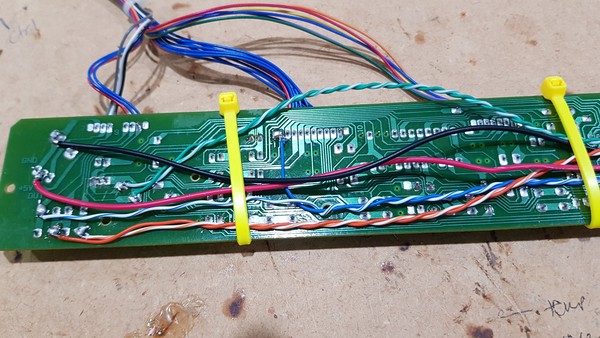
While the Rinnai heater presents only a single Power button on the top of the Control Panel, it actually presses down on two surface mount micro switches. Both switches need to be pressed simultaneously for the unit to turn on, but pressing either one, turns it off. They share a common ground, but it wasn’t clear to me if the separate feeds was another safety feature.
Keeping with the approach of remaining isolated, I’ve simply bridged these two switches with the output of two EL4N35 optocouplers. I repeat, two. Don’t try and combine them. Simulating a physical button press then is as easy as activating both optocouplers at the same time from the Arduino for 200 milliseconds
Simulating two button presses for a short duration
    digitalWrite(SWITCH_PIN_1, 1);
    digitalWrite(SWITCH_PIN_2, 1);
    wait(200);
    digitalWrite(SWITCH_PIN_1, 0);
    digitalWrite(SWITCH_PIN_2, 0);
Obtaining the heater status
This was the hardest part of the build. Even just understanding how the Control Panel’s combined green & red LED worked was difficult. There was always voltage at both sides and the drop over an active LED showed 0.19v on my meter??? It wasn’t until I later figured out about the secret of the matrix that this made more sense.
These are the things that I tried and failed with along the way:
- Optocouplers across the Control Panel’s Red and Green LED wiring. This was originally wired up around the wrong as I had read just one side of the LED and made a high voltage assumption. Putting it around the correct way and the Control Panel’s status LED turned off (not a feature I would like to live with).
- At this point, I also had the Optocoupler connected to one of the Arduino’s digital pins in the same way I did with the Daikin heatpump’s status LED. But even with the Optocoupler seeming taking all the power from the LED, the output still didn’t trigger anything in the Arduino nor on my meter.
- Give up on the status LED and try elsewhere. Don’t try and tap into one of the Fan circuits! You’ll pop an optocoupler and not only let the smoke out of a resistor, but the flames too. My fault, I assumed the fan motor was running on a low voltage DC supply, but it was really a much higher AC supply just reading low on my meter. I really need to get a new meter!
- Consider using a non-intrusive current meter across an AC wire somewhere. However, the entire unit only seems to draw around 0.25A so this would probably be pretty hit, miss and prone to misreadings and interpretations. Plus the heater can still be considered on, but not actually flaming, heating and blowing (the things that would actually make a difference with current detection).
- Given that I could actually get a partially lit red 3mm LED in parallel to the Control Panel’s Red and Green, I came back to that and made my own Optocoupler using a 3DU5c Optotransistor. Unfortunately the dim lighting wasn’t enough to trigger the Optotransistor that I now had in place on the Aduino digital pin instead of the optocoupler. Other brightly lit Red LEDs worked fine. I tried other 3mm LED colors (most didn’t even light), an IR and a small, single 5050 RGB strip led. None had the light power to digitally trip the Optotransistor. Then the first penny dropped. Instead of digital to the Arduino, connect it to analog and read the output at a lower range. Voila!
Optotranistor to Arduino with a 3.3K ohm resistor to ground
Sampling above a reading of 0.3v and I could detect the dimly lit LED. However, it was pulsing. What?? Then the second penny dropped and with it, the reveal of the matrix’s secret!! In order for the coordinate based matrix to work, it would have to have a constant revolving coordinate cycle, or pulse, running through it. This is how a small amount of wires can control a large amount of LED outputs and input a large amount of switches.
While the status LEDs are digitally pulsing, the resulting blinking effect is too fast and not visible to the human eye. This is also how Pulse Width Modulation is used to reduced the brightness of LEDs. And this explains why the LEDs appeared to have 0.19v across them. They didn’t. They would have had more than this, but again only for a short amount of time. My cheap voltage meter doesn’t read this accurately and instead displays some lower, sampling level like average .
Catering for the pulse
Potentially I could have introduced a capacitor to smooth out the pulse. However, this would likely not charge enough for the time it would need to be off and it would likely leak current around the rest of the matrix and upset things. Instead, the issue needed to be solved in software.
End result. Sample 100 analog Optotransistor readings and if anyone of them is above 0.3v, consider the LED on. And do this only every two seconds, just to free up some cycles.
Sampling for heater status
void loop()
{
  if(millis() - statusTimer > 2000){
      statusTimer = millis();
      bool greenvalue = false;
      for(int x=0;x < 100;x++){             //Take 100 samples from the pulsing
        greenvalue = (volts(A2) > 0.3);     //Only one of these needs to be on
        if(greenvalue){                     //to consider the LED an
            break;
        }
      }

      if(greenvalue != oldGreenStatusLedValue){
          send(binGreenStatusLedmsg.set(greenvalue ? 1 : 0));
          oldGreenStatusLedValue = greenvalue;
          Serial.print("New Green value");
      }
  }
}
Now knowledgeable of this information, potentially the original optocoupler circuit could have worked if it was wired up the Analog input. And potentially not. It was only the 3mm red LED that visually worked in parallel and an orange one to some extent. Perhaps the LED inside the Optocoupler may not have worked either.
Completion
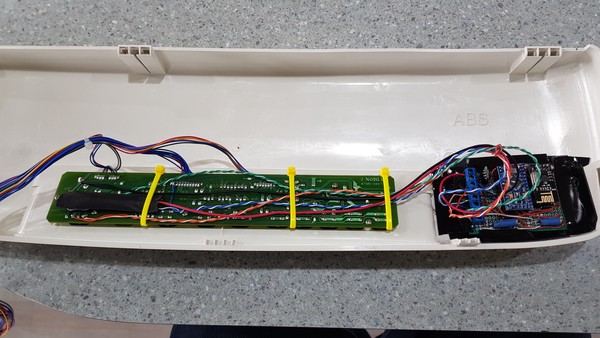
Putting it all back together and testing went easy enough. I put a fast blow 350mA fuse in the 5V+ supply line to the Arduino and mounted it at the very top of the heater under the plastic. If I had put it elsewhere in the metal heater, it’s likely a Farady Cage effect would have resulted.
Just One Problem
Unfortunately the build wasn’t entirely successful. When I now press the temperature Up on the heater, the Child Lock comes on and the temperature does not go up. Disconnecting the new build does not resolve this, so it must have been something I did earlier when probing for circuits etc. I’m reasonably confident the new components I have added have not directly done this nor negatively influenceed things, but you have been warned. The only way to get the temperature up now is via the IR remote. Luckily we rarely need to alter this.
OpenHAB Config
Switch Climate_Dining_Heater        "Diningroom Heater"             ["Switchable"]  {mqtt=">[mosquitto:mygateway1-in/61/1/0/0/2:command:*:default]"}
Number Climate_Dining_Heater_Green  "Diningroom Heater green [%d]"                  {mqtt="<[mosquitto:mygateway1-out/61/1/1/0/16:state:default]"}
Number Climate_Dining_Heater_Red    "Diningroom Heater red [%d]"                    {mqtt="<[mosquitto:mygateway1-out/61/2/1/0/16:state:default]"}
rule "Dining heater status changed" when
        Item Climate_Dining_Heater_Green changed or
        Item Climate_Dining_Heater_Red changed
then

        if(Climate_Dining_Heater_Green.state == 1 || Climate_Dining_Heater_Red.state == 1){
                logInfo("Climate Control", "Dining Heater updating to On. Green [{}], Red[{}]", Climate_Dining_Heater_Green.state, Climate_Dining_Heater_Red.state)
                Climate_Dining_Heater.postUpdate(ON)
        }else{
                logInfo("Climate Control", "Dining Heater updating to Off")
                Climate_Dining_Heater.postUpdate(OFF)
        }

end
TBD – automation logic something like turn on heater @ 7am if M-F and < 11 degrees outside
Sensor code
/**
* The MySensors Arduino library handles the wireless radio link and protocol
* between your home built sensors/actuators and HA controller of choice.
* The sensors forms a self healing radio network with optional repeaters. Each
* repeater and gateway builds a routing tables in EEPROM which keeps track of the
* network topology allowing messages to be routed to nodes.
*
* Created by Henrik Ekblad <henrik.ekblad@mysensors.org>
* Copyright (C) 2013-2015 Sensnology AB
* Full contributor list: https://github.com/mysensors/Arduino/graphs/contributors
*
* Documentation: http://www.mysensors.org
* Support Forum: http://forum.mysensors.org
*
* This program is free software; you can redistribute it and/or
* modify it under the terms of the GNU General Public License
* version 2 as published by the Free Software Foundation.
*
*******************************
*
*/

// Enable debug prints to serial monitor
#define MY_DEBUG

// Enable and select radio type attached
#define MY_RADIO_NRF24
//#define MY_RADIO_NRF5_ESB
//#define MY_RADIO_RFM69
//#define MY_RADIO_RFM95

// Enable repeater functionality for this node
#define MY_REPEATER_FEATURE


#define MY_NODE_ID 61

#include <MySensors.h>

#define SWITCH_PIN_1 2
#define SWITCH_PIN_2 4


#define GREEN_STATUS_LED_CHILD_ID 1
#define RED_STATUS_LED_CHILD_ID 2

bool oldGreenStatusLedValue=false;
bool oldRedStatusLedValue=false;

MyMessage binGreenStatusLedmsg(GREEN_STATUS_LED_CHILD_ID,V_TRIPPED);
MyMessage binRedStatusLedmsg(RED_STATUS_LED_CHILD_ID,V_TRIPPED);

unsigned long statusTimer;

void setup()
{
  // Then set relay pins in output mode
  pinMode(SWITCH_PIN_1, OUTPUT);
  pinMode(SWITCH_PIN_2, OUTPUT);

}


void presentation()
{
    // Send the sketch version information to the gateway and Controller
    sendSketchInfo("Dining Gas Heater", "1.0");

    present(1, S_BINARY, "Heater Switch");

    present(GREEN_STATUS_LED_CHILD_ID, S_BINARY, "Heater Green Status");
    present(RED_STATUS_LED_CHILD_ID, S_BINARY, "Heater Red Status");

}


void loop()
{
  if(millis() - statusTimer > 2000){
      statusTimer = millis();
      bool greenvalue = false;
      for(int x=0;x < 100;x++){             //Take 100 samples from the pulsing
        greenvalue = (volts(A2) > 0.3);     //Only one of these needs to be on
        if(greenvalue){                     //to consider the LED an
            break;
        }
      }

      if(greenvalue != oldGreenStatusLedValue){
          send(binGreenStatusLedmsg.set(greenvalue ? 1 : 0));
          oldGreenStatusLedValue = greenvalue;
          Serial.print("New Green value");
      }


      bool redvalue = false;
      for(int x=0;x < 100;x++){
        redvalue = (volts(A0) > 0.3);
        if(redvalue){
            break;
        }
      }

      if(redvalue != oldRedStatusLedValue){
          send(binRedStatusLedmsg.set(redvalue ? 1 : 0));
          oldRedStatusLedValue = redvalue;
          Serial.print("New Red value");
      }

  }

}


void receive(const MyMessage &message)
{
    // We only expect one type of message from controller. But we better check anyway.
    if (message.type==V_STATUS) {
        //Simulate button press for 200ms
        Serial.print("Incoming switch press");
        digitalWrite(SWITCH_PIN_1, 1);
        digitalWrite(SWITCH_PIN_2, 1);
        wait(200);
        digitalWrite(SWITCH_PIN_1, 0);
        digitalWrite(SWITCH_PIN_2, 0);
    }
}


float volts(int adPin)                       // Measures volts at adPin
{                                            // Returns floating point voltage
   return float(analogRead(adPin)) * 5.0 / 1024.0;
}
